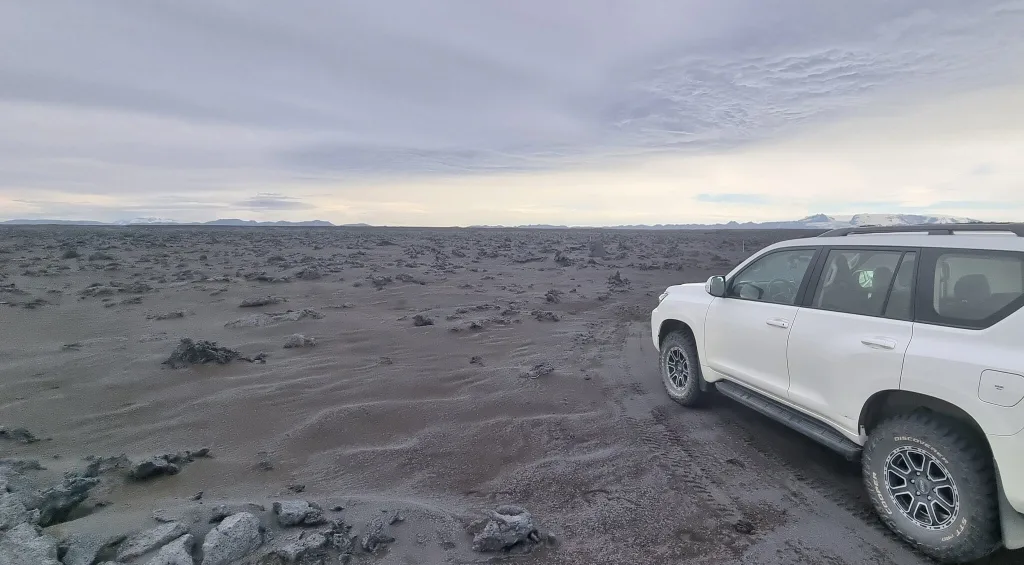
Best Icelandic landscapes in our humble opinion 🙂
Contents
9. REYNISFJARA BEACH
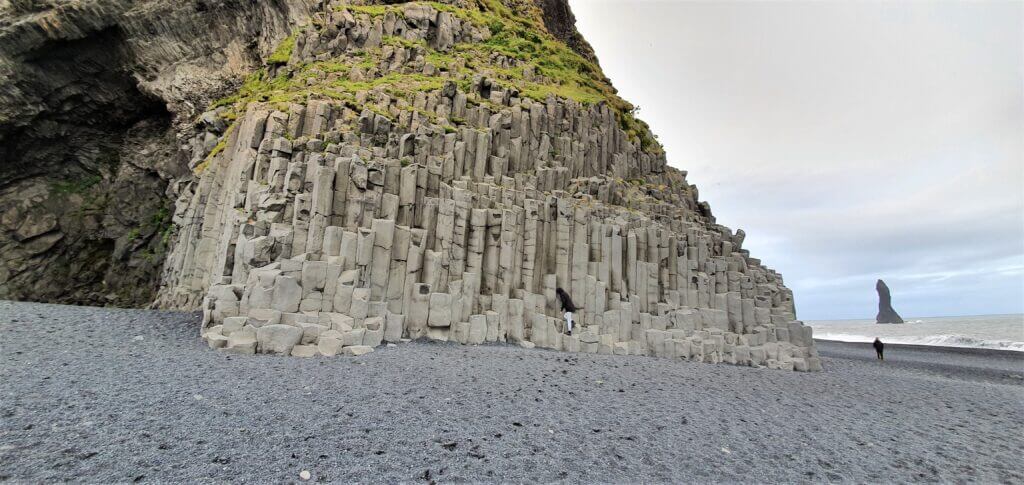
Basalt columns at Reynisfjara beach
Summary
Distance from car park: 2 minutes
Time spent at: 15-40 minutes
Worth visiting even with bad weather: yes, just beware dangerous waves
Physical condition needed: little
Interesting index: 1 – amazing (1-amazing, 2-great, 3-nice)
Reynisfjara beach is a beautiful easy-to-reach beach just next to the ring road, in the south, near Vik.
How to get to Reynisfjara
In summer, Reynisfjara is easily accessible by any 2wd car, by road 215. Read about how we chose our car. Or just get free discounts for your Icelandic car rental.
The main viewpoint for the beach with famous basalt columns is located here. That’s where we visited the beach. However, you may enjoy the beauty of the beach from several more viewpoints. For example, the eastern trail, which continues towards Vik to another black sand beach. If you are going for the Dyrhoaley cliffs, then there’s also a western viewpoint, here.
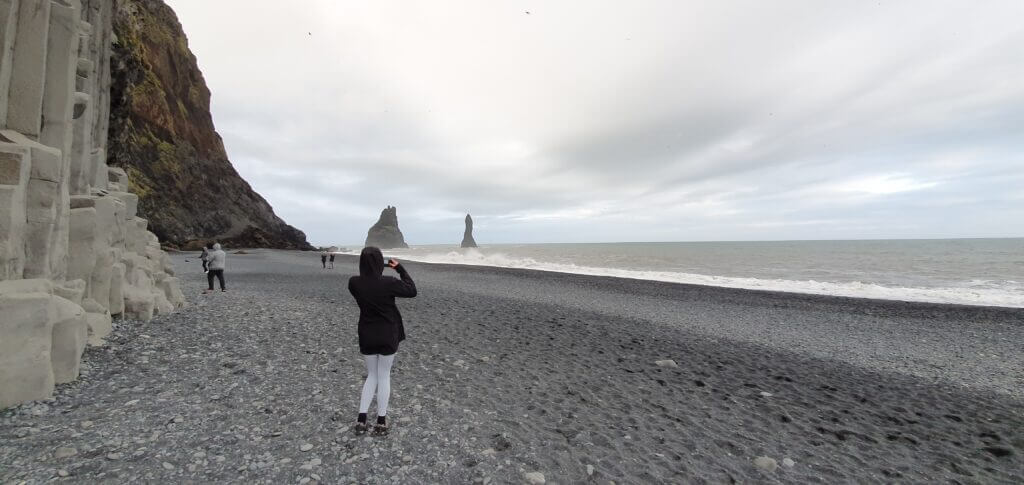
Reynisfjara beach at 9pm in the evening
Our experience with Reynisfjara
Reynisfjara was one of the most beautiful beaches we’ve seen around entire Iceland so it’s definitely worth a visit. All – the beach itself, the sea waves (which may be deadly, so keep a safe distance) and the nearby rock formations are stunning. Beware the strong wind, which we had a chance to experience, and I guess it may be even much stronger.
Tips about Reynisfjara
Don’t get too close to the sea waves. They may be deadly. Take care especially during windy weather. Several people have actually died at Reynisfjara beach, getting devoured by “sneaky” waves.
Reynisfjara beach is a touristy place. Want to avoid crowds of tourists? Read our guide on how to avoid tourists in Iceland.
There are also some beautiful Virtual Reality tours of Icelandic south coast and Reynisfjara beach.
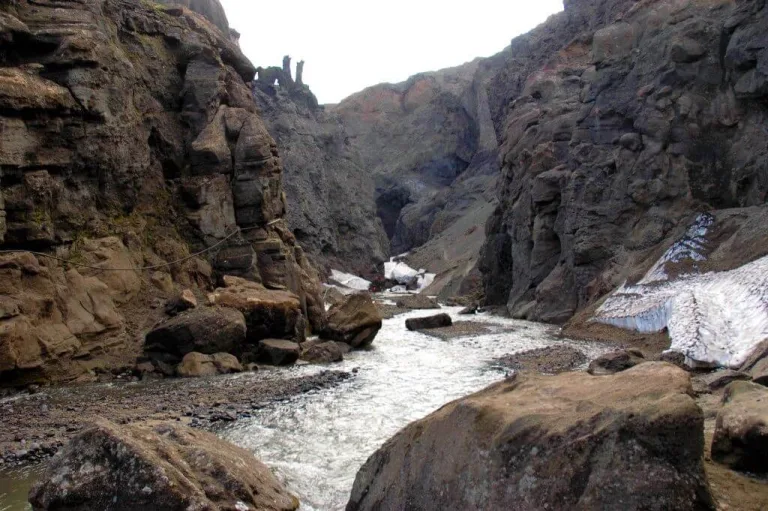
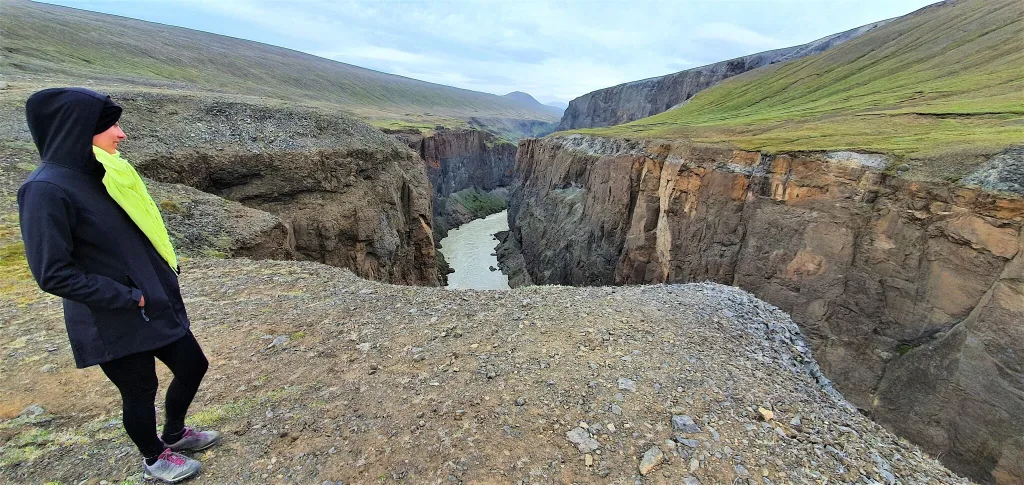
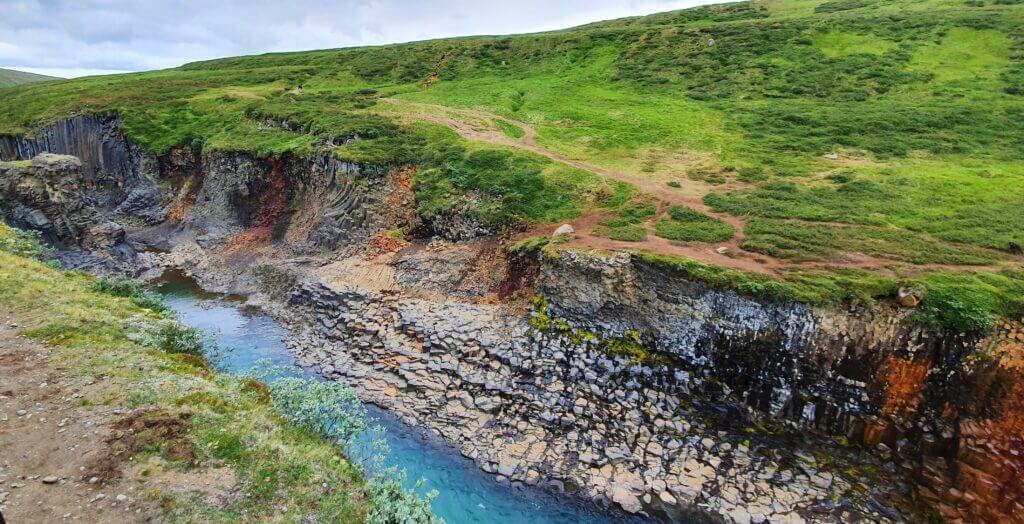
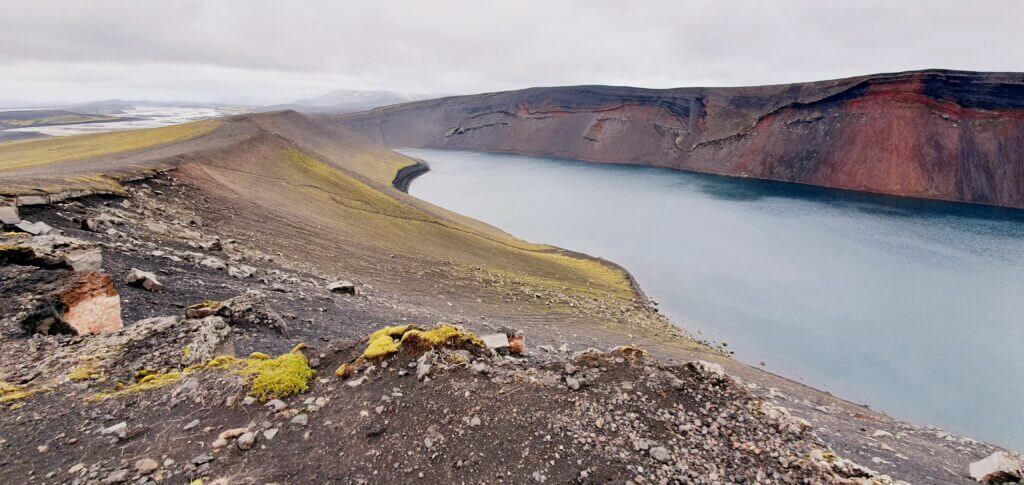
8. STUDLAGIL CANYON
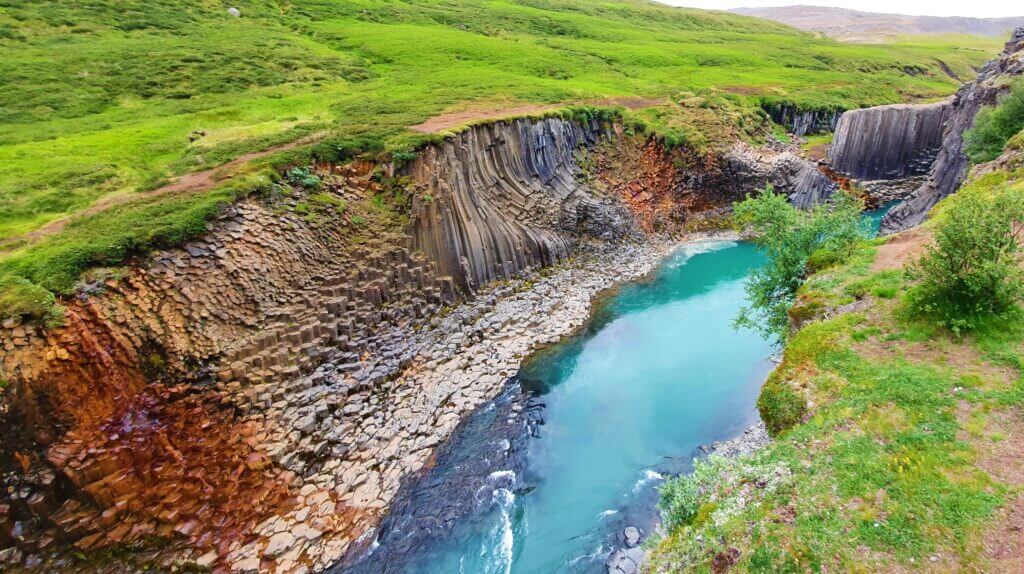
Stuðlagil Canyon, view from the western side
Summary
Distance from car park: 5 minutes / 30-40 minutes
Time spent at: 20-40 minutes / 1-2 hours
Worth visiting even with bad weather: yes, probably
Physical condition needed: little / medium
Interesting index: 1 – amazing (1-amazing, 2-great, 3-nice)
Stuðlagil canyon is a picturesque canyon near Egilsstaðir, but away from the main tourist areas.
How to get to Studlagil
In summer, Studlagil canyon alone is accessible also by a 2wd car, via road Jokuldalsvegur. It’s a semi-gravel road with some parts paved better and some worse, without any river crossings.
If you want your ride to be less bumpy, or if you want to combine Studlagil with a trip to Askja as we did, definitely go for a 4wd car. Read about how we chose our car. Or just get free discounts for your Icelandic car rental.
Two main viewpoints of the canyon do exist, i.e. there are two possible ways how to explore the canyon – from two different sides. Choose the side before your trip, because the time required for doing each side is significantly different.
The western side of Studlagil canyon
The western side we explored was the one suitable for those who don’t have enough time or energy to discover the canyon by walking along. On the western side (left from the south, right from Egilsstaðir) there’s a car park and stairs taking you down to the man-made viewpoint. It takes some 5 minutes to climb down the stairs. From there you may admire most of the beautiful views of the canyon. It’s not possible to descent down to the canyon itself though, compared to the other side.
Stuðlagil Canyon, another view from the western side
The eastern side of Studlagil canyon
The eastern side is the one where it’s possible to hike down right to the canyon itself. The car park you will aim for is this one. You have to first cross the small bridge to the eastern side of the canyon, where you have to leave your car (or eventually you may leave your car somewhere before the bridge). Then you have to walk along the bank of the canyon towards the south to see its most beautiful part. From there you are able to descent down to the river and make some amazing photos from the close distance.
The entire roundtrip including canyon exploration will take you some 2-3 hours to complete at minimum.

Our experience with Studlagil
We combined the visit of Studlagil canyon with a visit to Askja. Our priority for the day was Askja. That meant that, once we arrived at Studlagil, we had already been awake and on our feet for some 13 hours on that day. That’s why we chose an easier way to explore the canyon – from the western side.
The canyon was beautiful, and we were able to admire it from the bird’s eye view. The disadvantage, of course, was that we couldn’t make a descent to the base of the canyon itself (which is possible from the eastern side).
Tips about Studlagil
If you are lucky enough, water in the canyon will be crystal clear (as in our pictures). In case you are not, the glacier water of the Kárahnjúkar dam will change the colour of the water to a less picturesque one. Nevertheless, the canyon columns will remain the same at any time 🙂
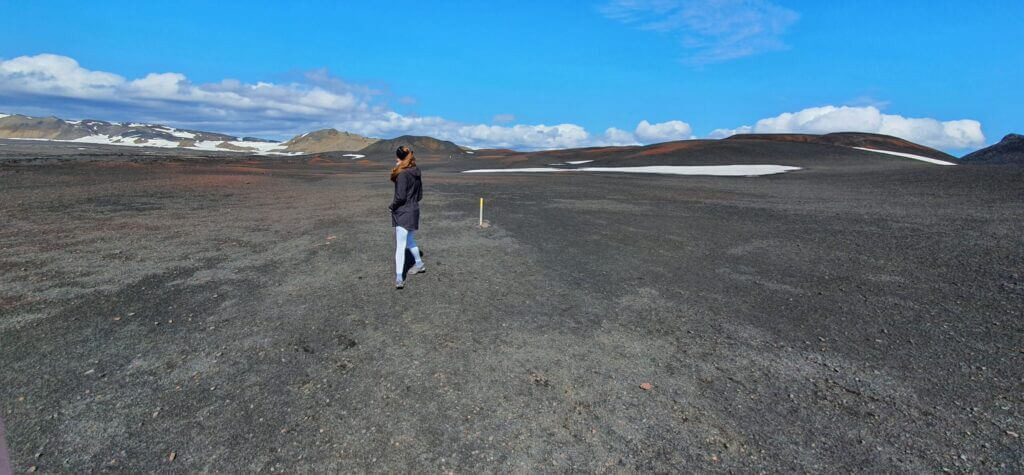
7. LJOTIPOLLUR
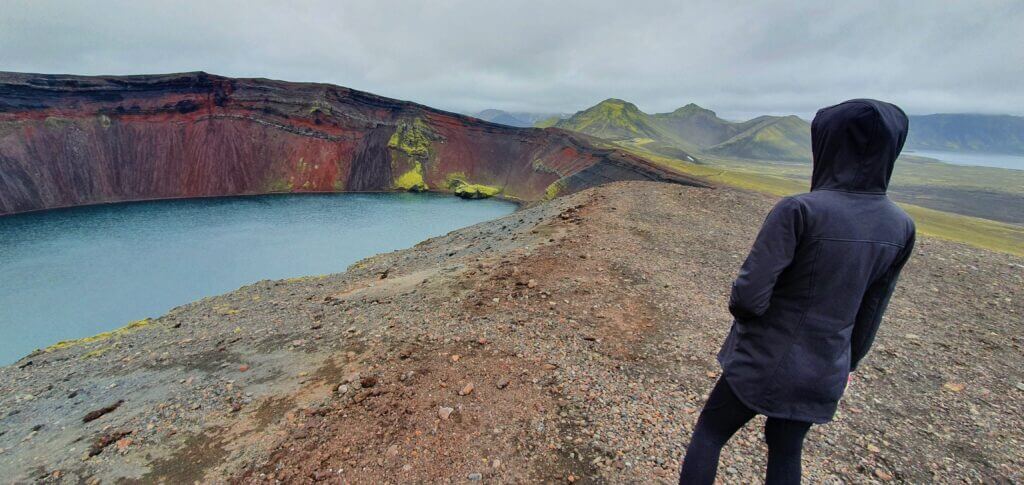
Ljótipollur
Summary
Distance from car park: 5 minutes ascent
Time spent at: 15-30 minutes
Worth visiting even with bad weather: yes, probably
Physical condition needed: little
Interesting index: 1 – amazing (1-amazing, 2-great, 3-nice)
Ljotipollur is a breathtaking colourful lake near Landmannalaugar.
How to get to Ljotipollur
You have to use the 4wd car to reach Ljotipollur. Read about how we chose our car. Or just get free discounts for your Icelandic car rental.
F-road towards Ljótipollur
If you put name Ljótipollur into Google maps, it will navigate you towards detour in the right direction from northern F208 road, coming from Landmannalaugar direction (left, coming from F26 direction). There aren’t any good road signs so just follow Google and you should be fine. You’re going to drive nice black gravel road in the middle of nowhere which will end with the sign “cars forbidden” again in the middle of nowhere.
Ljótipollur “parking”
The place with the sign served as a car park at the time of our visit (2 more cars were parked there, what a crowd). We left our car at this improvised car park and continued walking towards Ljótipollur direction a Google was pointing at.
Our experience with Ljotipollur
The walk from the parking lot took us around 5 minutes and a majestic red volcanic crater suddenly stood in front of us. We were the only visitors admiring it at that time (I don’t have any idea where were the people who arrived by the other 2 cars parked in the car park). Just us, absolute silence and the picturesque canyon filled with crystal clear water.
Ljotipollur trail
You can also hike around the Ljótipollur area but that wasn’t our plan, because Ljótipollur was already supposed to be the highlight of the area and we were really tired after our Landmannalaugar hikes.
Tips about Ljotipollur
Ljótipollur is a remote canyon where you will meet out of this world colours on every corner. It definitely didn’t look like a touristy place at the time of our visit and we had it all for ourselves at around 3 pm which is I guess still a peak hour.
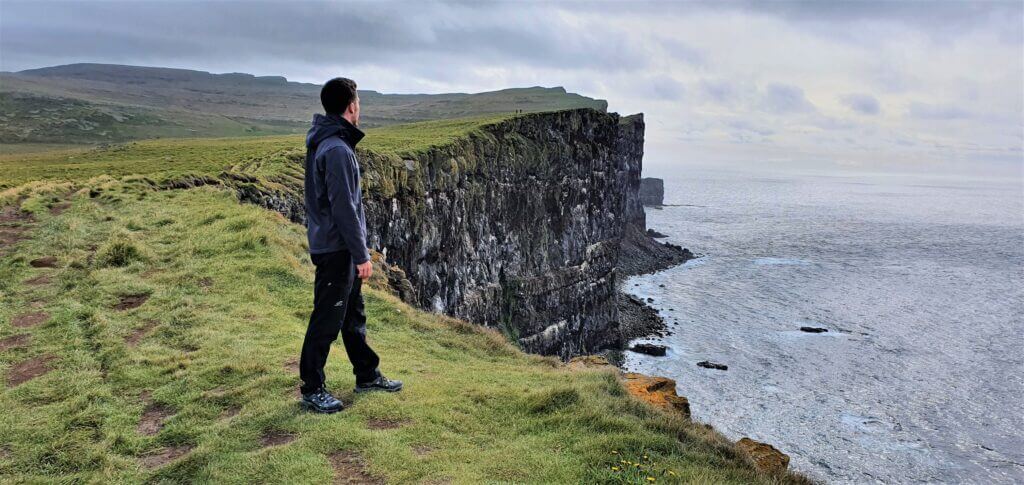
6. LATRABJARG
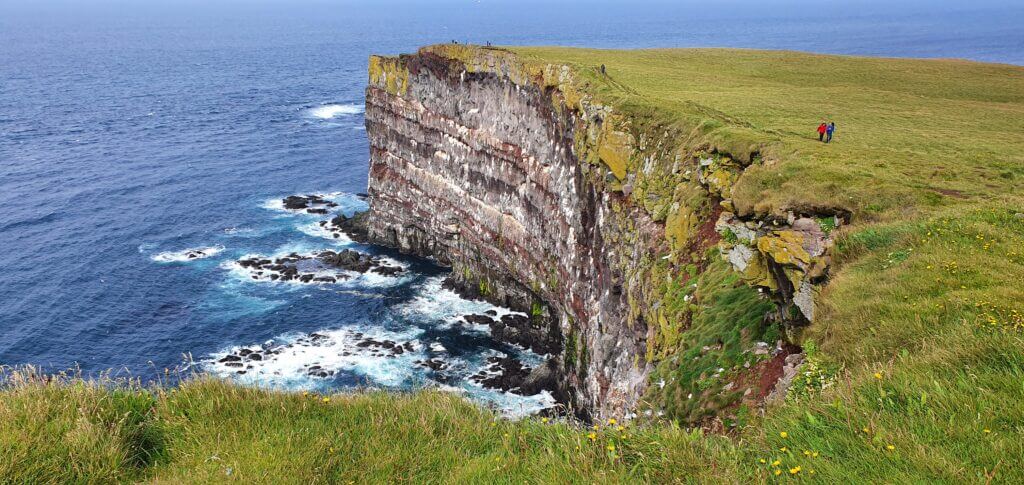
Látrabjarg on a sunny day
Summary
Distance from car park: 2-15 minutes
Time spent at: 20-60 minutes
Worth visiting even with bad weather: no, probably
Physical condition needed: little
Interesting index: 1 – amazing (1-amazing, 2-great, 3-nice)
Látrabjarg cliffs are gigantic cliffs at the westernmost point of Iceland.
How to get to Latrabjarg
Latrabjarg is officially accessible also by the 2wd car in the summer. Nevertheless, I recommend you to have a 4wd car to get there. Not only will it be safer, but also quicker and less bumpy. The last part of the road 612 leading there could easily be an F-road. It’s a gravel coastal road full of potholes. It doesn’t contain any river crossings, though.

Read about how we chose our car. Or just get free discounts for your Icelandic car rental.
Our experience with Latrabjarg
We spent some time observing strange puffin flights and their landing, often, right next to us. Truly once in a lifetime experience. You may hike along the edge of the cliff as long as you want. We did so for some 15 minutes and then turned back. Although Latrabjarg was the place where we saw the biggest number of cars parked in Westfjords, it still didn’t seem to be crowded because of the size of the entire area.
Látrabjarg cliffs
To conclude – Latrabjarg is definitely worth making a detour.
Tips about Latrabjarg
Not only are Latrabjarg cliffs the westernmost place in entire Europe, it is also the place with one of the most unique floras and faunas. Secondly, the actual Latrabjarg cliff is more than just magnificent. It’s huge and admirable. And as a bonus, guess who is here? Puffins!

Last puffins spotted during our journey. At Latrabjarg
During our entire 12-day trip this was the first and last place where we saw puffins. Later on, I read that Latrabjarg is a place where “it’s guaranteed to see puffins”. It seems to be so!
5. SIGOLDUGLJUFUR CANYON
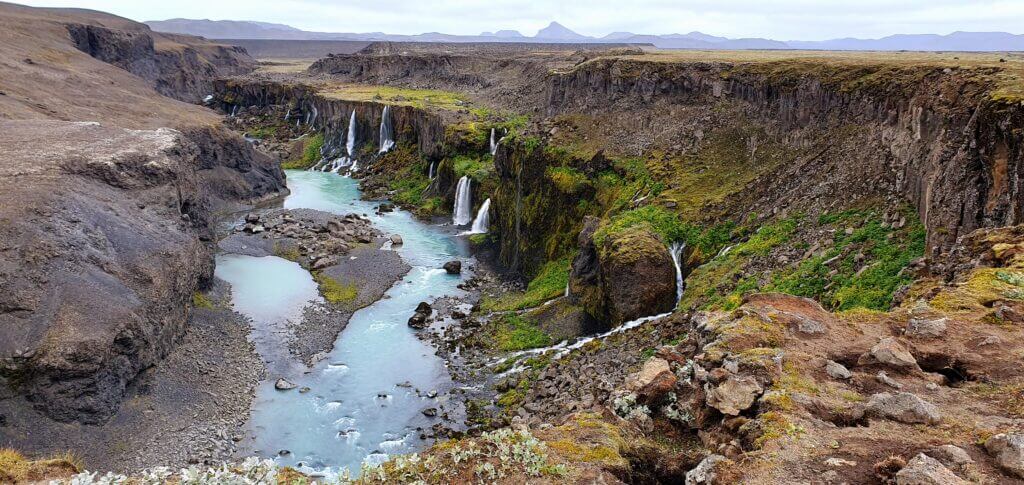
Sigoldugljufur canyon. A remote, magical, non-touristy place.
Summary
Distance from car park: 10 minutes
Time spent at: 20-40 minutes
Worth visiting even with bad weather: yes, probably
Physical condition needed: little
Interesting index: 1 – amazing (1-amazing, 2-great, 3-nice)
Sigöldugljufur canyon is a secluded canyon located north of Landmannalaugar.
How to get to Sigoldugljufur
Although the northern part of F208 leading to the canyon is just a normal gravel road, you still officially need the 4wd car, because it’s an F-road. You don’t need any hardcore jeep to reach it, however. Read about how we chose our car. Or just get free discounts for your Icelandic car rental.
Google maps are quite precise with the location of the canyon, although you won’t find any road signs indicating it, so you have to rely solely on Google maps. The canyon is located on the right side of F208 coming from the Landmannalaugar direction (i.e. naturally on the left side coming from the F26 direction). The only sign telling you “there’s something nearby” is the little car park near the spot which is the closest point connecting the road and the canyon marked on Google maps.
When you leave the car park, you continue walking along the unmarked gravel road (used only by locals) and you keep on the left side of it, exactly as suggested by google maps. After some 10 minutes of walking, you will arrive at the right bank of the canyon and a huge network of small rivers and waterfalls of unbelievable colours will emerge in front of you.
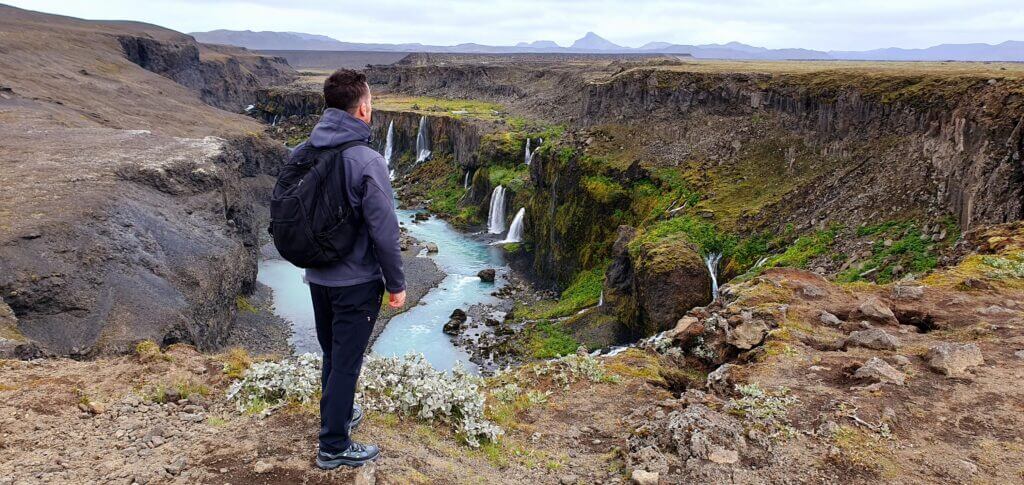
All alone at Sigöldugljufur canyon
Our experience with Sigoldugljufur
You will literally find yourself as in the middle of the fairy tale, especially if you’re as lucky as we were, and will be there all by yourself.
Sigöldugljufur canyon was our favourite canyon in Iceland because it was the least touristy and, in our opinion, the most beautiful. With all its remoteness it embodies for me the spirit of Iceland, i.e. a picturesque hidden place in the middle of nowhere.
Tips about Sigoldugljufur
There’s actually no marked trail, so unless they make one anytime soon, you’re going to slightly break the rules, as you will be walking on an “unmarked path” and therefore destroying Icelandic nature a bit. We tried to go the same way back to spare the nature of our footsteps. That being said, I think it’s inevitable someone will build a marked trail heading to the canyon soon as it’s becoming more and more touristy from what I’d read before our trip.
It’s also possible to continue several kilometres ahead along the valley, so it’s just up to you how far you want to go. You are able to see the major part of the canyon already from the first moment you have it in your sight, however. That’s exactly what we did – admired it for a couple of minutes and didn’t continue further along the valley.
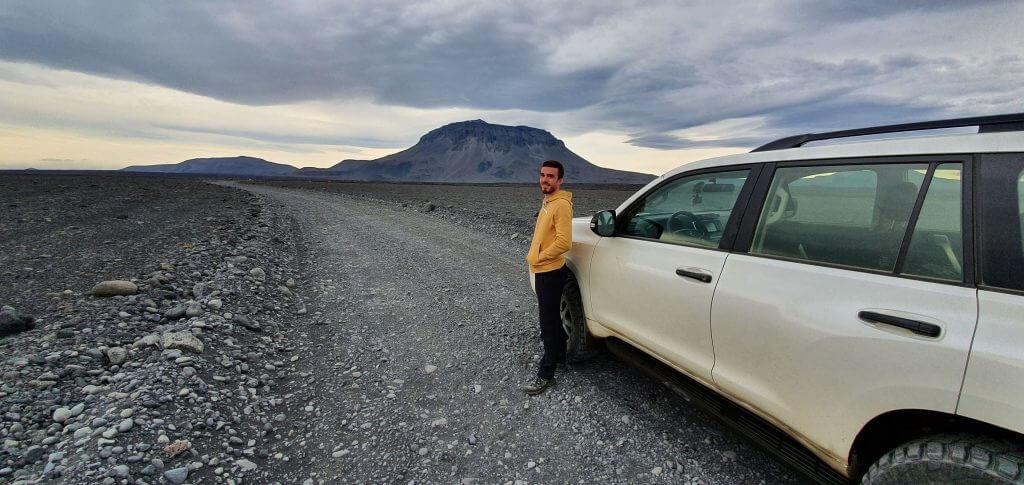
4. LANGISJOR AND SVEINSTINDUR
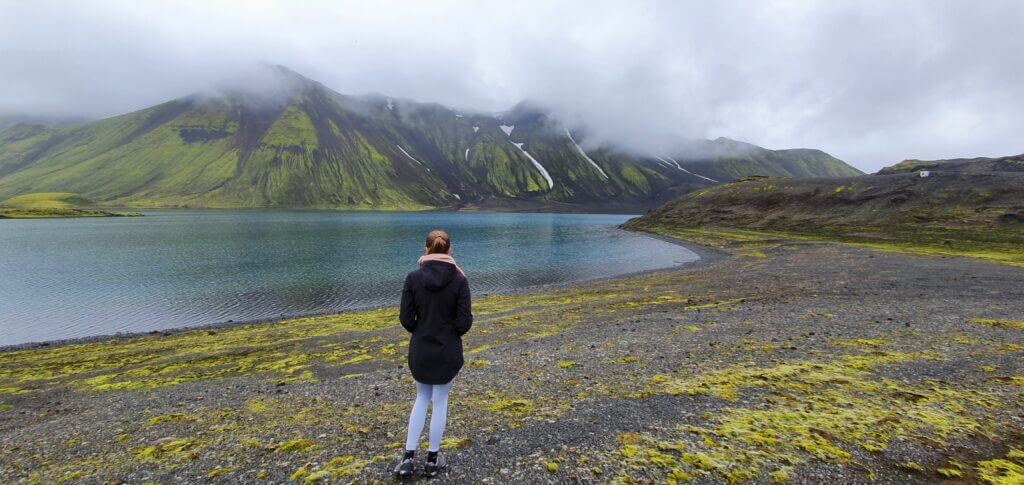
Langisjór lake next to Langisjór campsite mark on the map
Summary
Distance from car park: 2 minutes
Time spent at: 20-45 minutes Langisjor, 2-3 hours Sveinstindur
Worth visiting even with bad weather: no
Physical condition needed: little for Langisjor, advanced for Sveinstindur
Interesting index: 1 – amazing (1-amazing, 2-great, 3-nice)
Langisjór is a huge glacial lake located far away from any populated areas.
Sveinstindur is the tallest peak in the area.
How to get to Langisjor
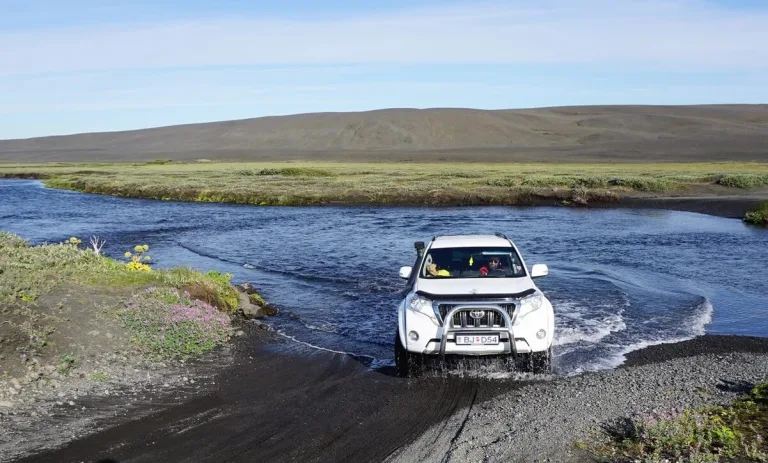
Langisjor and Sveinstindur are not easy to access. You will definitely need at least a medium-sized 4wd car. There are several river crossings, some of them with small rivers, some of them with medium-sized rivers. Read about how we chose our car. Or just get free discounts for your Icelandic car rental.

If you are interested in specific details about getting to Langisjor and types of river crossings you will have to encounter, read our post about getting to Langisjor.
We reached the “Langisjór camping”, or at least that’s what Google maps said, which was just a small cottage with 2 nice modern toilets at the end of the world. We continued to the point on Google maps named “Langisjór campsite” where the road ended.
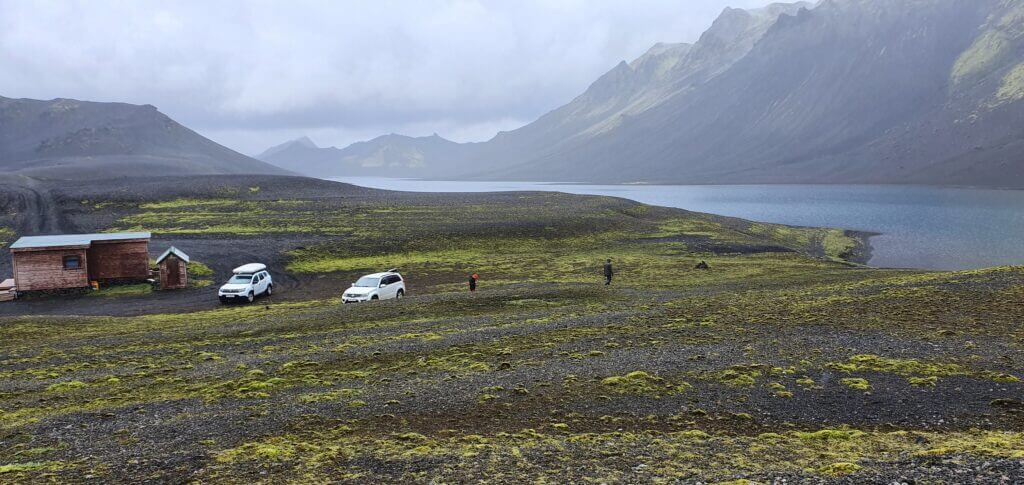
This was supposed to be Langisjór campsite according to maps. It just turned out to be a remote place with nobody being there.
Our experience with Langisjor
The water in Langisjór had been crystal clear and the complete silence surrounding the area was both amazing and a bit scary at the same time. First time in my life I experienced what one may call “absolute silence”.
You may just walk to the lake and enjoy its marvellous water and atmosphere around. There’s also a small hill nearby, which you may climb as well if you are up to.

Tips about Langisjor
The campsite looked a bit hostile for camping in our opinion. The only facilities there were toilets. So be aware of that, when planning your trip.
Langisjor was also one of the least touristy places we had been to during our trip around Iceland.
How to get to Sveinstindur
Sveinstindur is just next to the point named on Google Maps as “Langisjór camping”.
First of all, finding the start of the hiking trail was not an easy task at all. There are no signs indicating where should you go or park your car if you want to hike Sveinstindur. I just guessed – it’s not along the road we’d already driven (or at least I think so), it’s not near the lake, so let’s take the only road left – the road continuing on an unmarked F-road (described for example here).
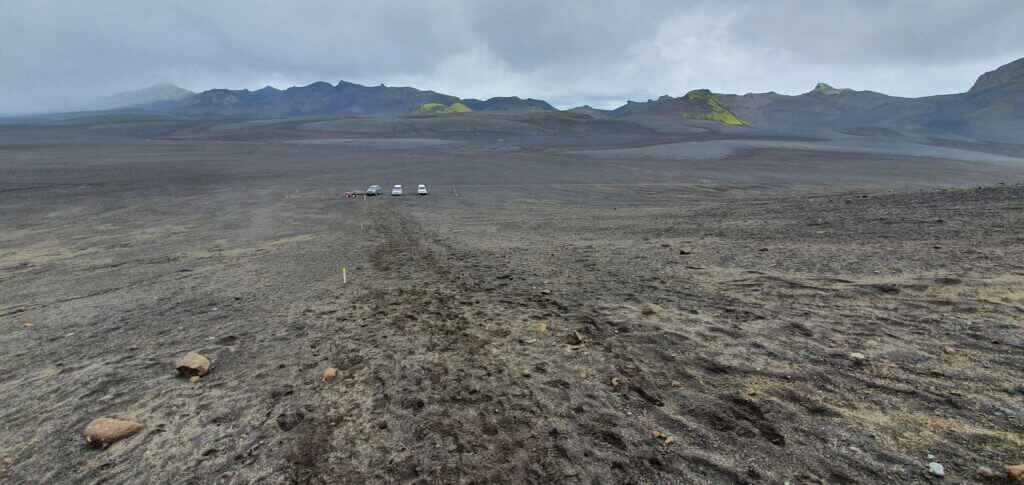
Sveinstindur parking. This is how a parking lot in highlands looks like.
Shortly after pursuing the road, we found a car park with 2 cars, which I again guessed, is maybe a car park for Sveinstindur? Yes, probably I’m right – I realized shortly after seeing first yellow sticks indicating a hiking trail, though still no signs or names which would say “Sveinstindur”.
Our experience with Sveinstindur
Sveinstindur seemed to be a great fit for my itinerary – non-touristy, amazing views from the top, not so long hike, out of this world landscapes everywhere around. Unfortunately, the weather started to be much foggier at the time of our visit and it even started to rain. OK, Icelandic weather, I told myself, we shouldn’t get discouraged by this. Well, I changed my mind later. It’s not a very good idea to climb Sveinstindur when it rains and when you don’t see anything because of the fog.
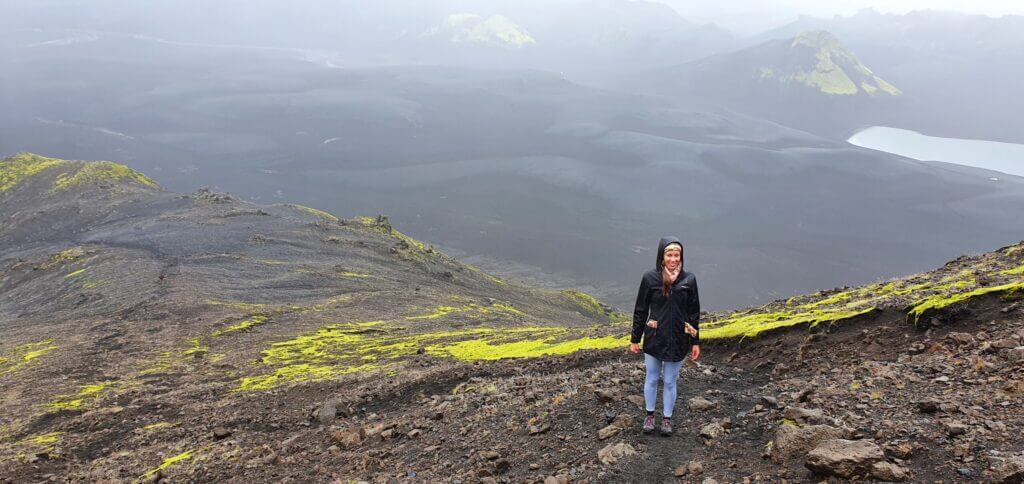
Sveinstindur hiking trail, somewhere near half of the road towards the peak. In the beginning, the hike seemed to be doable – the ground was OK to walk on, the visibility was so-so, the rain was light, so we continued. However, after some 20-30 minutes of hiking, we walked right into the big fog and we could see that everything above this point is covered in fog as well. Together with that, the rain intensified and the path got steeper and slippery.
At this point, we decided to turn back, as it was not worth it to continue the climb when we couldn’t see a thing. On our way back, we met a really fast hiker coming back from the top so I asked him whether he’d seen anything from the top. “Not a thing” he replied, which just reassured me to continue on our way back to the car. It’s a pity but what should we do – next time.
Tips about Sveinstindur
The upper part of the hike on Sveinstindur near Langisjor lake on a foggy day with slight rain
Quick advice – definitely go only when the weather is nice! It’s not a very pleasant experience when it’s not. Trust me, we’ve experienced it.
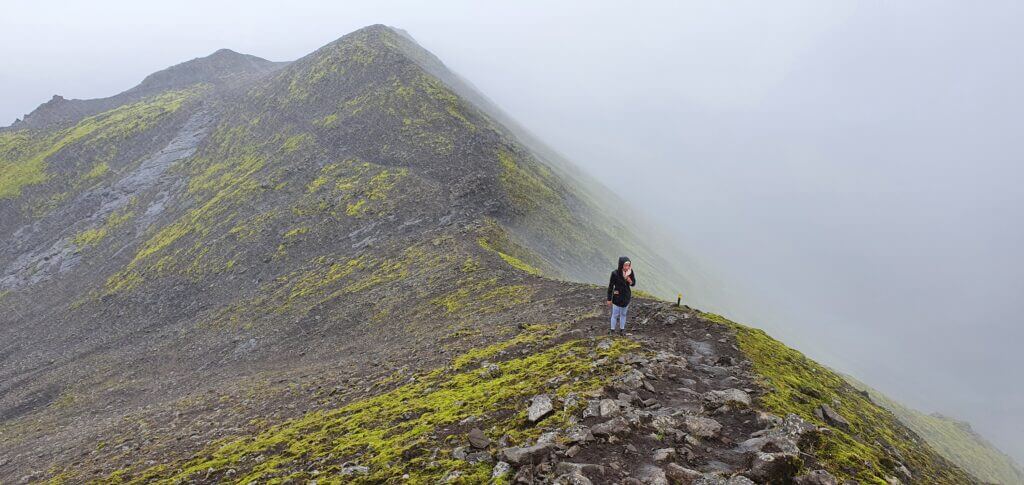
3. LANDMANNALAUGAR

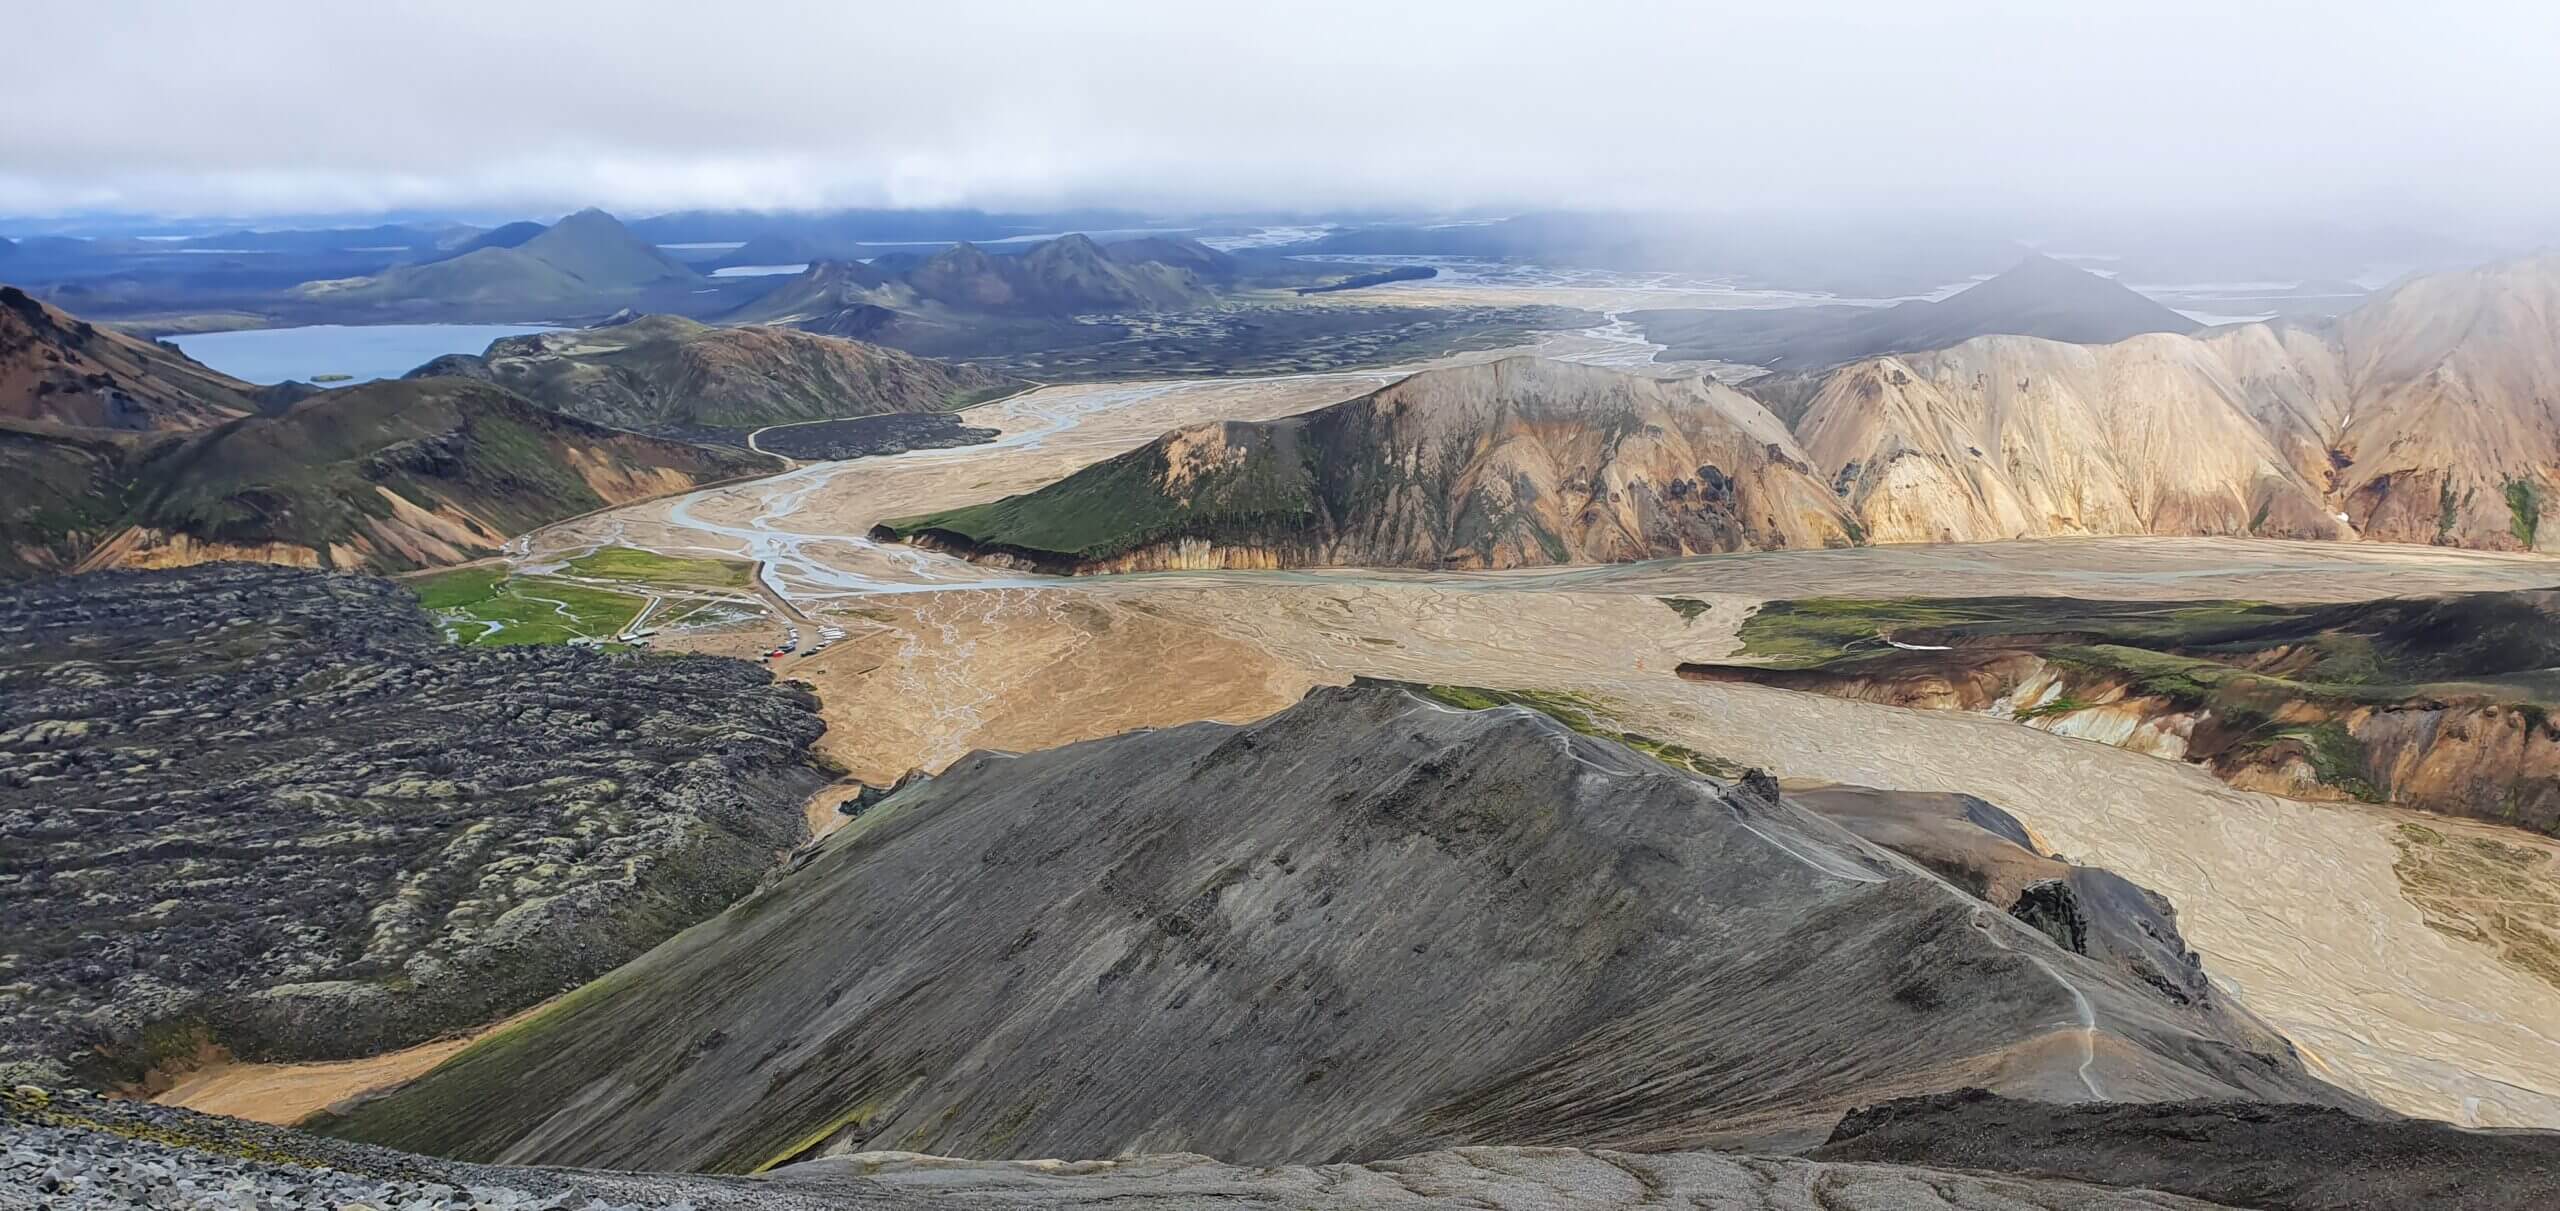
View from the peak of Bláhnjúkur towards Landmannalaugar camp, Laugahraun and 2nd (steeper) hiking trail
Summary
Distance from car park: 5-10 minutes
Time spent at: from 3 hours to several days
Worth visiting even with bad weather: no
Physical condition needed: medium to advanced
Interesting index: 1 – amazing (1-amazing, 2-great, 3-nice)
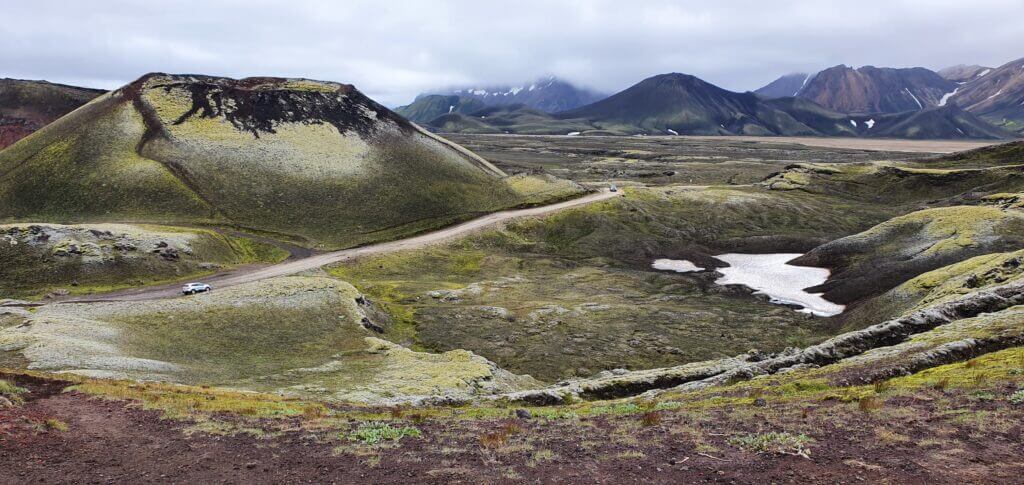
Landmannalaugar, or “rainbow mountains”, is a huge area full of breath-taking natural wonders of Iceland. It mostly refers to mountains and peaks of Brennisteinsalda, Blahnjukur and those nearby. It’s, however, huge and stretches itself all the way to Thorsmork.
How to get to Landmannalaugar
There are basically two main ways to reach the area. The northern one and the southern one. I personally recommend you to take both of them, but your plans might be different. For both of them, you will need a 4wd car, but they are as different as the night and the day are. That means, also the choice of a specific 4wd car should be made according to which route will you plan to take.
Read about how we chose our car. Or just get free discounts for your Icelandic car rental.
The northern part of F208
F208 north is the easier route because there are no river crossings. The majority of guides and blogs would recommend you this route since it’s generally easier and safer. I do agree it’s easier, but I don’t agree you should take only the northern part of F208.
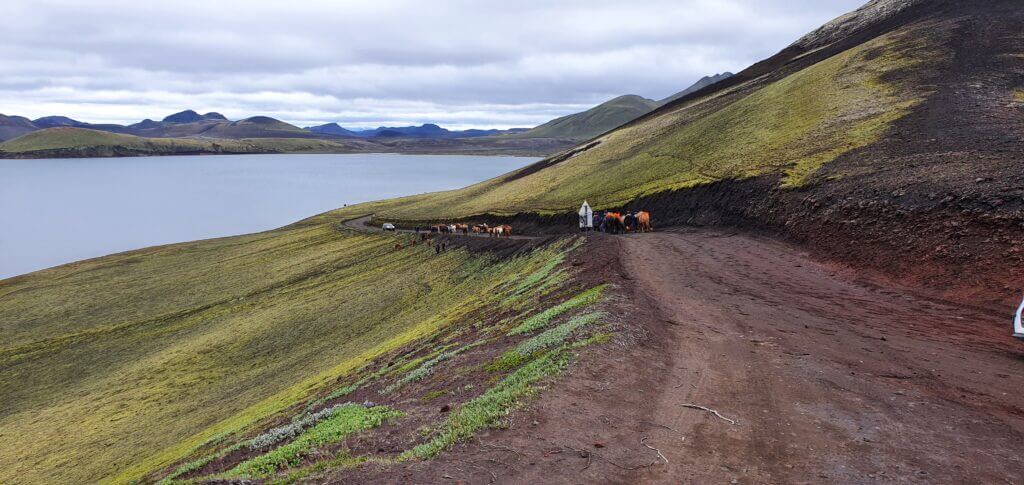
Horses or “Icelandic ponies” blocking the F208 road Fjallabaksleið Nyrðri north of Landmannalaugar
There are several nice stops along the road like Ljotipollur lake or Sigoldugljufur canyon. Other than that, however, the landscapes around the road are not so spectacular. Definitely not, compared to the southern route. Read more about our journey along the northern part of F208.
The southern part of F208
Despite (or thanks to?) being long and containing several river crossings of different sizes, from small to medium-sized ones, F208 south is one of my favourite Icelandic roads. Landscapes surrounding the road are once in a lifetime experience and so is the drive itself.
F208, or Fjallabaksleið Nyrðri, after crossing with F235 towards Landmannalaugar
Choose your car wisely and you will never forget about your journey on the southern F208.
Our experience with Landmannalaugar
There are basically 3 types of activities you may do around Landmannalaugar. Hiking, bathing or driving. Hiking would probably be the number one activity visitors go to Landmannalugar for. That’s why we’ve put up a 1-day hiking guide in Landmannalaugar for you.
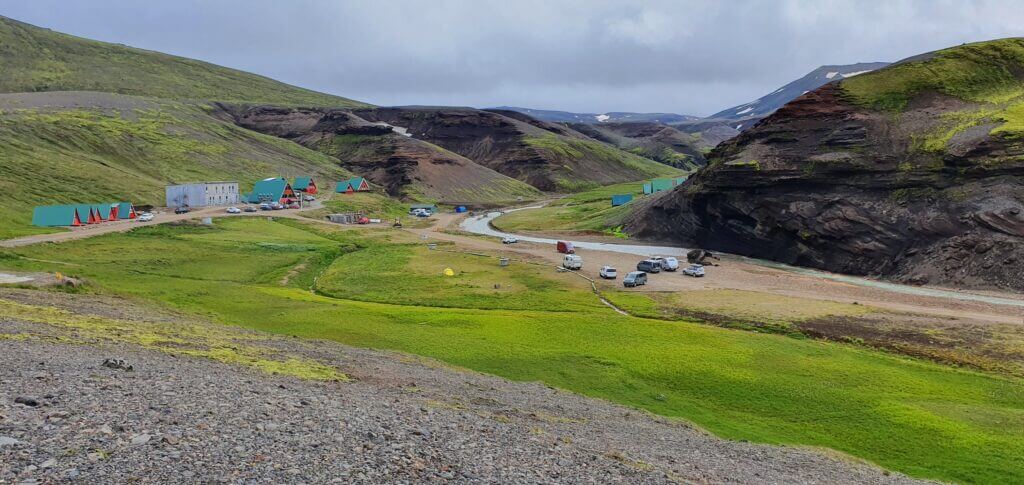
On our journey, we linked together driving the southern part of F208, with the visit of Langisjor and Sveinstindur and finally with the arrival to Landmannalaugar. That being said, we arrived at Landmannalaugar in the evening, camped at the Brennisteinsalda campsite and went for hiking on the following day.

Spectacular views right from the beginning of the hike on Bláhnjúkur and even on the slightly foggy day
We devoted just 1 (not even entire) day to Landmannalaugar so we wanted to see as much as we could with the best views over the area in the shortest time possible. That’s why we chose the combination of hiking the two most beautiful relatively easily accessible peaks – Brennisteinsalda (the orange mountain) and Blahnjukur (the blue peak).
Tips about Landmannalaugar
Landmannalaugar may be a bit touristy. Read our tips on how to avoid touristy places in Iceland.
Plan for the good weather. This one is a must. Strong wind or rain may even be very dangerous during the hikes in Landmannalaugar.
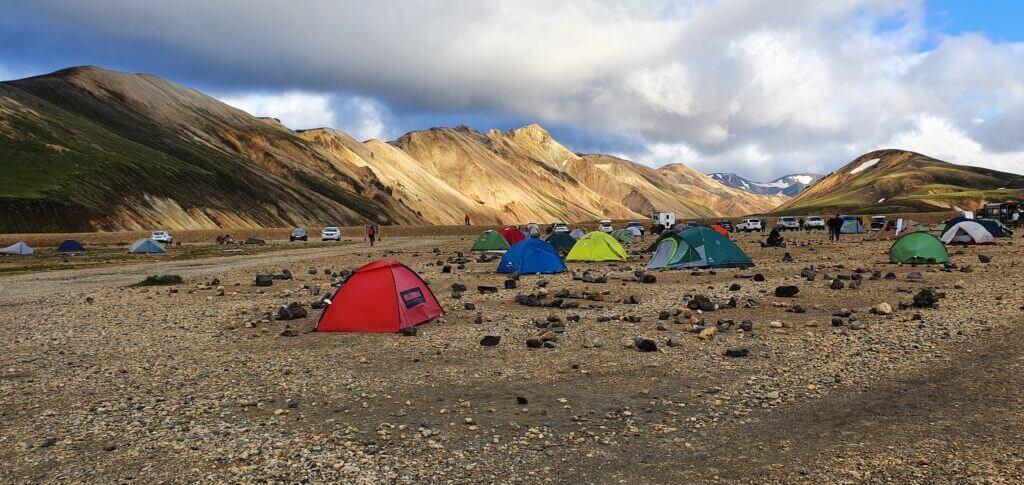
Landmannalaugar Brennisteinsalda campsite on a summer evening
If you are seeking tips for hiking in Landmannalaugar, read our hiking guide. If you are interested in our entire experience including what we’d done before and after Landmannalaugar or how we camped, read about day 3 of our journey and about day 4 of our journey.
There’s even a Virtual reality tour of Landmannalaugar!
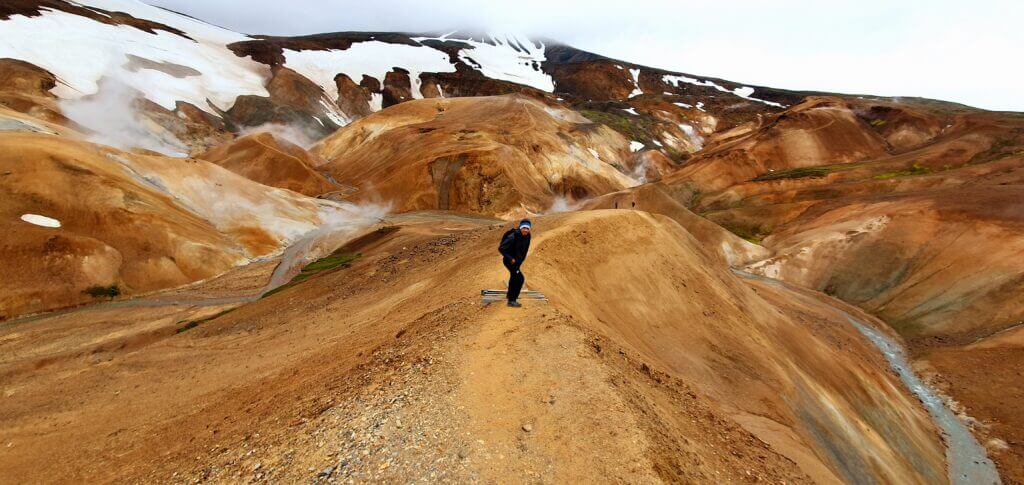
2. KERLINGARFJOLL
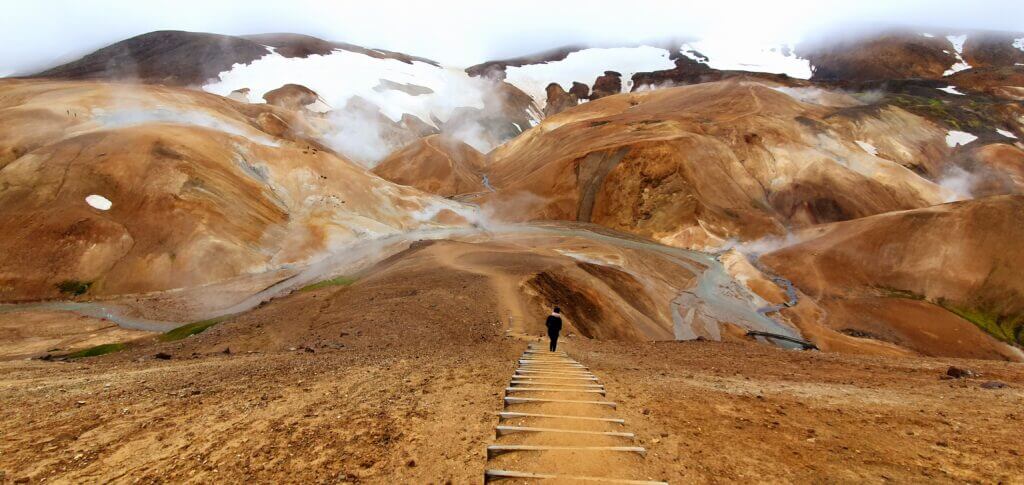
Clay staircase in Hveradalir area of Kerlingarfjöll
Summary
Distance from car park: 2 minutes
Time spent at: 1-3 hours (or more according to your hiking passion) Worth visiting even with bad weather: no, probably
Physical condition needed: medium to advanced
Interesting index: 1 – amazing (1-amazing, 2-great, 3-nice)
Kerlingarfjoll belongs to the category of another “out of this world” Icelandic experiences. It’s an area full of orange mountains and sulphuric (mostly not for bathing) hot springs.
How to get to Kerlingarfjoll
There are two main ways to reach the area. From the north and from the south, both via F-road F35. Technically, from the south of F35, it’s a shorter route. But, it doesn’t matter much which way you choose to start from – north or south. What matters more is, what you plan to do before and after your Kerlingarfjöll trip. Read more about what route we chose here.
F35, aka Kjalvegur, near Hveravellir
Officially, you need a 4wd car to drive the F35. It’s a gravel road with many potholes, but it would be definitely doable also by a 2wd (if it were not for the 4wd restriction). By saying that I mean, F35 is not hard to drive and doesn’t contain any river crossings.
The toughest part of the drive to Kerlingarfjoll is the last ascent towards the main area of Hveradalir. It’s quite steep and we’d seen several cars turning back, being afraid of making the ascent with their car. If you are interested in details, read our guide on Kerlingarfjoll. To sum up, you definitely need a medium-sized SUV to reach Hveradalir (or some big guts).
F347 road next to Hveradalir hot spring area in Kerlingarfjoll
Our Dacia Duster has done its job well and we reached Hveradalir area of Kerlingarfjoll without any problems. Read about how we chose our car. Or just get free discounts for your Icelandic car rental.
Our experience with Kerlingarfjoll
We chose to arrive at Hveradalir geothermal area by car and to explore it from there. You may hike around the area as long as you want and as far as you want and turn back at any moment. This is the most time-efficient option and allows you to see one of the most beautiful views of Kerlingarfjoll in quite a short amount of time.
Hveradalir area is one of the most beautiful and breath-taking places I’ve ever been to in my life – together with Askja, Landmannalaugar and the F-roads south of Landmannalaugar. You literally feel like you’re on a different planet. This time it’s not rainbow mountains, no black sand, no green moss. This time, it’s orange mountains mixed with wild sulphuric hot springs and snow. A lot of snow. And cold. And the wind. Welcome to Hveradalir.
Kerlingarfjöll mountain resort campsite
There are several smaller hills and there are also smaller wooden stairs-like steps almost on each of them to help you with the ascent. And I do understand why. If it weren’t for them, every 10th visitor would have slipped on the clay and injured or killed himself. The views and the atmosphere of the place is truly amazing. Hot springs with hot sulphuric steam are everywhere and they help create an occasional feeling of warmth. There are, however, no hot springs to bath in Hveradalir area. This is contrary to Google maps calling the location “hot springs” or “geothermal area”.
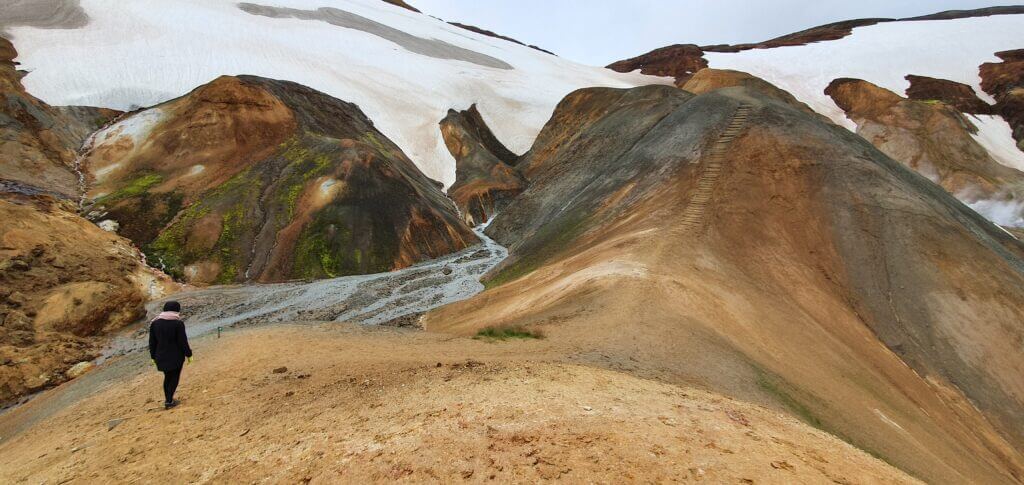
One of the summits of the several smaller hills around the Hveradalir in Kerlingarfjöll
Interested in more details about hot springs or hiking options in Kerlingarfjoll? Read our guide.
Interested in what we’d done before and after the trip to Kerlingarfjoll, which routes we chose, where we camped and many more? Read about day 8 of our journey.
Tips about Kerlingarfjoll
Once in Kerlingarfjöll, you have numerous hiking options. You may for example hike the red loop trail, getting to all of the biggest summits around the area, sleeping over at mountain huts. This is a very challenging hike, where you will be going to need very good gear (e.g. crampons) and be in a very good physical condition. And it will take you about 3 days. Read more here.
One of the numerous trails in Hveradalir area of Kerlingarfjoll
Also bear in mind, that on the 8th August, 3 pm in the afternoon (i.e. probably one of the warmest times possible) the temperature climbed to tropical 5°C. And the strong wind didn’t help it at all, making everything feel even some 5°C colder. If you plan to camp here, you’re going to be freezing for sure.
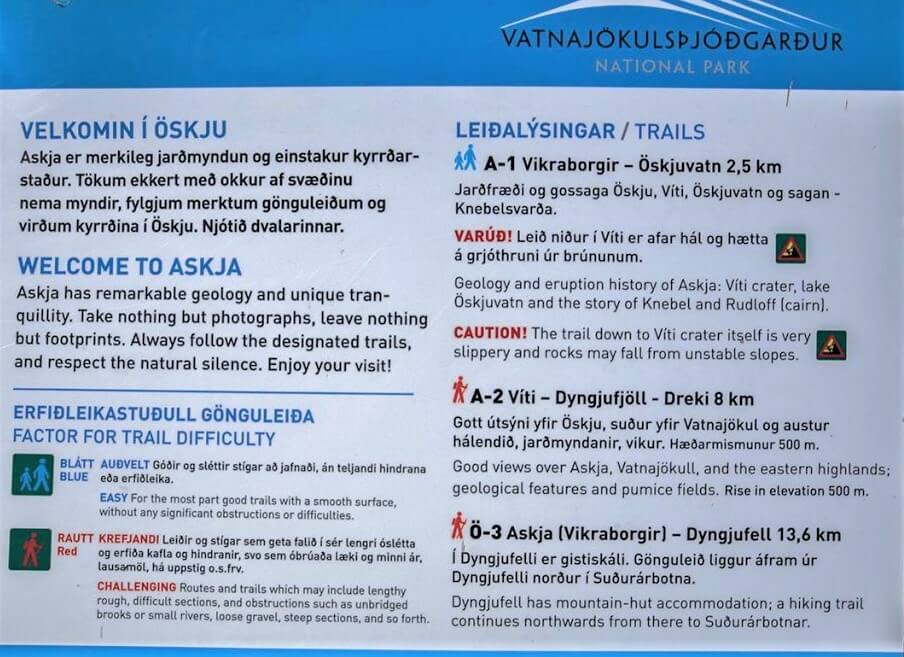
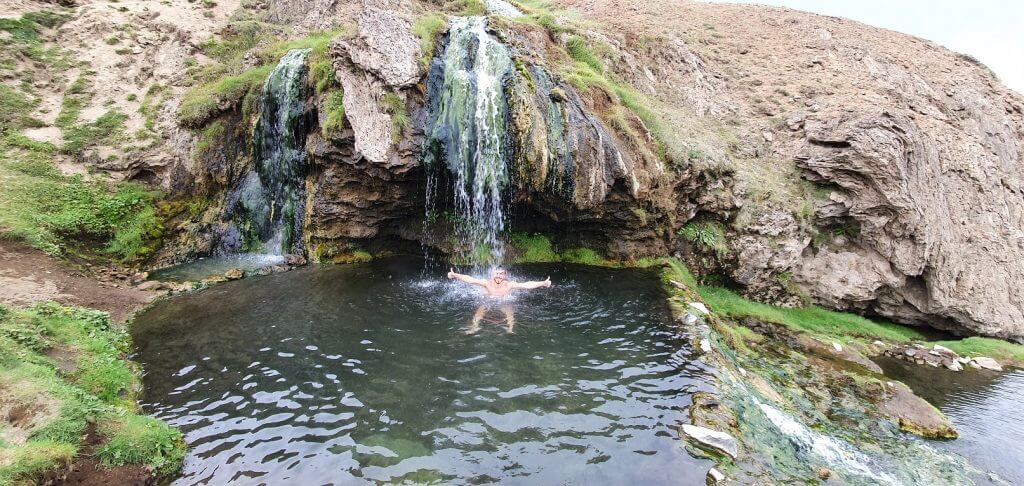
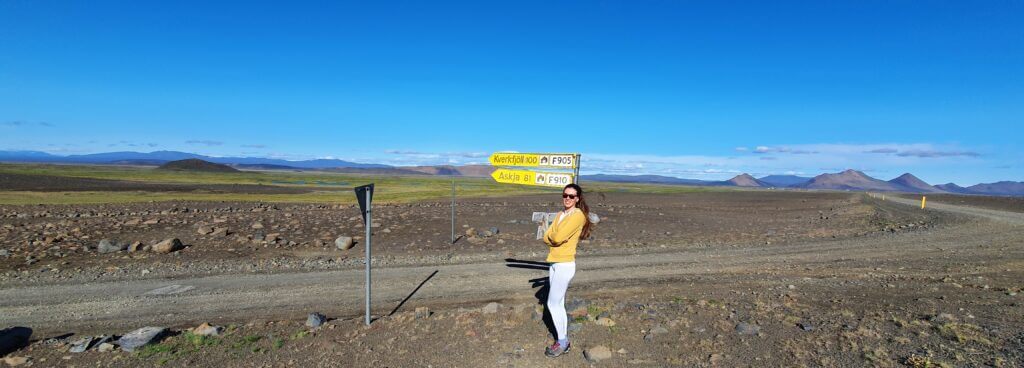
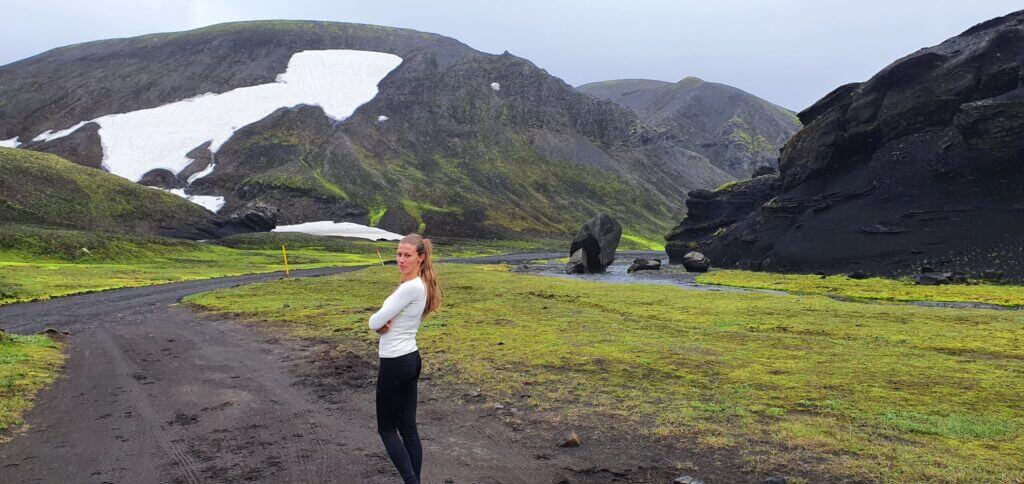
1. ASKJA
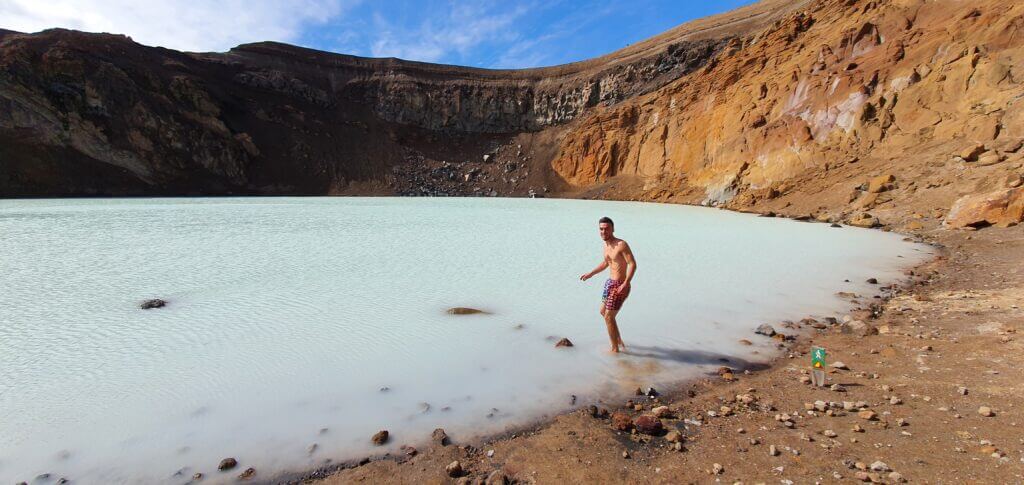
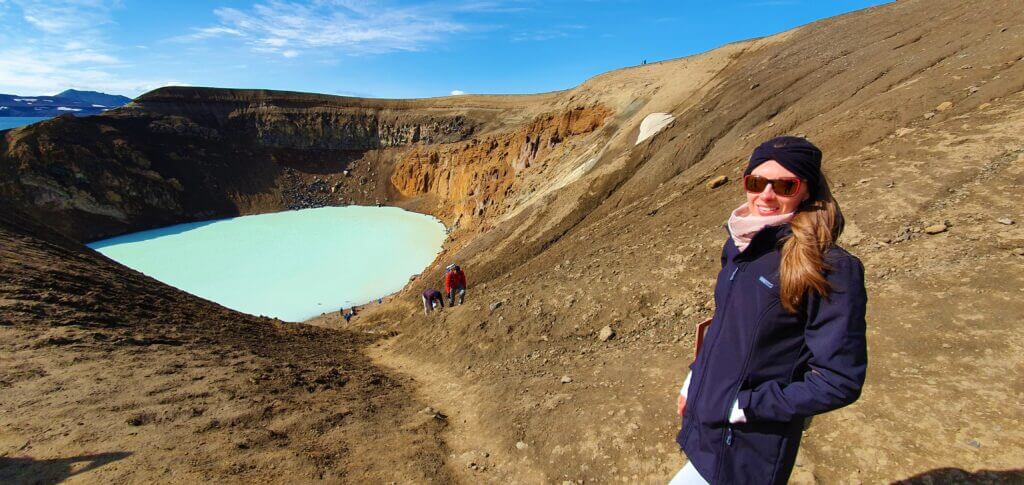
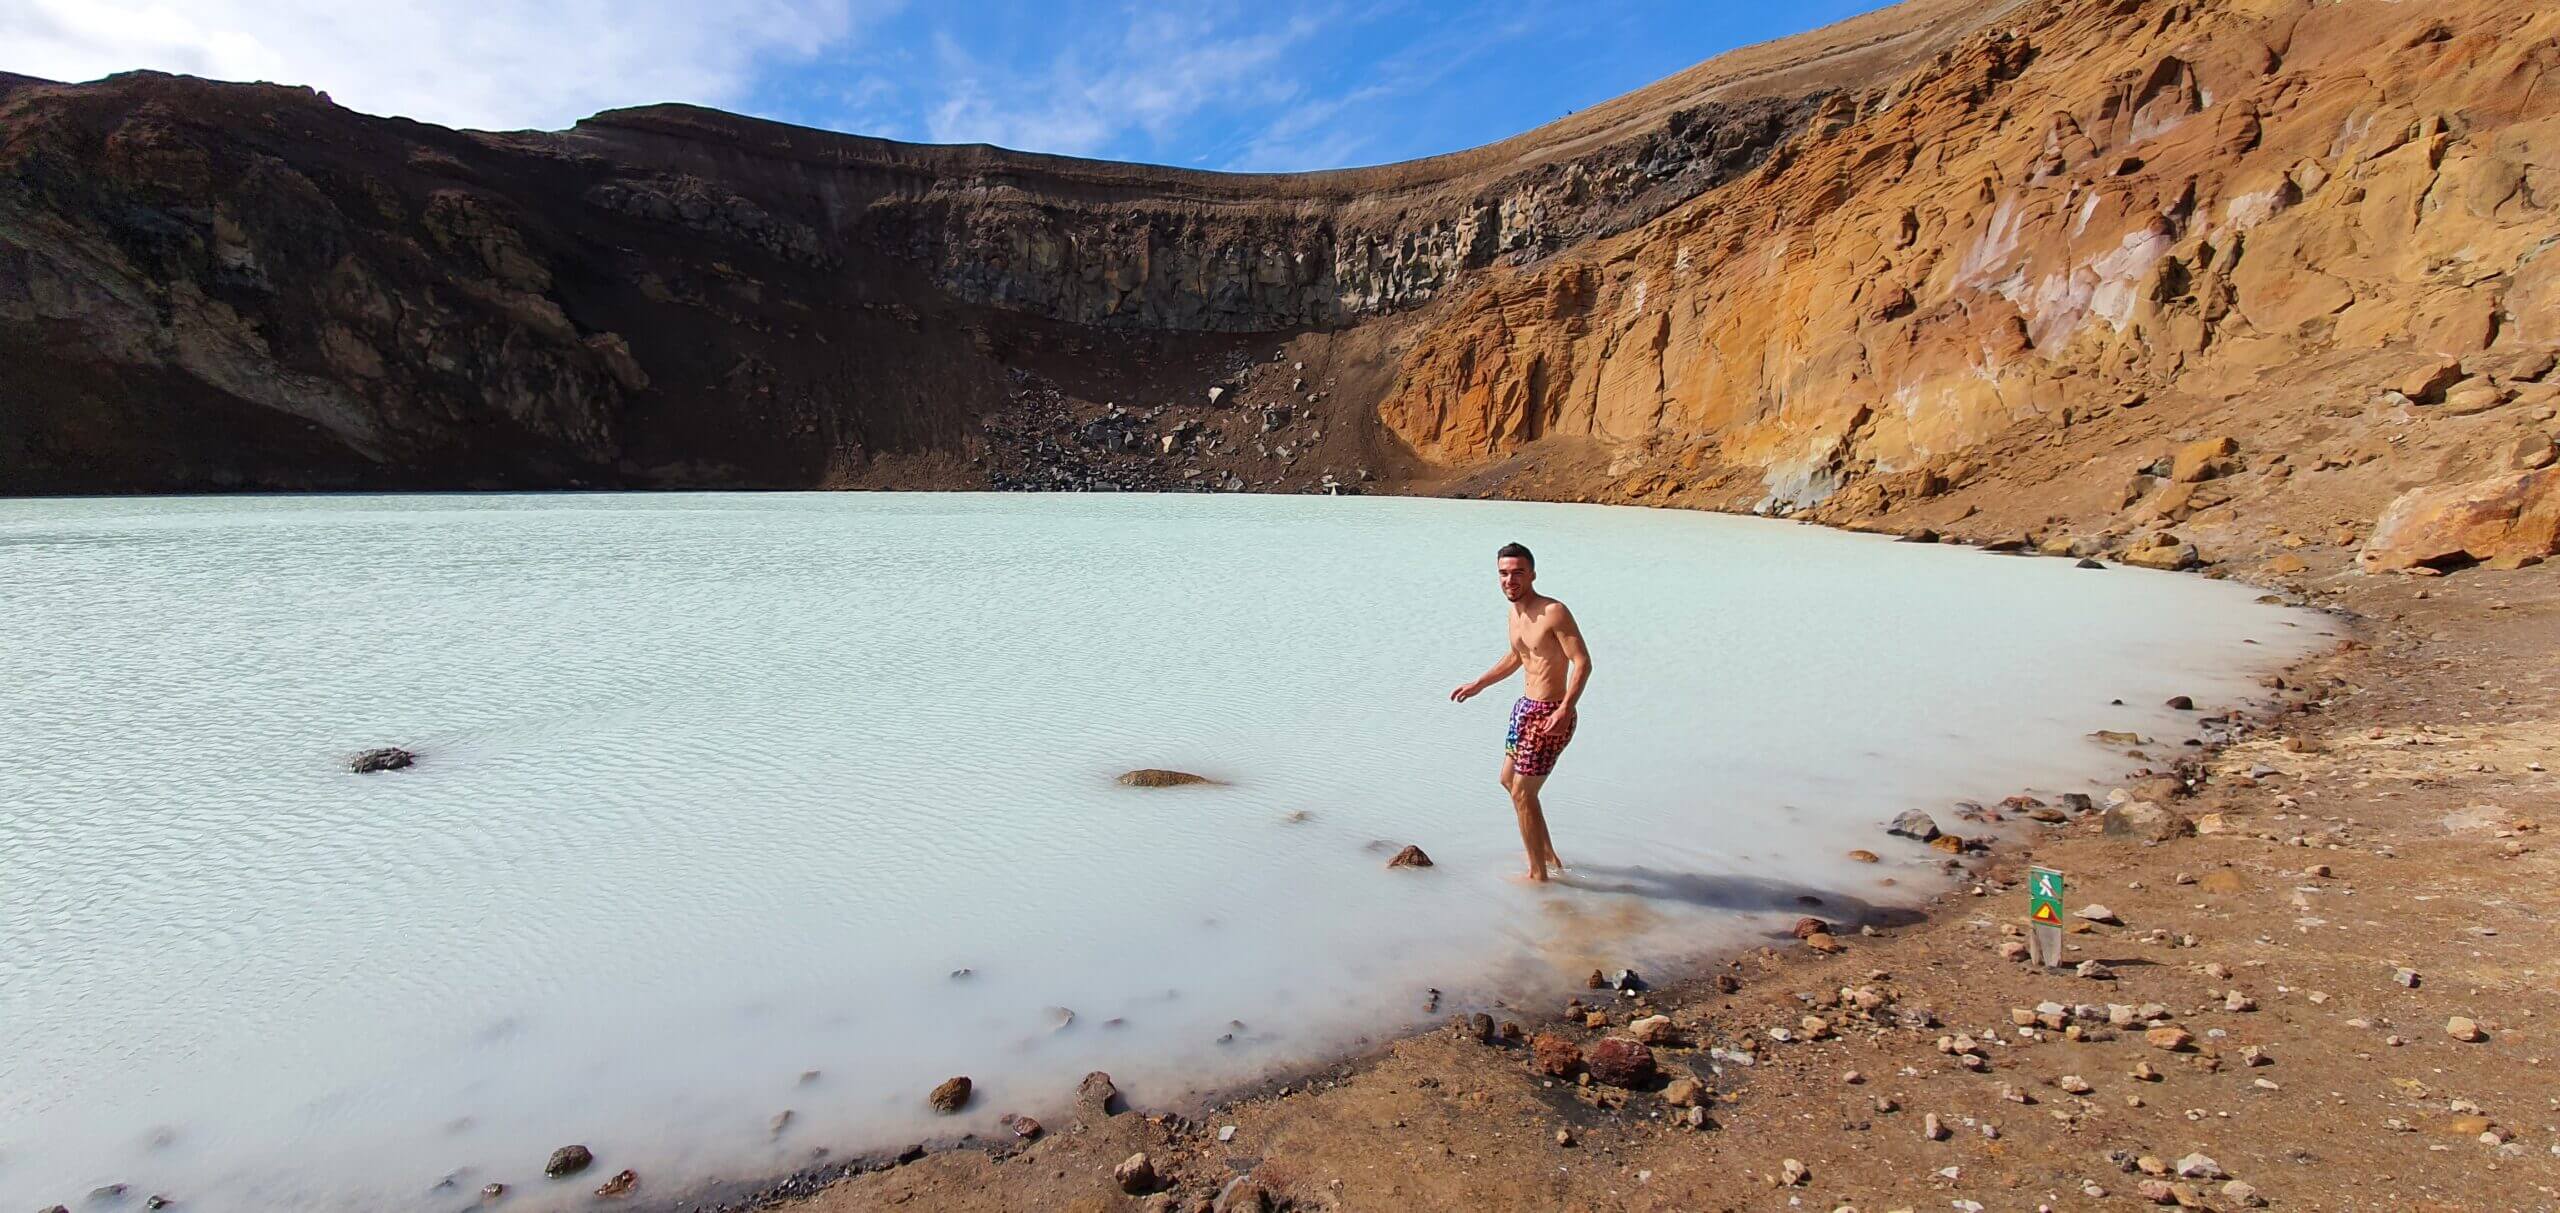
Me swimming in 25°C sulphuric water of Víti crater in Askja
Summary
Distance from car park: 20-30 minutes one way (from Vikarborgir)
Time spent at: >1 hour
Worth visiting even with bad weather: yes, probably
Physical condition needed: medium to advanced (depends if you want to climb Viti)
Interesting index: 1 – amazing (1-amazing, 2-great, 3-nice)
Askja is a hidden gem of Iceland. It’s a picturesque volcanic crater filled with warm sulphuric water in the middle of nowhere. The drive to Askja is strenuous but more than worth it.
How to get to Askja
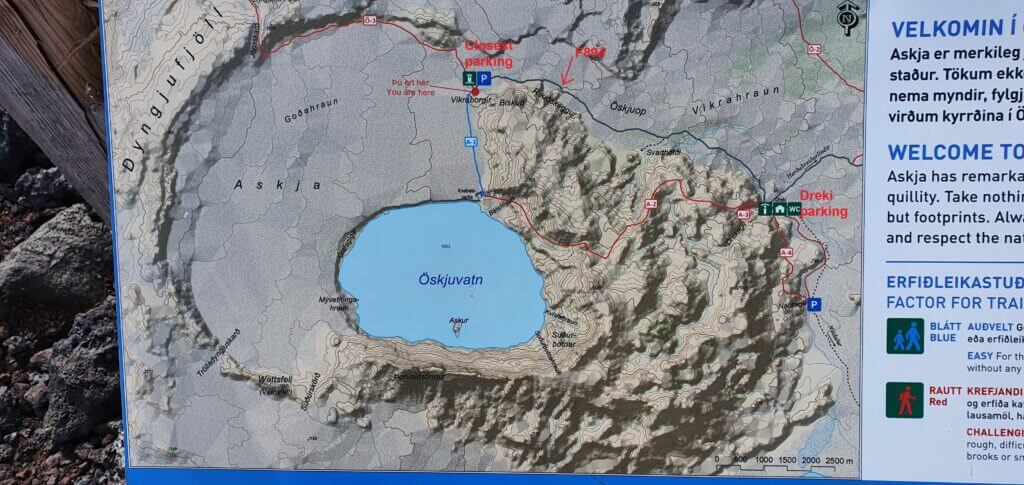
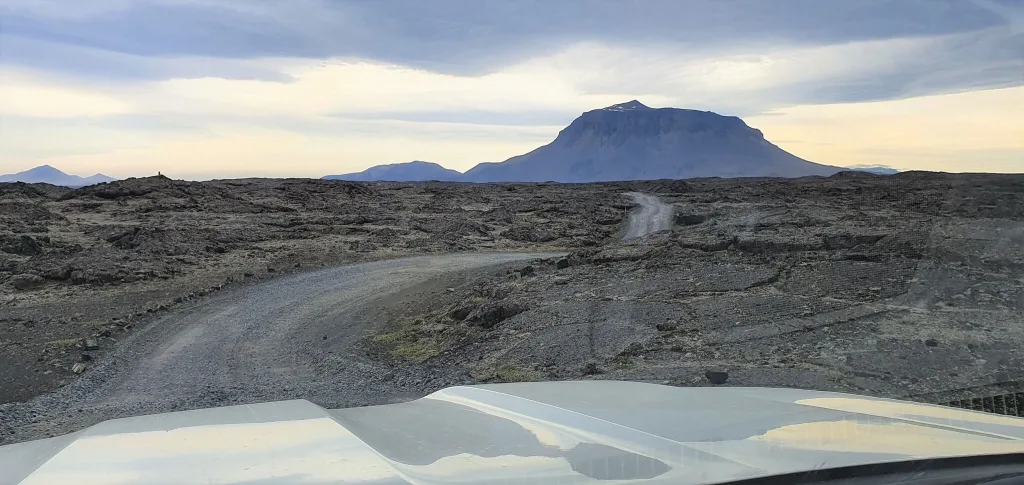
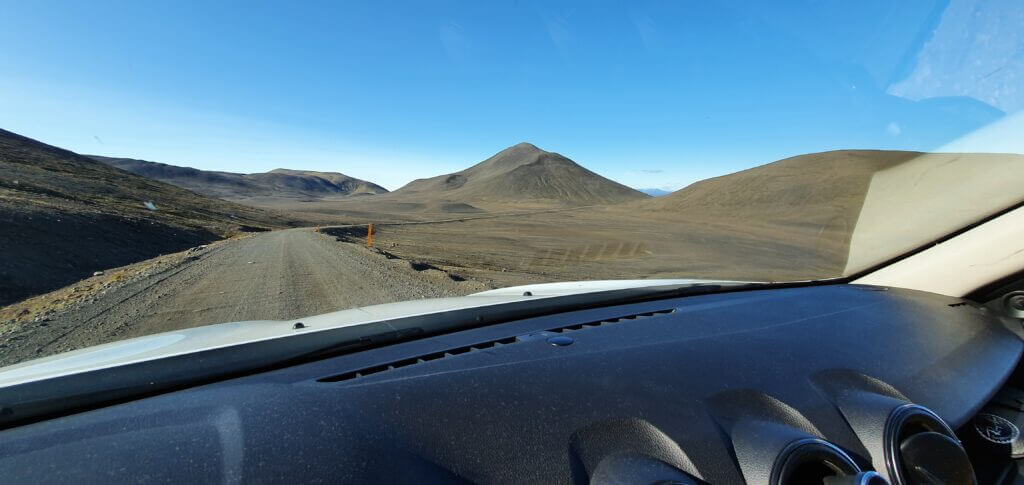
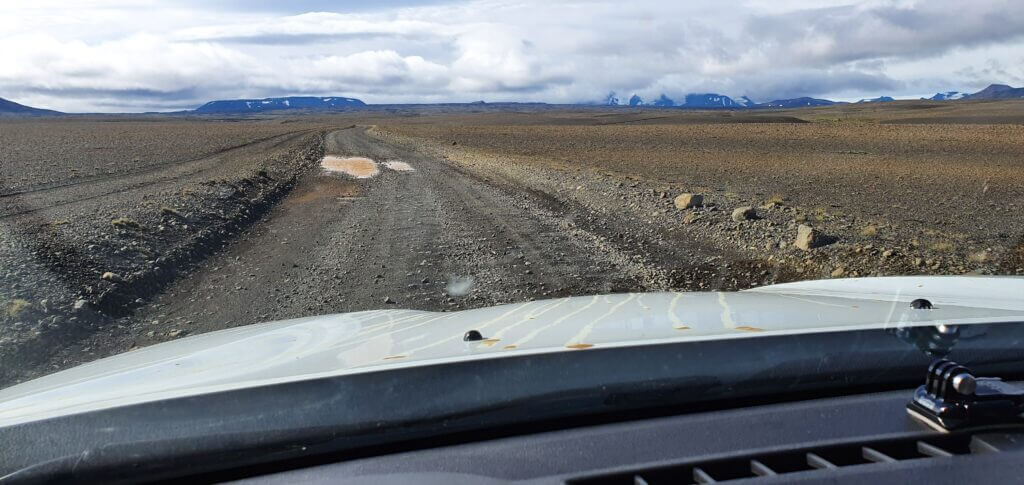
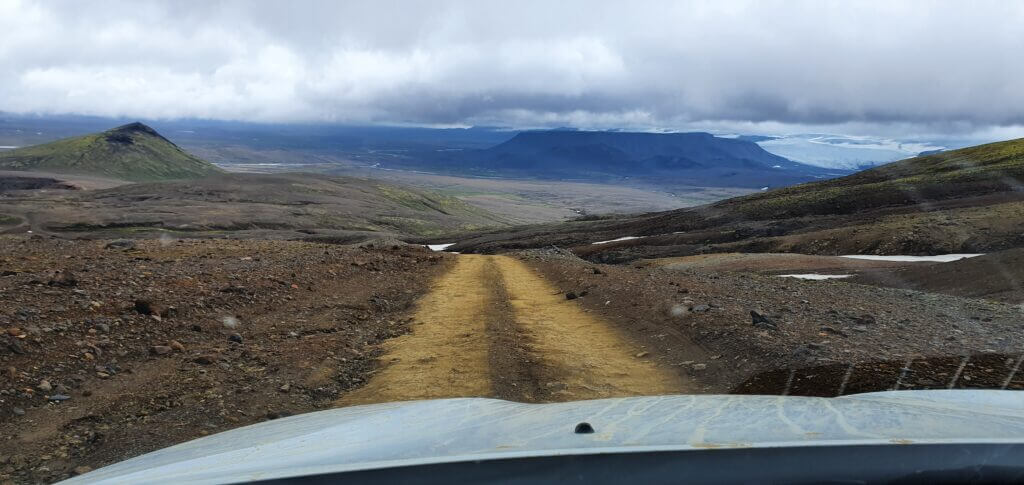
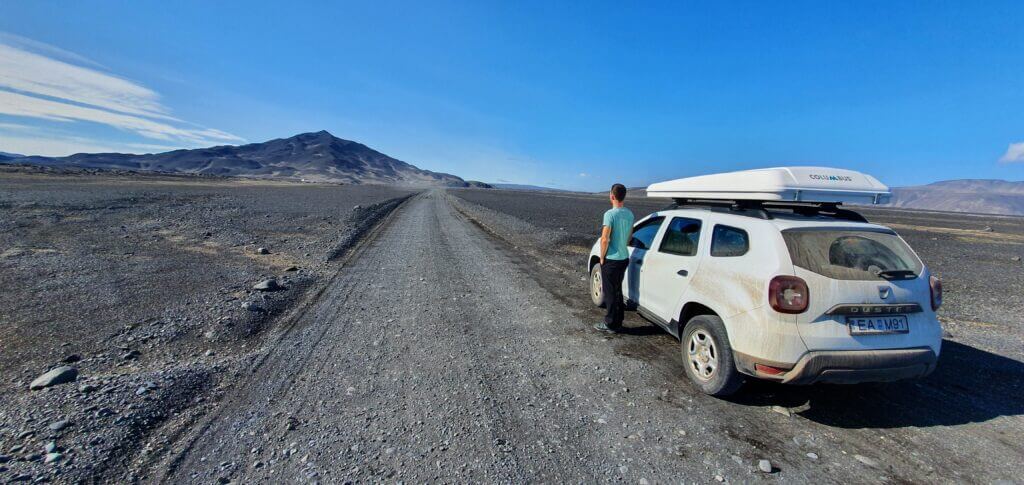
To drive to Askja you definitely need a 4wd car. There are two main routes available to reach Askja. The northern one (F88) and the eastern one (F905, F910).
The northern route is the toughest one because F88 contains several big, treacherous rivers. You will need a large super-jeep if you want to take F88.
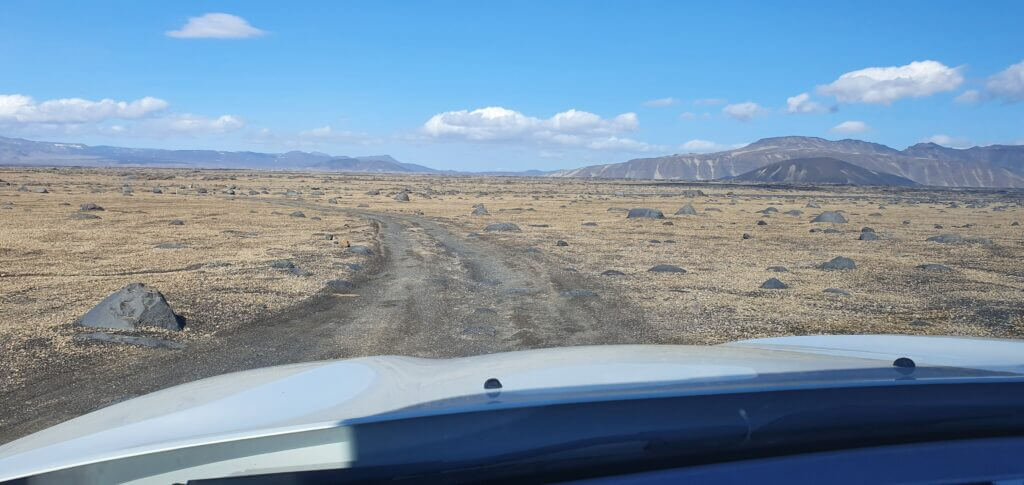
F905 to Askja on an exceptionally beautiful sunny summer day
The eastern route contains river crossings as well, but only small and medium-sized ones, so it’s doable also with a medium-sized SUV. If you are interested in specific details about each road and each river crossing, you may read our guide on how to visit Askja.
It’s important to choose your car carefully for your visit to Askja. Read about how we chose our car. Or just get free discounts for your Icelandic car rental.

Our experience with Askja
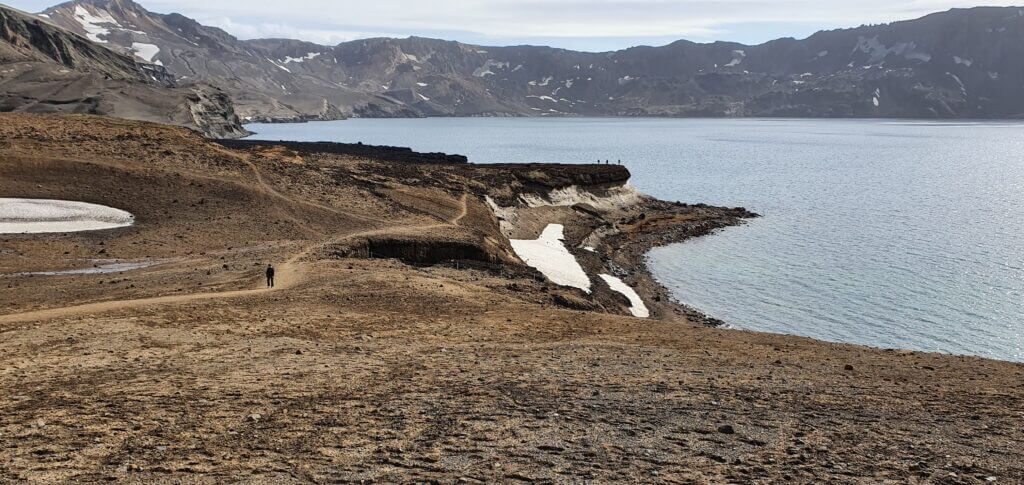
From the car park it takes some 20-30 minutes of walking via a well-marked path with yellow sticks to reach the place everybody sees in the pictures – i.e. Víti crater. Sun still shined, the sky was still clear and the wind was still mild – what a wonderful day! And Viti crater looked even better than in the photos! Fairy-tale-like blue water with moon-like surrounding landscapes. Askja was the highlight of our trip.
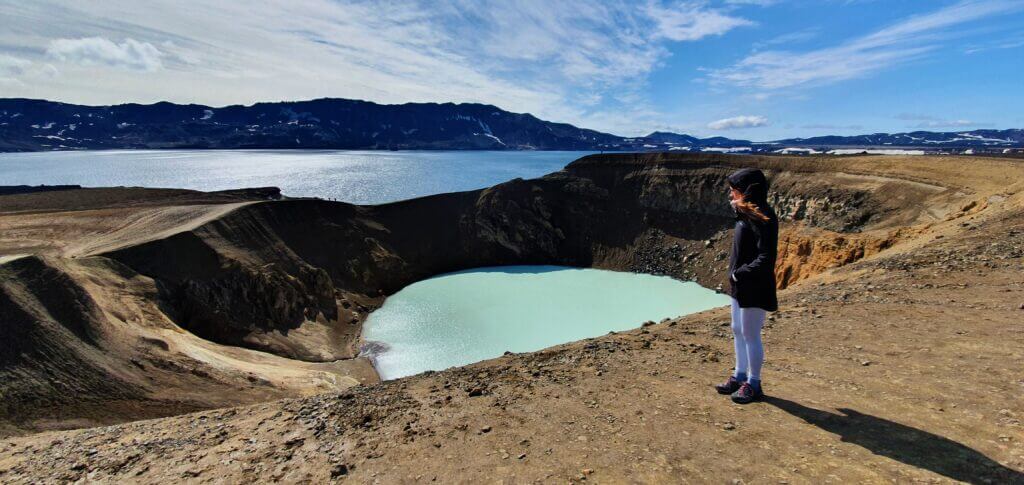
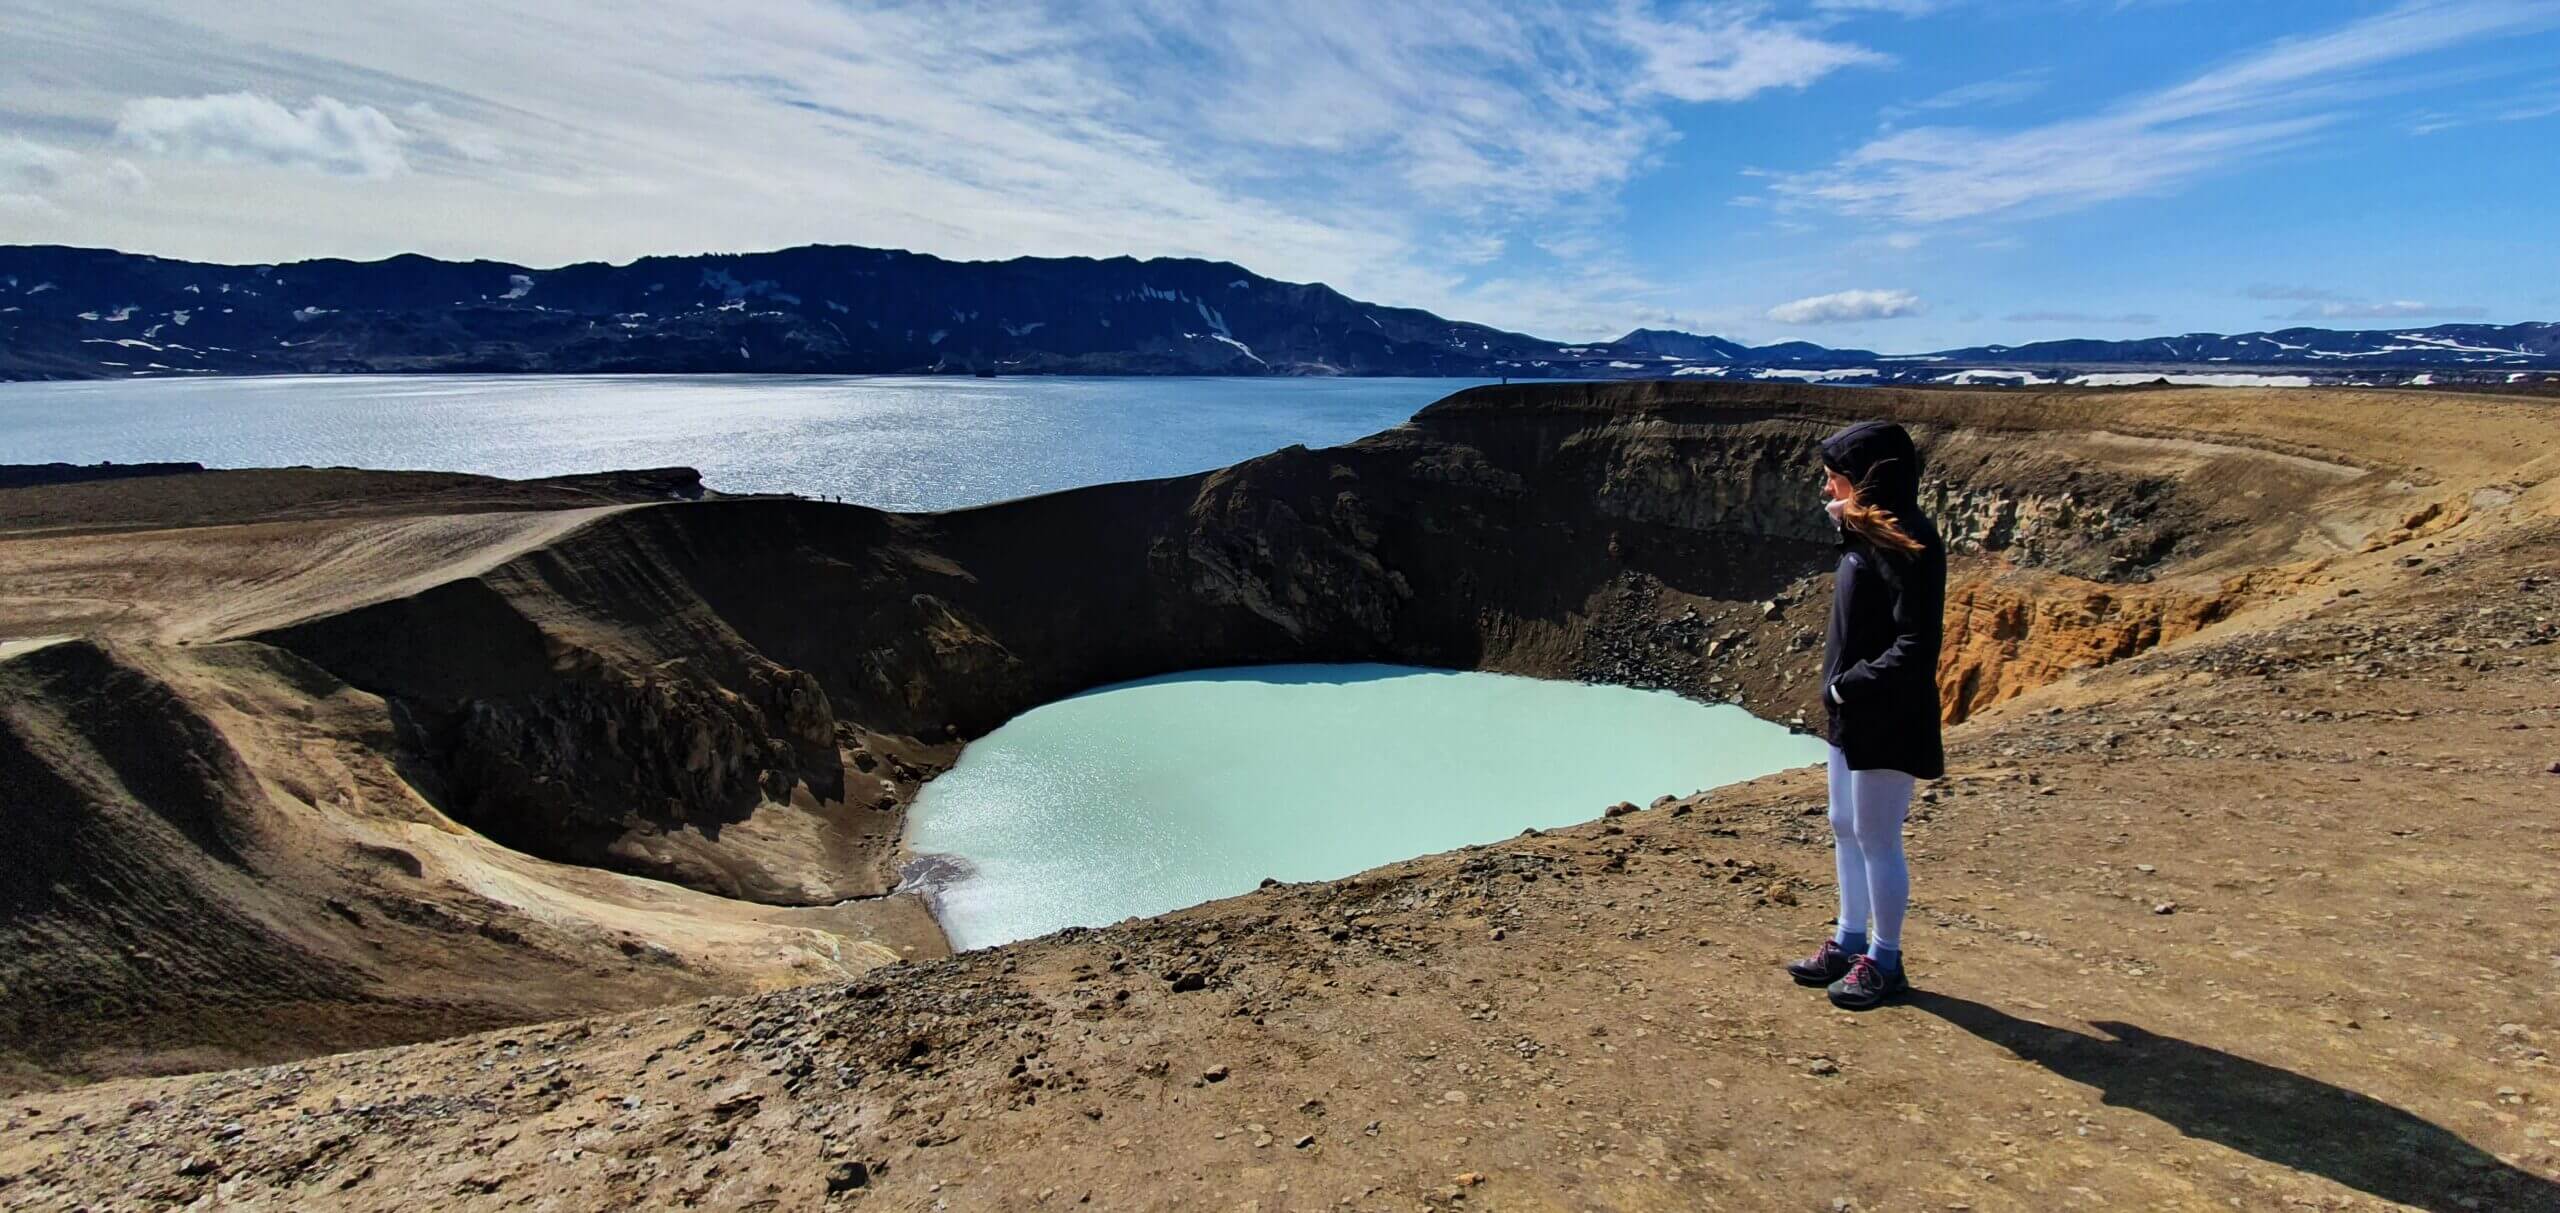
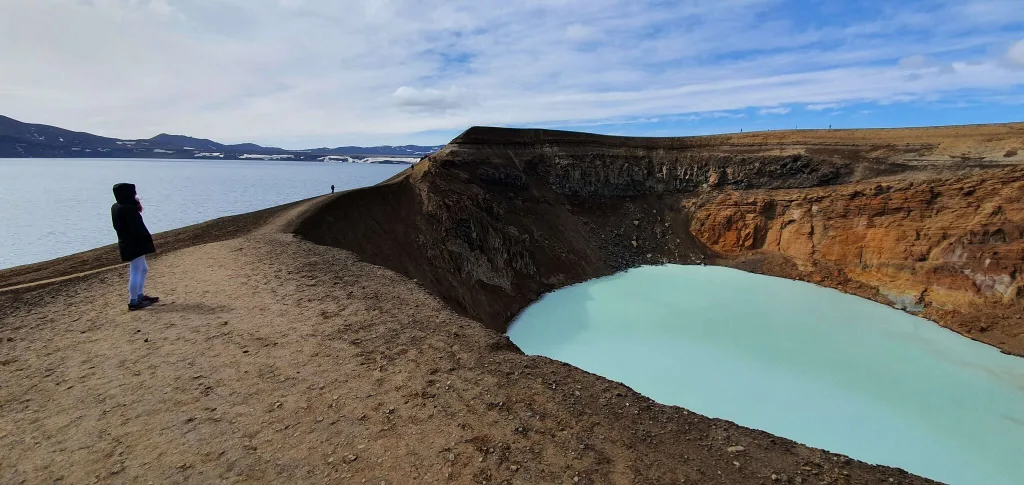
Amazingly beautiful Askja (the whole area), Víti (the crater lake) and Öskjuvatn (the bigger lake nearby) all in one picture
We also decided to descent down to the crater itself and take a bath. This was one of the two moments during our journey when I was a bit scared (first one when hiking up the Blahnjukur peak in Landmannalugar, climbing the steep clay slippery trail). Here again, the descent was steep and the ground was covered with slippery clay, which means you’re unable to control any fall of yours, in case it happens.

Nevertheless, it’s a short descent and not too dangerous, so in good weather, you should be able to make it. Once down in the caldera, you may enjoy swimming in the water with a temperature around 25°C, which is definitely not a hot spring but it’s definitely warmer than air (at the time of our visit around 10-15°C). Once in a lifetime experience.
Tips about Askja
- Askja = name of the entire area.
- Viti = volcanic crater you are probably aiming for as we were, with blue picturesque geothermal water.
- Oskjuvatn = big lake just next to Viti, with no geothermal water (Google calls Oskjuvatn “Lake Askja”).
Vikraborgir car park, the closest point available on your route towards Askja/Víti crater
Once you reach Viti, you may either:
- Just admire the beauty of Viti crater and monumental Oskjuvatn lake next to it, or
- Hike around the area, or
- As we chose (or as my girlfriend persuaded me), hike down the Viti crater and swim in the green/blue geothermal water.
Öskjuvatn lake in Askja area, next to famous Víti crater
Interested in more details on different hikes, map of the area and our experience? Read our guide on Askja.
Interested in how we combined Askja with the visit of Studlagil canyon, where we camped and where we went next? Read about day 6 of our journey.
![]() ask questions or get inspired in our community
ask questions or get inspired in our community