
Þakgil is an amazingly beautiful hiking area, yet there was no detailed guide to Thakgil, nor any detailed description of the best hiking trails in Þakgil. We want to fill this gap and will be writing in deep detail about all the hiking trails, the Thakgil campsite, how to get to Þakgil, what to see, and when to go.
Contents
- When to visit Þakgil
- How to get to Þakgil
- Thakgil campsite
- Hiking trails in Þakgil
- Myths and Facts about hiking in Thakgil
- What is the best hiking trail in Thakgil?
- Is one day in Thakgil enough?
- How difficult are the hiking trails in Thakgil?
- Can you get to Thakgil with a 2wd car?
- Is the yellow trail the most beautiful one?
- Should you do the Þakgil hikes only in the nice weather?
- Is the yellow trail dangerous?
- Do you have to cross the river during the hikes?
- Is the purple trail and the common red/yellow trail worth hiking?
- Hiking the Yellow and Red trail loop – our experience
- Hiking the Red trail to Mælifell
- Tips for hiking in Thakgil
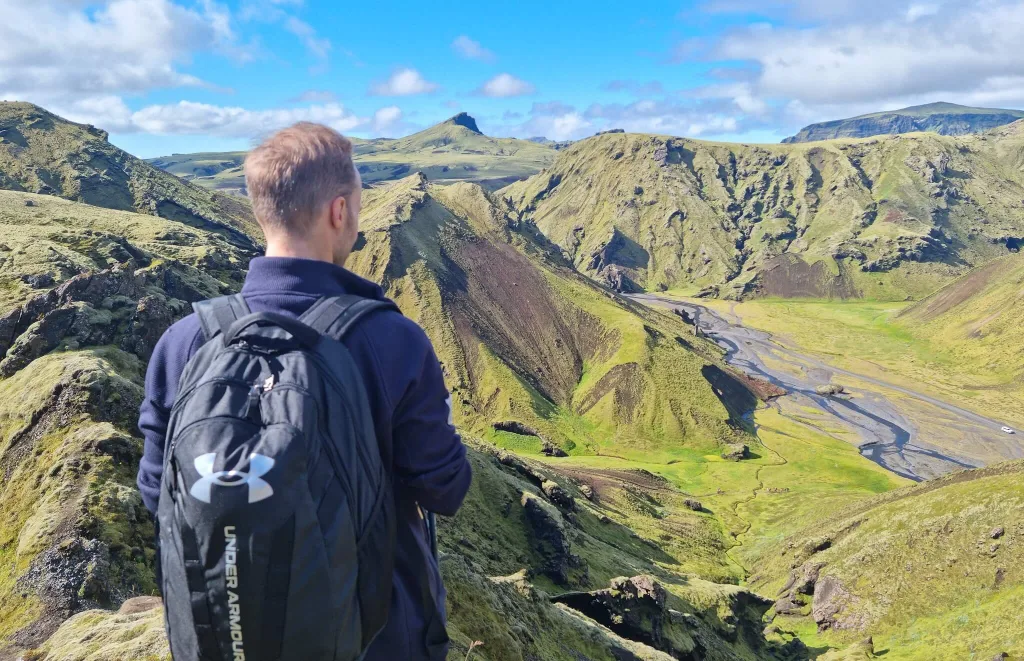
Hikes in Thakgil definitely belong to the best hikes in Iceland. Some people incorrectly spell the Icelandic name Þakgil as “Pakgil”, but it’s not “P”, it’s “TH” as Thór. And Thakgil is a hiking paradise full of canyons, ravines, waterfalls and even melting glaciers! Þakgil is located pretty close to Vik, a very popular city in southern Iceland, very well accessible to all tourists. There are three main hiking trails and several possible detours.

Most of the other blogs out there describe only one of the Þakgil hikes in detail – the purple one – the Remundargil ravine hike. Probably, because it’s the easiest and the quickest one. However, definitely not the most rewarding one 🙂
That being said, we will do the opposite. We will describe in detail our day hike which included hiking a yellow trail and a red trail in Thakgil. These hikes are called the Austurafréttur hike and the Mælifell hike. We also added an amazing hidden bonus – a hike to Huldujökull glacier.
When to visit Þakgil
Same as for all parts of the Highland of Iceland, you can visit Thakgil only in summer when the hiking trails are open. When do hiking trails in Þakgil open? The trails open once there is no snow on the trails. This usually happens any time between the beginning of June and the first half of July.
When do the Thakgil hiking trails close? The trails close after the first heavier snowfall. The first heavier snowfall typically reaches Þakgil at any time between the first half of September and the end of October.
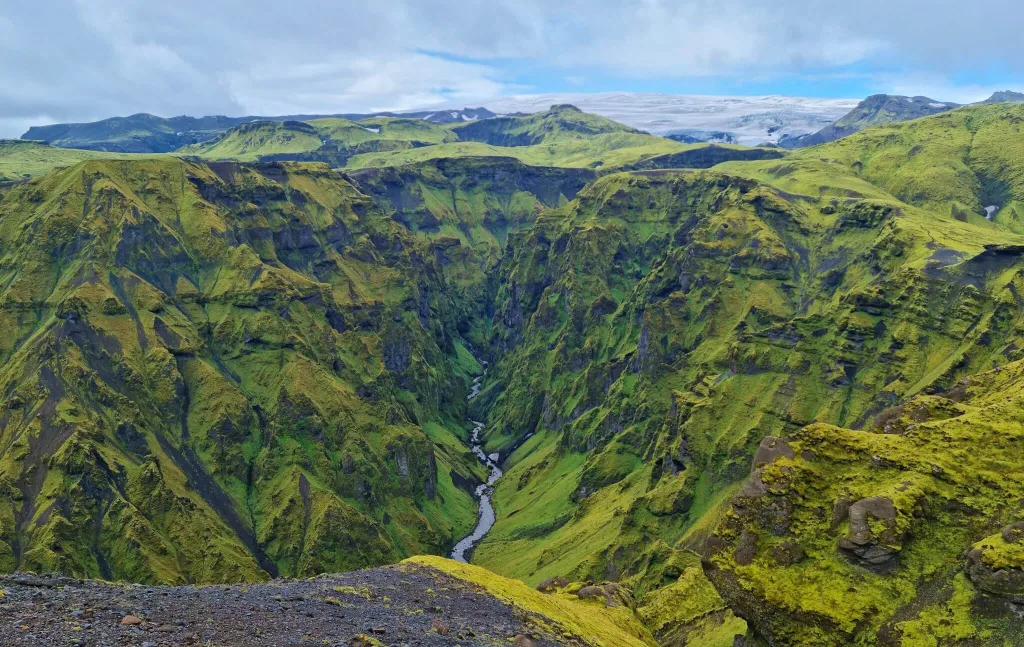
Magnificent canyon next to the red Maelifell trail, Þakgil
So, when should you visit Thakgil? To be sure to have clear and dry trails, visit Þakgil between the first half of July and the second half of September. This period also coincides with the mildest and warmest weather, which you will definitely need. For 100% accurate info on the current state of the trails, please contact the campsite or safetravel.is.
Can I visit Þakgil in winter? Outside of the main season? Only in theory. First of all, the road leading to Thakgil is full of snow at that time. Secondly, the trails are full of snow too. This means both the road as well as the trails are very dangerous to navigate and you should never do that without a professional guide. Even with their help, Þakgil is typically inaccessible between October and May.
Tips on the most beautiful places in Icelandic Highlands.
How to get to Þakgil
The only way to get to Thakgil is to use the gravel Road 214, Kerlingardalvegur. Since the road is 16 kilometers (10 miles) long, you have to rent a car or hitchhike. There’s no bus service to Þakgil. You may probably be able to arrange some expensive private transport, but in that case, better rent a car.
Beginning of the road to Þakgil. This was the easiest part.
Road to Þakgil
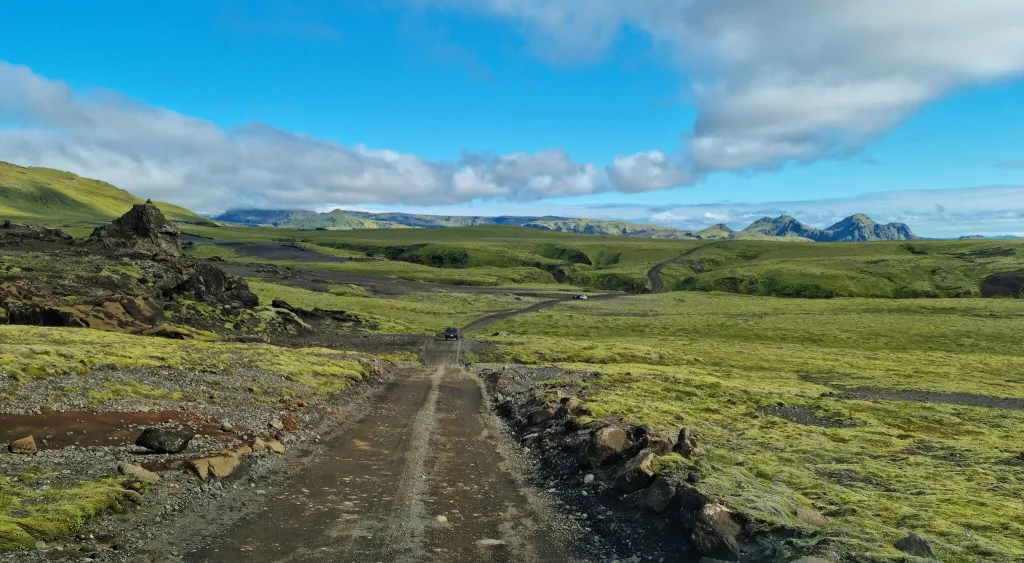
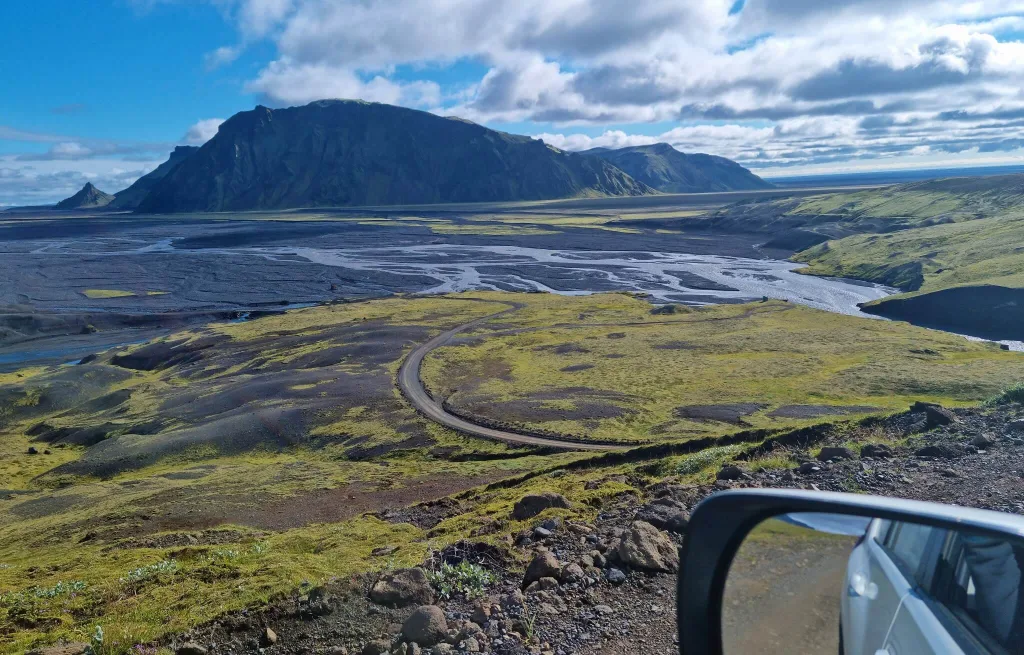
Kerlingardalvegur, or Road 214, leading to Thakgil is a pretty bumpy gravel road. Road to Thakgil is officially a normal 3-digit road, however, it could quickly be classified as an F-road. I could easily name several F-roads that are easier (and more comfortable) to drive on than Road 214. The thing is, the road to Þakgil doesn’t contain any river crossings, so they decided to classify it as a normal road.
The road is open to normal vehicles only in summer. In winter there’s usually “no winter service”. What does it mean? Feel free to read our article about Icelandic Roads to find out more. Long story short, expect a very bumpy and slow drive with many potholes and in summer also many fellow tourists.
Road 214 Kerlingardalvegur to Þakgil on a beautiful sunny day.
Do you need a 4×4 to get to Thakgil? The road to Thakgil is definitely passable also in a 2wd car, but you will feel much safer in a 4×4 car. I’m glad we had our Land Cruiser. This way we didn’t need to worry about any damages to the car’s undercarriage / chassis. Or you can rent with Lotus, the only car rental company in Iceland which insures undercarriage / chassis). If you are interested in details of how car rental insurance works in Iceland, we wrote a detailed guide on that.

All that being said, if you are lucky enough with the weather, the road to Þakgil is amazingly beautiful on a sunny day. A scenic drive through a valley full of river streams, black ash, and green moss hills everywhere around you with a lush green Thakgil valley slowly coming closer to you in the background. Totally worth the bumpy drive.
Parking in Thakgil
The only actual sort of “official” car park in Þakgil is located at the campsite. This is probably the best spot to leave your car and it’s free unless you stay overnight. That would be camping already and you need to pay for that. Not all the hikes in Thakgil begin at the Thakgil campsite, though – see the map of Thakgil hiking trails below.
We left our car on the gravel, next to the road, close to the purple hiking trail.
If you want to park your car as close to the beginning of your chosen hiking trail as possible, you may also park the car next to a road, close to the start of the hiking trail (as we did). However, please keep strictly in mind, that you can NOT park on the moss or grass. You have to find a gravel spot or a spot where there’s nothing you may potentially destroy and evidently other cars have already parked there before. Additionally, never leave your car parked on the road itself! Park NEXT to the road. If you are unsure about where to park, better leave your car at the campsite, it’s pretty close to all the trails anyway.
A detailed guide on How to choose the best Car for Iceland.
Thakgil campsite
Þakgil campsite is probably one of the most beautiful campsites in Iceland. Thakgil camping is located directly in the heart of Þakgil. In summer you will be surrounded by magnificent lush green hills and ravines. There’s also a much more expensive possibility to book your private hut. Take a look at the website of the campsite for an up to date info. The website may be a bit outdated from time to time (seems like locals are not much of web admins, understandably) but the phone number is working, so I suggest you call them if you need anything. They do speak (simple) English 🙂
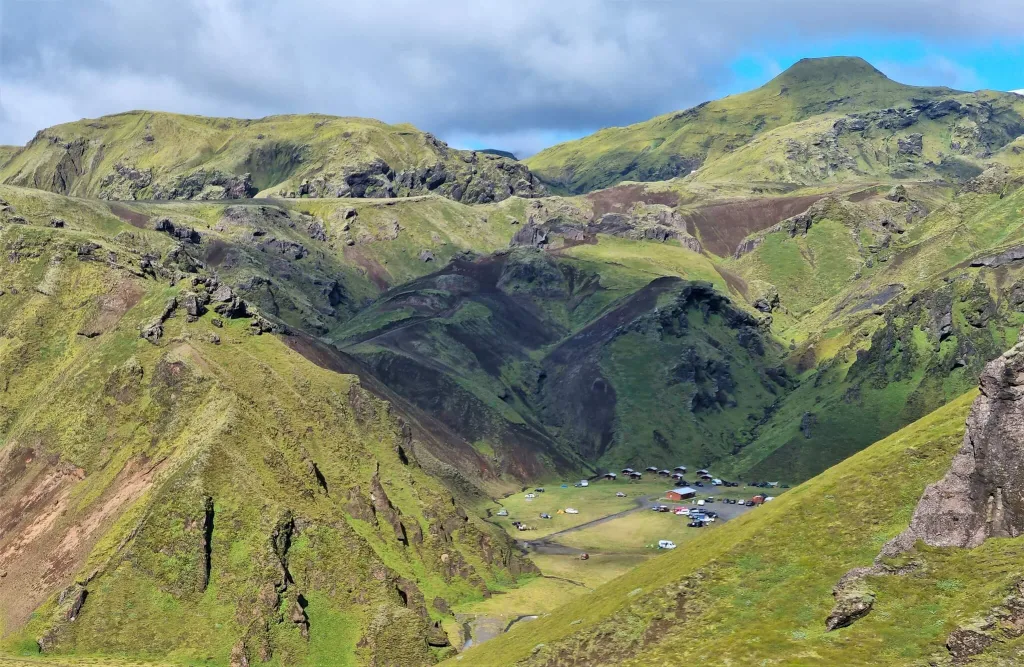
Þakgil campsite
If you want to book a hut or accommodation nearby, we highly suggest you do so enough in advance. Huts in Thakgil are in very high demand in summer. With simple camping, you don’t need to book in advance. It’s a first come, first serve system and I don’t remember the campsite being full at any time. There’s also a possibility to ask for the current trail conditions at the campsite. Sometimes you may also get an accurate answer. Don’t rely on that, though – see our hiking story below :).
Hiking trails in Þakgil
- Ravine walk from the campsite, 1km, 15-20 minutes
- Remundargil ravine (purple trail), 13km, 3-5 hours
- Austurafréttur range (yellow trail), 17km, 6-8 hours
- Maelifell (red trail), 14km, 4-5 hours
- Huldujökull glacier detour (white trail), 3km, 1-3 hours
- Austurafréttur + Maelifell + Huldujökull loop (yellow + red +white trail), 20km, 6-9 hours
Map of the hiking trails in Þakgil
There are 3 main hiking trails in Þakgil – the red trail, the yellow trail, and the purple trail. Then there are several “side” trails. See the hiking map of Thakgil below. This map is accurate and you can rely on it. The original map, however, didn’t mark any dangerous parts, or river crossings. That’s why we added our notes to the map and we suggest you read our entire article if you plan on going hiking in Thakgil.
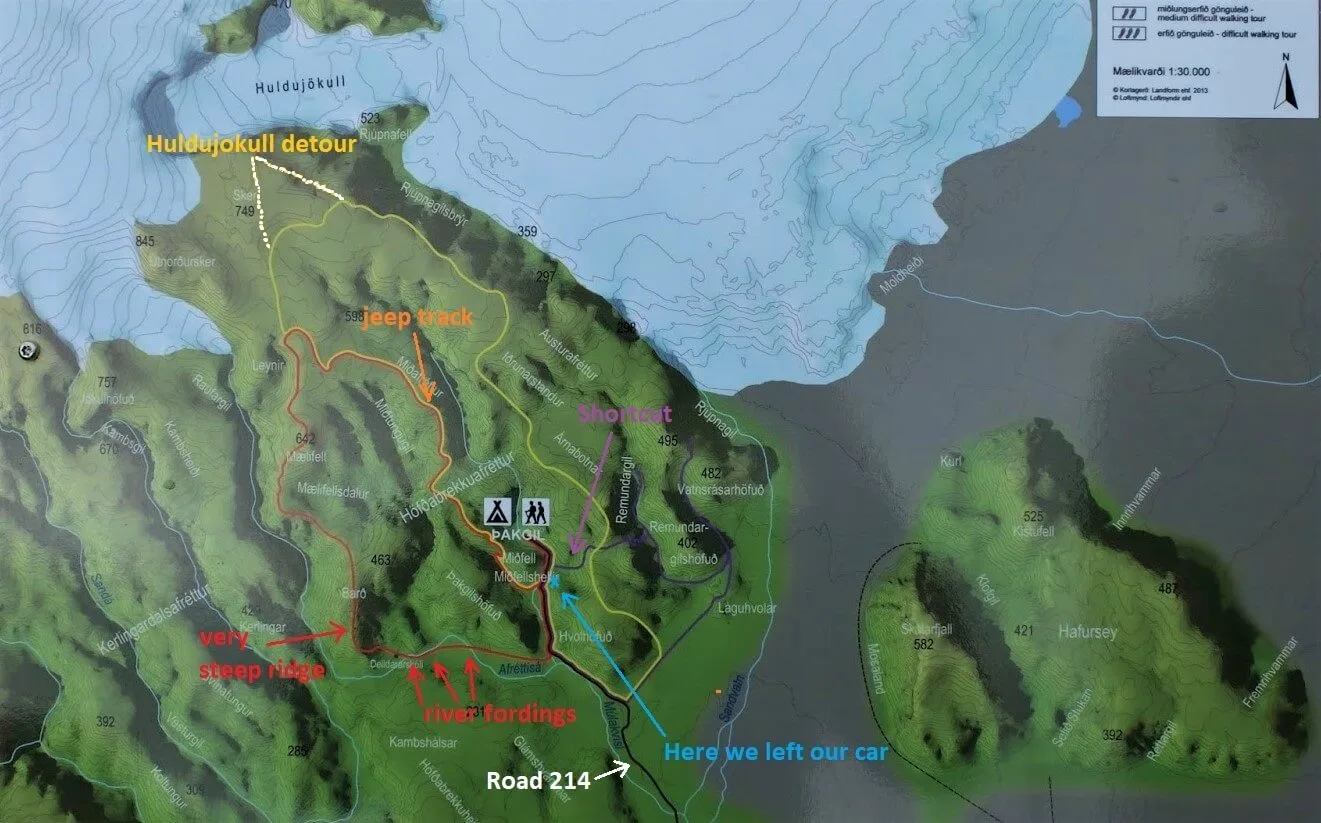
Map of Þakgil hiking trails with our notes (click to enlarge)
If I had to rank the main trails by difficulty, the order would be as follows:
- Common red/yellow trail (the easiest)
- Yellow and purple trails (medium)
- Red trail (more difficult)
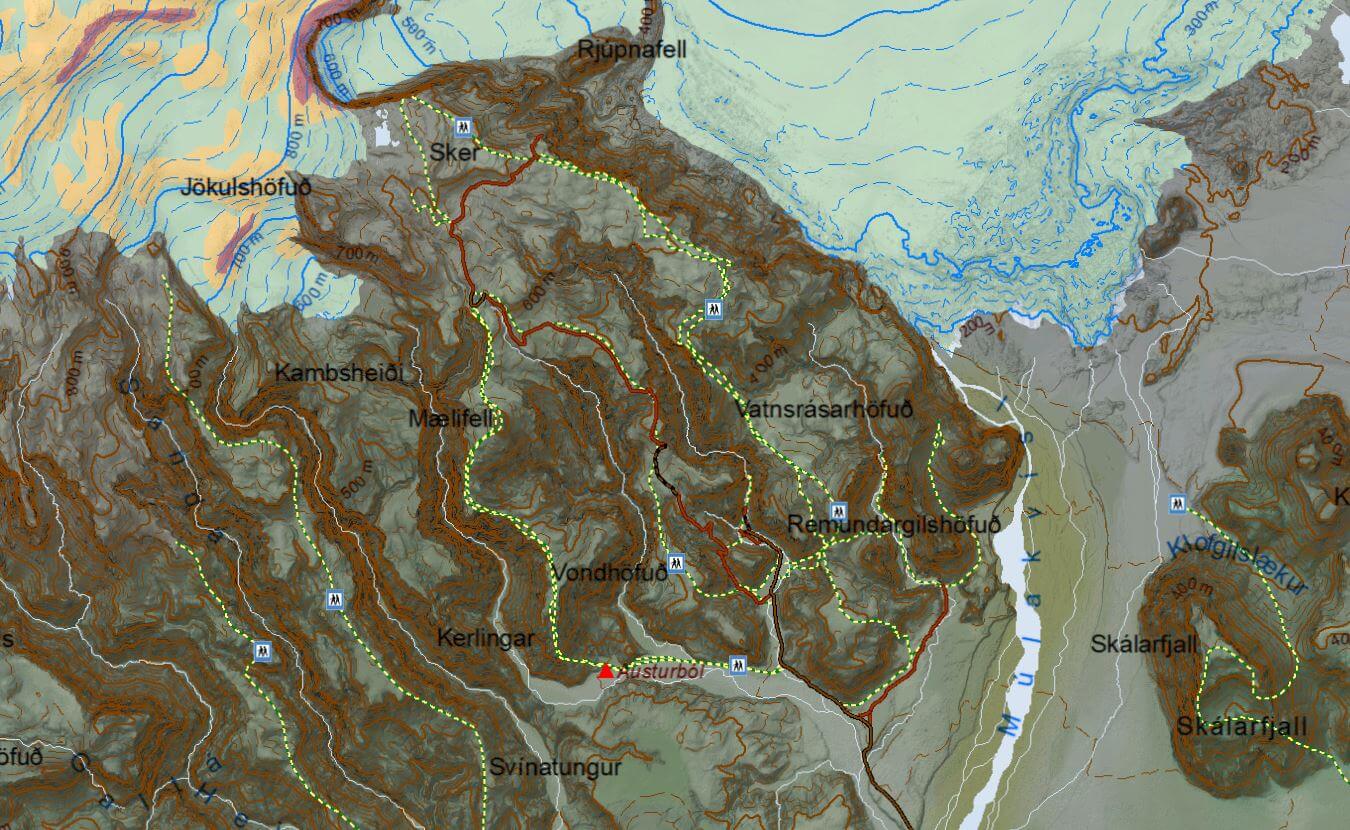
Local map of all the hiking trails, roads and tracks in Thakgil (click to enlarge)
The alternative map above depicts all these trails (including the detour) and distinguishes between hiking trails only (yellow/green dashed line) and buggy/jeep tracks (brown) which also serve as hiking trails.
Myths and Facts about hiking in Thakgil
The lack of factual information about hiking trails in Thakgil gives rise to many weird myths about Thakgil. Below we answer all questions we’ve heard about Þakgil.
What is the best hiking trail in Thakgil?
The most beautiful trails are the eastern part of the Yellow trail and the western part of the Red trail, in our opinion. They are also the most difficult trail segments. Views from these parts of the trails are simply stunning, see our trip report below. Probably the most beautiful unmarked detour from these trails is a detour to Huldujökull glacier.
The red Mælifell trail is very green, full of spectacular canyons and ravines.
Is one day in Thakgil enough?
If you catch the nice weather, one day is definitely enough to see the best of Þakgil. If you want to hike all the trails, it would take you 2 days if you are a quick hiker, and 3 days if you are a slow hiker. Just bear in mind, the trails and the surrounding landscapes are somewhat similar, so it doesn’t entirely make sense to hike every single inch of all of them.
The yellow and the red trail may be done in 1 day as a huge loop. This is exactly what we’ve done and couldn’t be happier! Totally worth every mile! The yellow and the red trail are pretty diverse and quite different from each other – it felt like hiking at two different places. The entire loop took us 9 hours to finish, including many photo pauses, a longer lunch break, and losing almost an hour by finding the proper route when crossing the river. See our trip report below.
Many useful discounts on Icelandic car rentals and Guided tours.
How difficult are the hiking trails in Thakgil?
The hiking trails in Þakgil are of medium difficulty. They are definitely not easy hikes for families with little children or for the elderly. They are also not any mountaineering expeditions. No special equipment is required in summer. We recommend taking hiking poles and if you plan to hike the red trail, then also water shoes for the river crossing.
Steep descent from the red hiking trail in Þakgil
Can you get to Thakgil with a 2wd car?
Yes, you can, but you will have to drive slowly and there’s a chance you may damage your car because the road to Thakgil is very bumpy. We recommend taking any 4wd car and driving carefully.
Is the yellow trail the most beautiful one?
We think that the eastern part of the yellow trail and the western part of the red trail are the most beautiful trails. If we had to choose just one, it would be a hard decision. The yellow trail is definitely an easier one, though, with no river crossings.
The least exciting trail is the common red/yellow trail because it leads via old jeep tracks. This part of the trail is, on the other hand, also the easiest part to hike. If you aim for a worry-free hike, or you are simply hiking in unfavorable weather, then go for this trail.
Amazing views from the yellow hiking trail in Þakgil
Should you do the Þakgil hikes only in the nice weather?
Yes, definitely. Aim for clear skies and no strong winds. The hikes are doable in light rain and slightly windy weather, but if it gets worse, they may be pretty dangerous. There are some steep ridges and slippery parts, so please, choose your day wisely and better turn back when feeling unsafe.
Especially the western part of the red trail and the eastern part of the yellow trail are pretty dangerous if it strongly rains/snows/wind blows, regardless of your hiking experience. The common red/yellow trail should be fine because it leads through the old road/track. However, consider also the views – if it’s foggy, you will see nothing despite doing a pretty demanding hike.
Is the yellow trail dangerous?
“I’ve read that the yellow trail is pretty demanding, steep, and dangerous at some points and you should better do it starting from the east (counter-clockwise).”
Well, I don’t think this is true. From our experience, the route is doable in both directions in good weather and if you are used to longer hikes. If you are not used to hiking, then yes, this trail is demanding and possibly dangerous.
Rainy picture from the middle of the red hiking trail in Þakgil. Still amazing views.
All trails are dangerous during bad weather, like strong rain, strong wind, snow, or bad visibility due to fog. In the nice weather, the yellow trail is not more dangerous than the other trails of Thakgil in any way. In fact, the most dangerous trail is the red trail in our opinion, due to the sharp ridge part and river crossings.
Do you have to cross the river during the hikes?
Only when hiking the red Maelifell trail. There are 3 river crossings located close to the campsite. The river is pretty fast flowing and it’s no joke to ford it, see our experience below. Take water shoes, adhere to river fording principles, and always hike at minimum in a group of 2.
Is the purple trail and the common red/yellow trail worth hiking?
Of course, they are worth hiking 🙂 The entire Þakgil area is totally beautiful and all the hikes are nice. We are just cherry-picking here the best out of the already beautiful options.
Hiking the Yellow and Red trail loop – our experience
Our rainy and a bit foggy view from top of Mælifell red trail in Thakgil
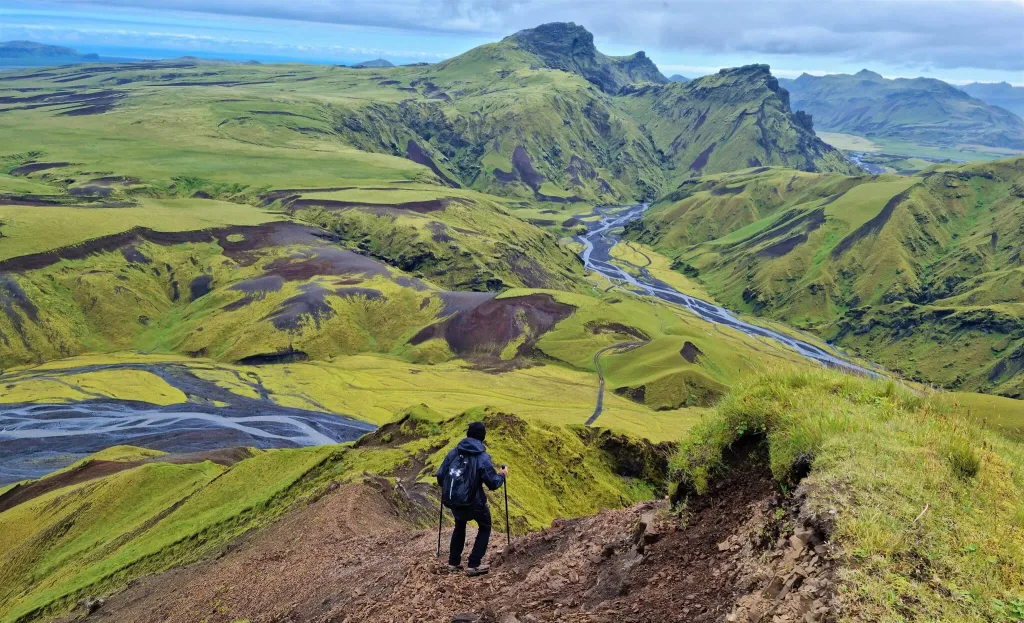
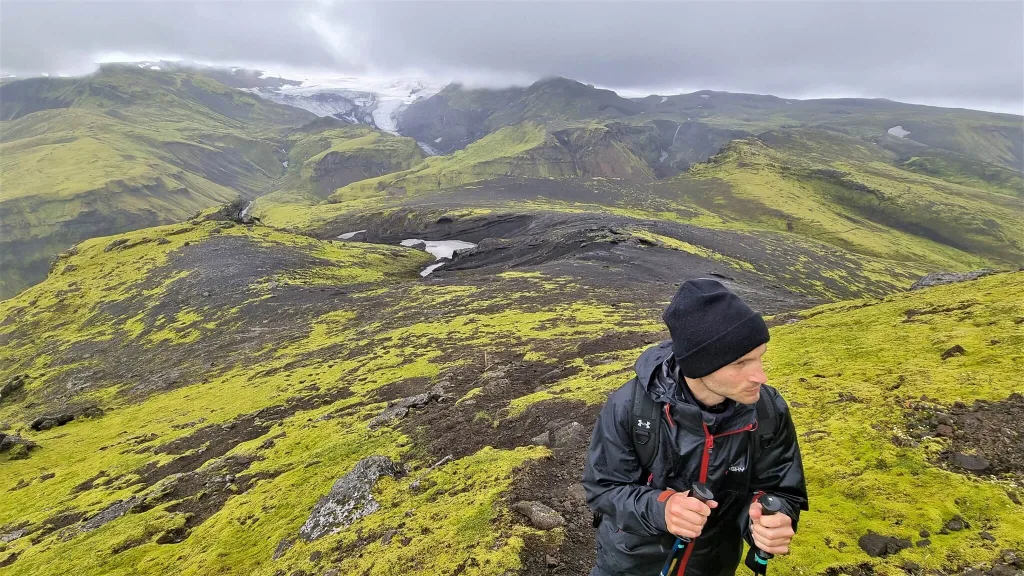
Yellow hiking trail in Thakgil, also known as Austurafréttur, is one of the two hikes we consider the most amazing in Thakgil and also the most difficult. The second one is the red trail to Maelifell. Here is a link to our Wikiloc hiking trail in Þakgil.
The yellow trail is probably slightly easier than the red one, though. You may form your own opinion after reading our report. As you can see on the map, there are several options for how to hike the yellow trail. We chose the counter-clockwise direction, i.e. an ascent from the east and a hike towards the Austurafréttur range. It took us 3 hours one way to hike the eastern part of the yellow trail and to reach the Huldujökull glacier.

Map of the yellow-red loop hiking trail in Þakgil we took
There are several different starting points for the yellow trail available. We aimed to choose the “most efficient” starting point to minimize walking on the road and maximize hiking the trail itself. That being said, we parked our car at the intersection of the road to Þakgil and the purple hiking trail, see above.
We had first crossed the little stream next to the road, then ascended up via the purple trail, and then continued to the north via the yellow trail.
The ascent towards the Remundargil ravine
We started our hike by first crossing the river. It was possible to cross the river by jumping and we didn’t have to take our shoes off. Hiking poles definitely helped. The river is pretty narrow, though, and it was also possible to find some “jumping stones” to cross the river through. Afterward, the hike began with a pretty steep, but safe, climb on the purple trail. The climb led to the intersection with the yellow trail, up on the ridge.

First ascent via the purple Remundargil ravine trail crossing our yellow trail. Our car is in the distance.
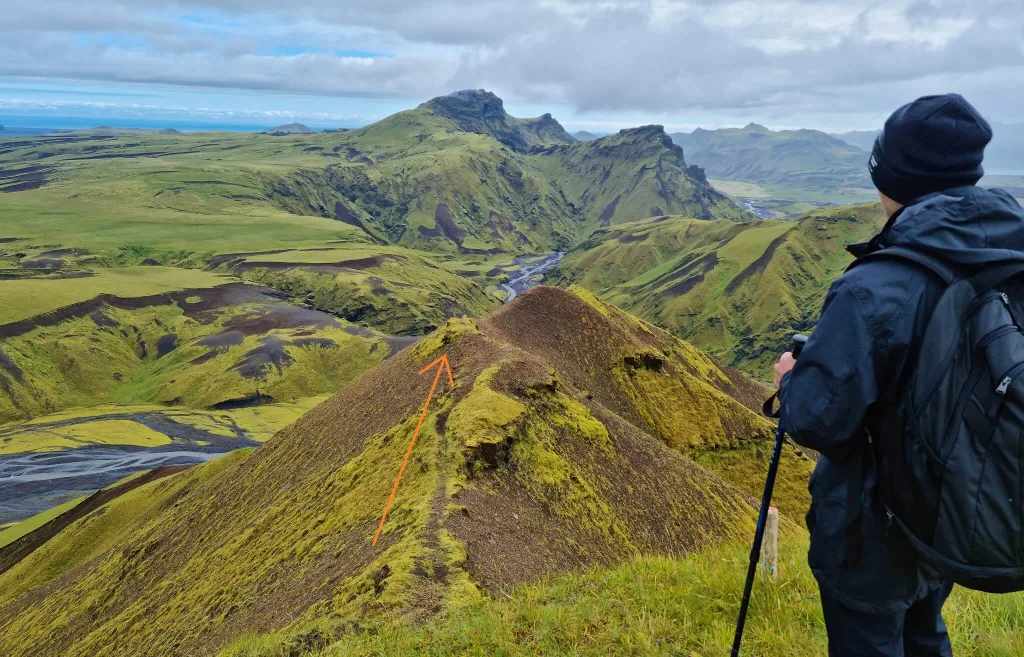
Technically, we haven’t done the “entire“ yellow trail, because we made a shortcut via the purple trail, and the yellow trail continues further toward the southeast. Nevertheless, we made this decision on purpose, because we wanted to save some time for a hike towards Huldujökull. Moreover, the southernmost part of the yellow trail (which we skipped) is said to be the least interesting one.
A pretty steep, but short ascent via the purple trail led us up towards an intersection with a yellow trail, where we continued left on the yellow trail. After finishing the ascent, you will be rewarded with amazingly beautiful 360 degrees views. Only 15 minutes into the hike and you may already admire the stunning beauty of Þakgil from this viewpoint. Our car already looked so tiny in the distance after the climb.
Austurafréttur trail
I’ve read on some blogs that the yellow trail is unmarked. This is not true at all. The yellow trail is well-marked. After an intersection of a purple and a yellow trail, the yellow trail then continues to the north as a gravel path. This part of the trail is slightly boring but doesn’t last very long. No worries, many nice views are yet to come.
View after the first ascent towards Austurafréttur range – the yellow hiking trail
You will soon reach a point where you have to perform one additional steep ascent. This ascent leads via the old moss field and can be very tricky if it’s wet because it can become pretty slippery. We had perfect weather with blue skies, therefore also no problems with the ascent at all, just burning some calories. After this last ascent, the trail mostly continues as a gravel path along the eastern edge of the pretty wide Austurafréttur ridge.
Another picturesque viewpoint will soon pop up on your right – a view over a gigantic Kötlujökull glacier. This viewpoint may serve as one of the great picnic spots as well. The yellow trail then continues further north along the edge of the ridge and several little waterfalls and canyons can be observed in the distance, right next to the Kötlujökull glacier.
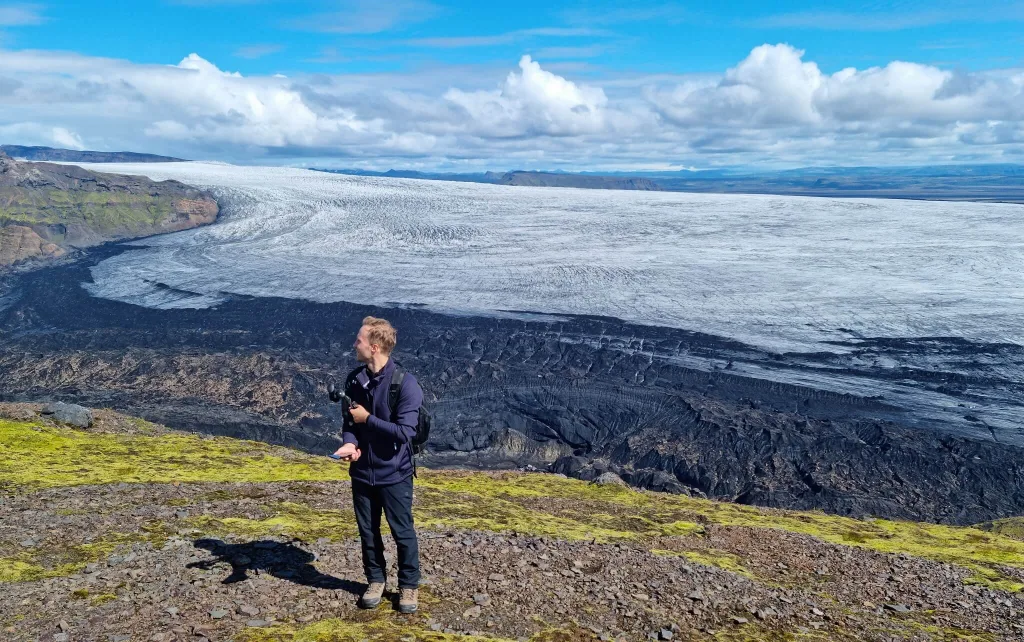
Views over the Kotlujökull glacier from the yellow Austurafréttur range trail
You will then reach the point where the yellow trail (and marks) start turning left and lead to the dirt tracks probably used by jeeps or ATVs/quad bikes. This is where the marked yellow trail connects to the dirt road and continues back west to the intersection with the red trail. On top of the yellow trail to the left, however, you have the option to continue further north towards Huldujökull glacier. This is exactly what we’ve done and what I highly recommend on a nice day!
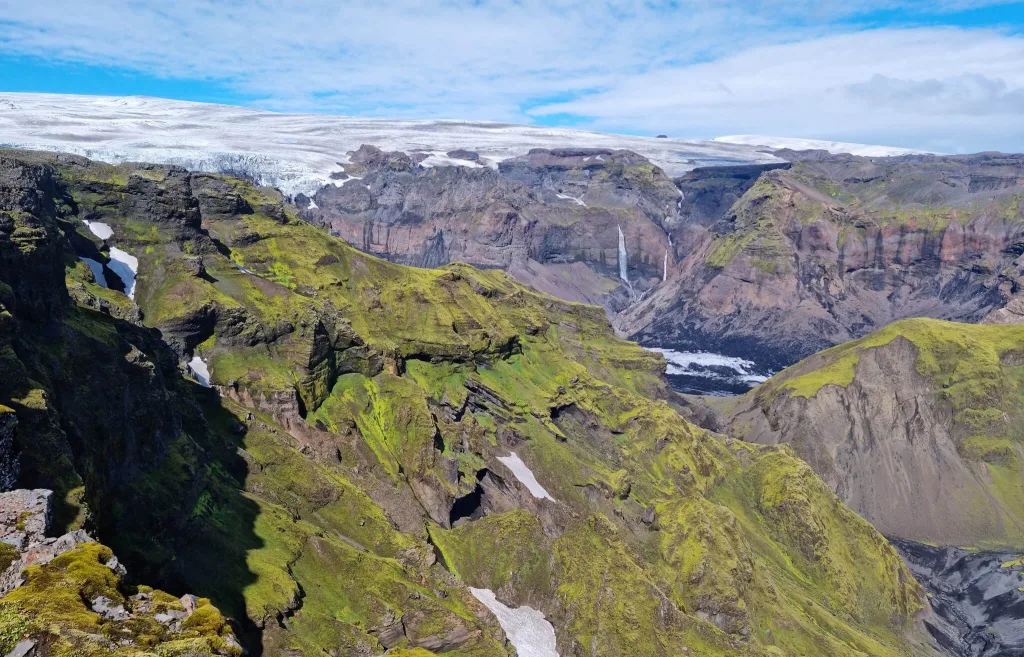
Hike to Huldujökull glacier
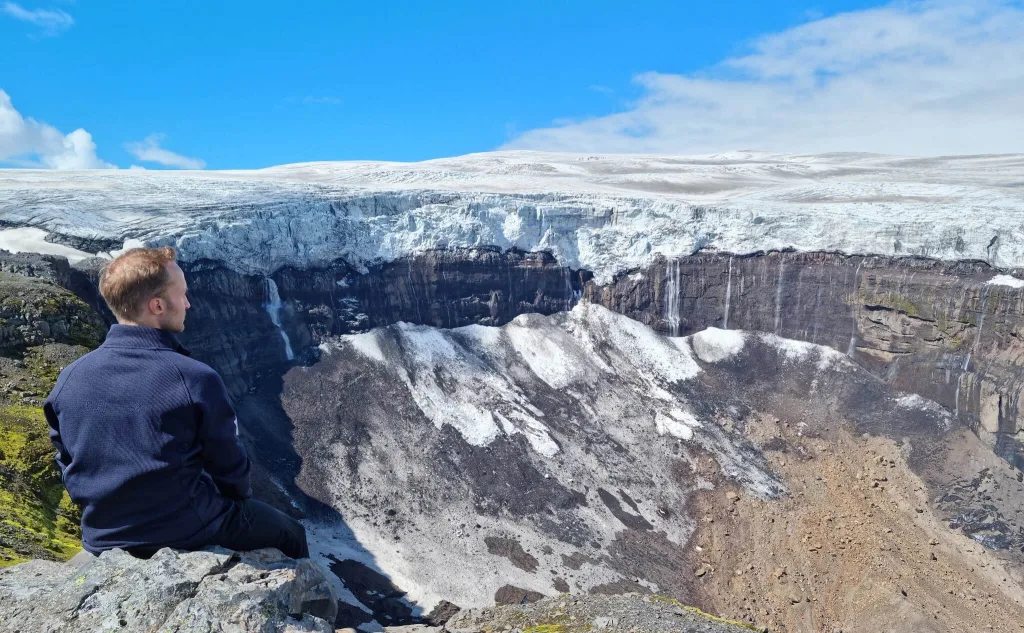
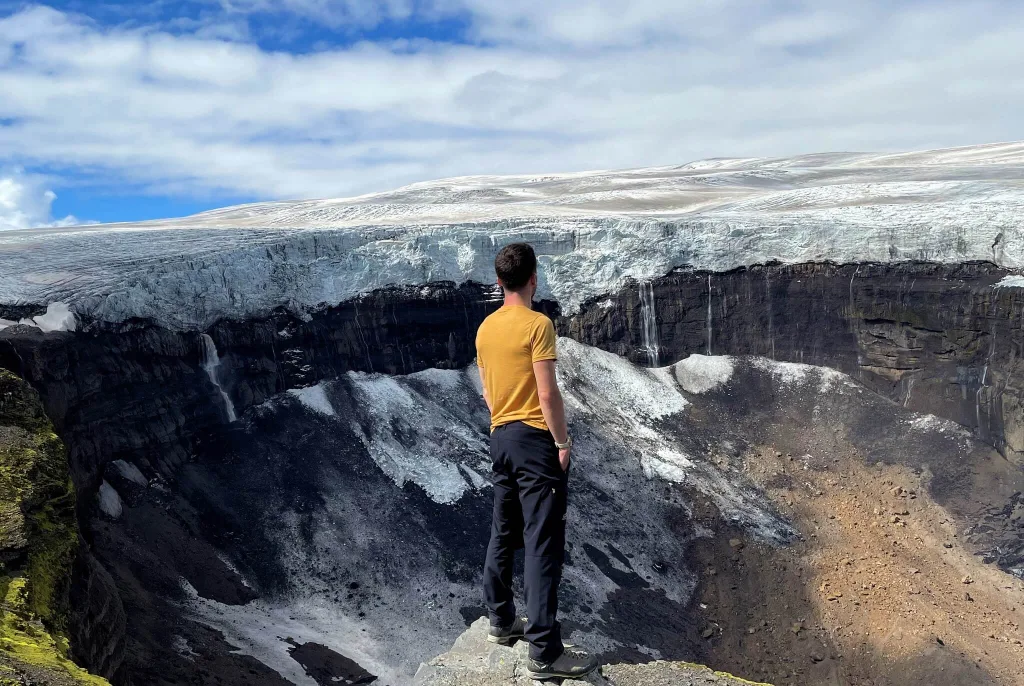
After hiking the eastern part of the yellow trail, you will reach an intersection of yellow marks (continuing to the left) and white marks (continuing straight ahead in the northern direction). We followed the white marks and made a detour away from the yellow trail towards the melting Huldujökull glacier (which our friend Dace kindly pointed out to us, thank you!). An ideal time to hike this trail is summer – because this is when the glacier melting may actually be observed and witnessed in real time!
Amazing views at the melting Huldujökull glacier in Þakgil
White Trail
You won’t find a white hiking trail to Huldujökull on a classical hiking map, only on a local Icelandic map. It leads via a pretty dull stony/gravel path on the eastern edge of this Thakgil ridge. However, the trail itself is not your main aim here. Instead, you aim for reaching the Huldujökull Glacier, which will slowly start to reveal itself in front of you (on a nice day with good visibility). Hiking the white/unmarked trail to the glacier and back took us roughly 2.5 hours including a lunch break and many pauses for photos.
Scarce white marks on the white “bonus” trail leading to amazing Huldujökull melting glacier in Þakgil
If I remember correctly, at some point even white marks disappeared. Nevertheless, the orientation is not that hard, because you more or less hike pretty close to the eastern edge of the wide ridge all the time. After the marks had disappeared, we simply followed the edge until the edge basically ended. This included a few little ascents and descents on stony terrain. Although being unmarked, a walk like this is perfectly fine, unless you don’t damage anything “alive” (like moss, please don’t step on any!).
Huldujökull Glacier Views
There are many different viewpoints of Huldujökull, just have in mind where it’s located and you can definitely get there. I don’t recommend going in foggy or (strongly) rainy weather though. Not only you will not see a thing but you may also get lost.
Final, unmarked part of the trail leading to the melting Huldujökull glacier
After reaching the northern edge of this Thakgil ridge a monumental view over almost the entire Huldujökull Glacier opened directly in front of us. And not only that! We had a chance to witness a bit sad but amazingly beautiful phenomenon of a melting glacier! Right in front of us. We were even lucky enough to observe and hear a massive fall of part of the glacier into the ravine below, due to thawing. I’ve caught one of these falls on camera (see the video below, to be added later). Power of nature as a live broadcast.
We made a little picnic with views over a thawing glacier and soaked up the sunrays on this heavenly beautiful day. We then admired the glacier from many viewpoints, hiking a bit to the west. Subsequently, we hiked back via an unmarked trail to reach the yellow, marked one. We’ve first seen the yellow marks and then reached the intersection of a red and a yellow trail.
The end of the partially unmarked white hiking trail in Þakgil
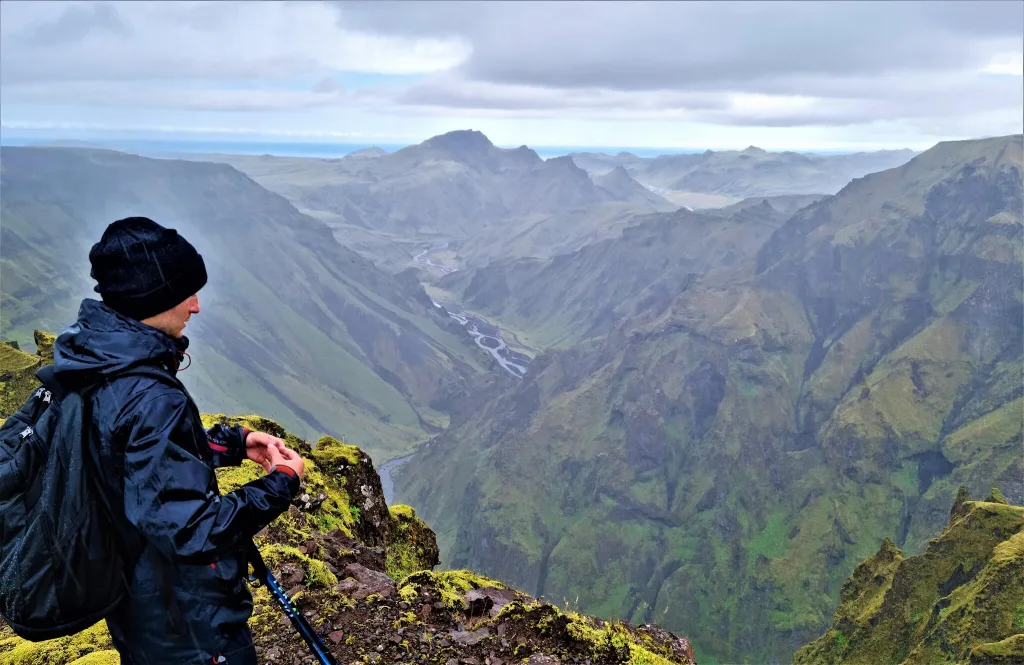
Hiking the Red trail to Mælifell
The red trail in Thakgil is full of lush green valleys and peaks, amazing canyons, and green river valley views. We totally recommend it, just please go only if you are a more experienced hiker. There are 2-3 pretty exposed and steep parts towards the southern part of the trail. It took us 4-5 hours one way to complete the western part of the red trail, including a 1-hour search for the correct river crossing route.
Beginning of the red hiking trail, near the top, near the intersection with the yellow trail. Mælifell on the right.
Originally, we had planned on doing only the yellow trail, i.e. we had wanted to descend back via the common yellow/red trail (western part of the yellow trail / eastern part of the red trail). However, once we reached the intersection of a yellow and a red trail, we realized that this “common yellow and red trail” is simply a rough track for jeeps/ATVs. And, we rather prefer driving the tracks than hiking on them. That being said, we rather wanted to descend back via a pure hiking trail – which is exactly what a western part of the red trail is.
At that point I texted our friend Dace, asking whether the common red/yellow trail is worth the hike. She responded that this was the only option, because a map at the campsite showed some “X” marks on the red trail, indicating that the red trail may have some obstacles or impassable spots. Therefore, I decided to call the campsite directly and ask about the red trail. After a few minutes of trying hard to explain that we want to ask about the conditions of the red trail, I didn’t get any answer. The other side didn’t understand what we were asking about.
Hiking near the top of the red Mælifell trail in Þakgil
Finally, we made a decision to try the red trail and in case we reach any impassable point, we still had enough time to turn back and hike down via the easier trail/track. Unfortunately, as is often the case in Iceland, the weather turned from clear blue skies to quite annoying rain. Still not strong enough to change our plans, though.
95% visitors visit only 5% of places. How to avoid tourists in Iceland?
Ascent to Mælifell
The northernmost part of the red trail (where we began our hike) leads to a mountain called Mælifell. Beware, this is not the same Maelifell as this one. Probably the most famous “Maelifell” is instead located next to the road F210, Fjallabaksleið Syðri. Did you know that there are actually more than 10 Mælifells in Iceland? Just to make it easier for a foreign visitor 🙂 Nevertheless. This Maelifell was nice too and more so were the views from the top of it!
This part of the red trail to Mælifell in Þakgil is quite easy and even in normal rain, it wasn’t complicated to hike it. Contrary to the gravel/glacier scenery of the yellow trail, the surroundings of the red trail are much much greener. The final ascent to Mælifell is a bit steeper but fairly short.
Foggy and rainy view from the peak of Mælifell on the red trail in Þakgil
After reaching the peak, you will be rewarded with some of the best views over the entire Thakgil! I definitely recommend this detour (even if you then turn back to the yellow route) on a nice day! Unfortunately, this was the point when it rained the most during our trip and also Mrs. Fog came to visit us, so the view was a bit blurred but amazing anyway.
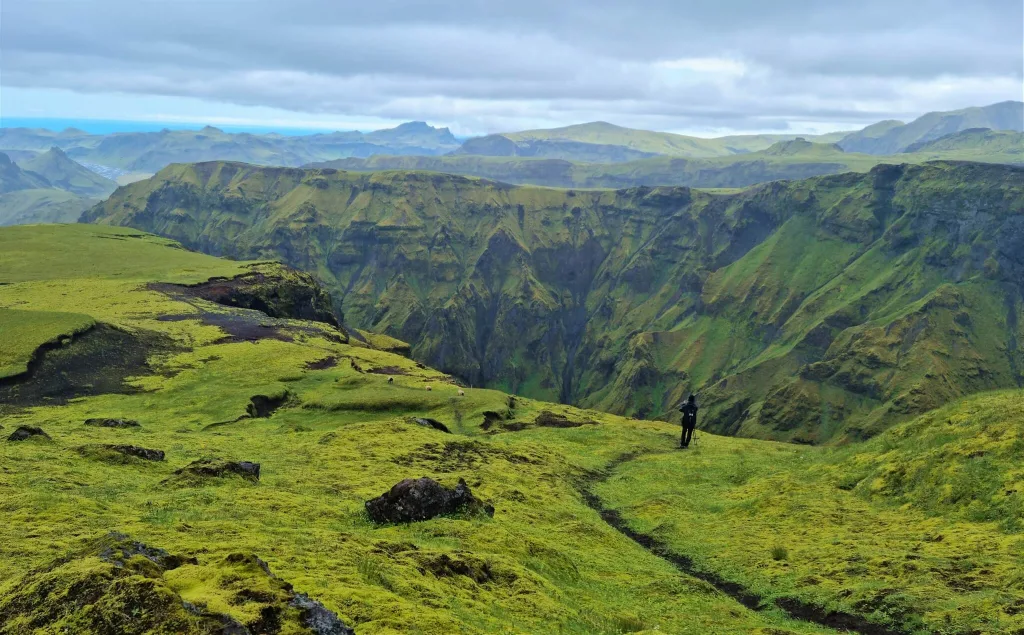
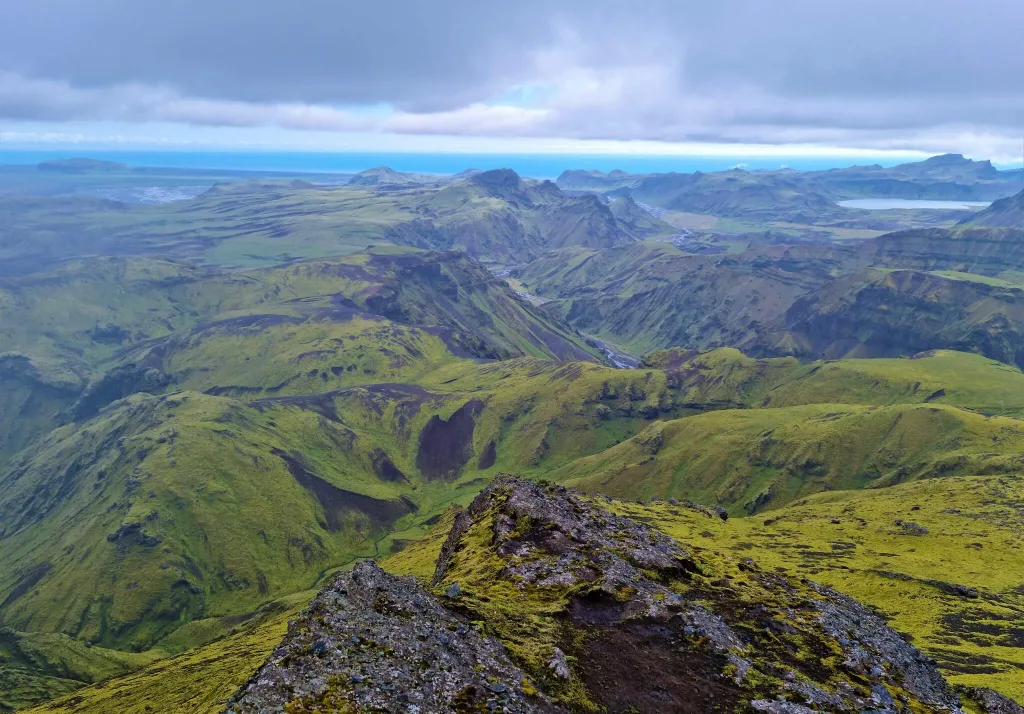
Green canyons and ravines
What follows next during the middle part of the red trail is a pretty easy walk on the western edge of a Thakgil ridge. Stunning views over huge canyons on your right will be your company all along this part of the red trail. There are several scenic photo spots worth stopping at. One of these spots is a view over a gigantic green canyon, multiple times more spectacular compared to, for example, a very touristy Fjaðrárgljúfur canyon. And guess what, you will have it all for yourself! The chances that you will meet someone here are close to zero. We met exactly ZERO people on this trail! Besides that, a lot of friendly trail-following sheep will be your guides.
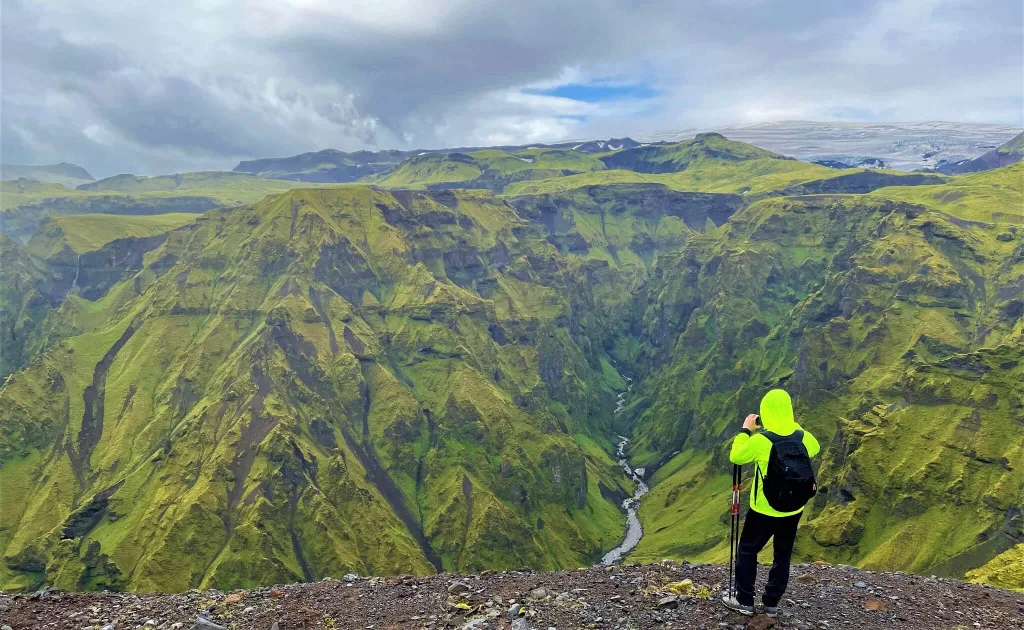
Me in front of the huge canyon on the red trail in Thakgil (better then Fjadrargljufur!)
Slippery ridges and descent to a hut
The trickiest part of the red trail is located in the southwestern part of the trail, roughly more than halfway into the hike (halfway of the western part of the red trail). It’s near a spot marked on maps as “Barð”. This tricky part is a pretty exposed ridge followed by a steep and slippery descent. By an exposed ridge I mean a narrow hiking trail with steep falls both to your left and to your right. Definitely not for anyone with a fear of heights. This is where the hiking poles were priceless to maintain our balance. I don’t want to even imagine doing this in a strong wind, or strong rain. Stay away from this part in unfavorable weather!
After a short walk via the exposed ridge, a steep, slippery, and again exposed ridge descent continues for about 50 meters. This was the worst part of the hike for me because personally I just hate terrain where I don’t have any firm ground to walk on available. I have to admit I had to step inch by inch because I felt like slipping and falling with each step. Thus, these 50 meters took me about 15 minutes to finish. My cousin finished this quite quickly, though, so maybe it’s just my problem with these steep and slippery trails ^^.
The most exposed part of the red hiking trail in Þakgil. It’s much scarier in reality.
Nevertheless, despite this part of the red trail being dangerous, it is amazingly beautiful too! View over the entire valley and all of the river arms was spectacular and we totally enjoyed it. The descent soon turned into a much safer one, and ended all the way down in the river valley, right next to an empty mountain hut. There’s also a track for jeeps leading to the hut, including several interesting (and not that small) river crossings. The track was easy to be observed from above when descending.
River crossings
There’s a big and fast-flowing river right next to the hut. This is also where the well-trodden path ends. We were able to spot the next red trail mark far in the distance on the other side of the river. Well, this meant, we had to cross the river. But the question was – where? Right next to the hut, the crossing simply looked too wide and the river too fast-flowing to be safe. Moreover, we left our water shoes in the car, so we aimed for crossing without getting our feet wet. And this finally turned out to be an unachievable task.

The steepest and most slippery ridge a) from above, b) from below. Much worse in reality than in the picture.
Long story short, we first hiked along the eastern bank of the river only to realize there was no way to continue. Firstly, we climbed a little hill on the left (where we saw human steps) and continued, but the river looked nothing like anything you wanted to cross. A fast stream and very wide even at this spot. We tried for about an hour to find a spot where to cross but unsuccessfully. Turning back was not an option at this point, we were already about half an hour of walking away from our car.
At this point, I finally remembered reading about the red trail before our trip. I forgot that one of the route descriptions mentioned “you may have to cross a river; several times”. Well, the hell they were right. My cousin resigned a bit at that time, rather wanting to hike his own way via huge hills to our right. This wasn’t an option for me because it was both dangerous and illegal, creating your new own route in an unknown place. Luckily, we met a local glacier guide hiking this trail for the first time too, struggling to find a spot to continue and ford the rivers as well.

The best spot where to cross the first river arm on the red Maelifell trail. Don’t have pics of the other 2 fords :-/ (click to enlarge)
After a little brainstorming, the glacier guide approved my idea, that we should cross the river where cars cross. My reasoning was that Icelanders probably know why they cross the river there with their cars. The spot where cars cross should (generally) be shallow enough also for people to cross. Some of us took our shoes off, some crossed in their shoes. We held each other’s arms and crossed slightly upstream – exactly according to river wading guidelines. A river reached our knees at the worst point and was flowing pretty fast, but we made it without major problems to the other bank.
We followed the car tracks afterward, which, however, soon disappeared. And the river appeared again. Another river crossing. At that point, I remembered again what the description said: “you may have to cross a river; several times”. I see now. Several times. To make it shorter – we crossed again, the same technique, only this time the current was much stronger. At one point I felt like the current might drag me down, but this is where holding each other’s arms totally helped and we crossed successfully.
There was one last crossing (the smallest one) before we reached road 214 to Thakgil. After 9 hours of hiking, we happily got into our cars again, thanking god for all – a beautiful day, views, making it safely back, and successfully finishing all these adventures! What a day!
Enjoying out-of-this-world views over Huldujökull Glacier in Þakgil
Tips for hiking in Thakgil
- Pick a day with good weather. I know it’s not that easy, but at least try. We wrote a handy guide on How to find nice weather in Iceland. Nice weather, at minimum, means no strong wind and no strong rain. Some trails are pretty dangerous to hike in bad weather. Secondly, I more than just recommend going in clear weather, i.e. no fog or very little fog. You may have good weather but with poor visibility, all the spectacular views may be gone. But fog is still a better alternative compared to rain and wind, which, when being strong, are dangerous.
- Wear proper clothes and gear. Good hiking shoes, layers, and one waterproof (not water-repellent) layer for both trousers and jacket are a must. I highly advise taking hiking poles as well, they are amazing support on all kinds of slippery terrain. Take a GPS with trail coordinates at least in your phone as well. If you are a novice hiker, you better rent a Location Device or a satellite phone.
- Don’t go alone and bring water shoes and a little towel, if you plan to hike a red trail. There will be river crossings. Cross them where cars cross and slightly upstream, holding arms of each other as support.
- Try both the yellow and the red trails, they are amazing! Of course, only if you already have an experience with all-day hikes. You can hike the yellow and the red trail both in one day or as separate day hikes.
- Don’t be shy to change your plans and/or turn back if the weather worsens or if you get lost. You don’t want to get injured or die in here.
YOU MAY ALSO LIKE:
- How to visit the HIGHLANDS OF ICELAND
- 25 HIDDEN GEMS in Iceland Nobody Writes About
- Ultimate Guide to THÓRSMÖRK
- HORNSTRANDIR: A Remote Hiking Paradise
- Best Places and Hikes in KERLINGARFJÖLL
- TOP 25 PLACES IN THE HIGHLANDS
- LANDMANNALAUGAR Hiking Guide
- LAKI CRATERS: All You Need To Know
- WESTMAN ISLANDS – Top Places and Hiking Trails
![]() ask questions or get inspired in our community
ask questions or get inspired in our community


Hi! Firstly thank you for the very thorough guide of Thakgil.
I will be going to Iceland this coming June 2023 with my mother and am wondering if it will be possible to do just the eastern part of the Yellow trail with the Purple trail shortcut.
I am reasonably confident in my athletic ability even though I don’t hike very much, but my mother is 60 and isn’t really in the best physical shape. We’ve done longer walks together but not so much hiking with large ascents and descents. Given that, do you think just doing an out and back on the eastern part of the Yellow trail (maybe an hour each way) is doable for us, or should we stick to the shorter ravine walk?
Thanks again!
Hi Claudia and thank you!
1) When are you coming in June? At the beginning of June, the trails may not yet be accessible (but they can be, depending on the conditions of the trails after winter). End of June they should be OK.
2) The eastern part of the yellow trail is much steeper (also the purple shortcut is) compared to the western part. I don’t think someone not in a good shape will be keen on doing these. You may try the western part (this is the common red/yellow trail), it’s definitely easier, just the views are not that stunning (but still beautiful).
Thank you for the response!
Our trip is from the 9th to the 17th, but the day that we’re hoping to do Thakgil is the 14th (weather permitting of course). Guess I’ll just have to keep an eye out on the trail conditions and weather.
Hi Igor, do you think the jeeproad is drivable by Toyota Hilux (now)?
We want to shorten the way to Huldujokul.
Hi it’s a very bad quality track, I better wouldn’t do it.
Hi!
If you don’t have much time, which route and which direction/which part would you choose if you only had 1 hour to walk one way? Which route is the most beautiful in the first hour?
I think it looks like you can either go red route, red-yellow route, or yellow route if you have an hour one way?
Do you think it will be possible to go there in the middle of October?
Are there any shorter routes as well?
Thanks for a great guide!
Hi Vickie, I suggest you take a northern part of the Purple trail – this is most likely the only trail where you can get some nice views within 1 hour. The rest of them require about 2+hours for breathtaking views.
Thakgil is hiking in the highlands and highlands get covered by mud, rain, wind or snow (or all of them) typically beginning of October. So the chances for mid-October are low. Only in case of exceptionally dry and mild weather.
Hi,
thank you for the thorough description of the hikes, this is super helpful!
You’re welcome and thank you!
All the routes are open? we are planning to go there on Sunday and I understand thhe red one is closed, is that right?
Please always check this in real time with https://www.thakgil.is/ and https://safetravel.is/ by phone/email. We are unable to give real time trail/road conditions.
Hi Igor,
Beautiful post and beautiful blog…
I’m going to Iceland this autumn for the first time with my family (my wife Cristina and Laura, 12 and Emily, 7 years old). We’ll be in Vik September 1st.
I would love to have a hike in Thakgil, but the complete loop (red/yellow) is not feasible. We’ll have sth. like 4/5 hours time (weather permitting); what do you suggest?
I was thinking about the purple trail + a bit of the yellow but starting from the parking at the end of the street turning right before arriving to the camping.
Do you think it would be nice and it’s worth it?
Thank you
Hi Pascal and thank you!
The purple Remundargil trail will definitely be worth it, it’s beautiful as well! Just be sure you do not do it in the rain; it can be slippery and dangerous, especially for your 7-year-old child. That being said, this is not an easy hike, so I already assume your children have some hiking experience. Otherwise I wouldn’t bring them on this trail, and rather choose a Ravine walk or the common red/yellow trail.
Have a beautiful trip!
Hi Igor
I’m a big fan of yours. Thanks for this article, I’m there in August and hope to do exactly the trail you did, as long as I can find someone to go with to be able to cross the rivers safely. If not then I won’t come down that way, but will definitely go to see the glacier. I’ve saved your gpx on Wikiloc.
I’m doing the Laugavegur and Fimmvörduháls beforehand, and am so much looking forward to this, as well as more at Kerlingarfjoll!
Thanks for all the information, which I appreciate immensely!
Hi Liz and thank you so much! Your kind words mean a lot to us! Thanks to people like you we keep going forward with what we do <3
Hope you will have a wonderful trip! Enjoy!
Hi Igor, thank you so much for your detailed guide. I’ve been doing a lot of reading on your website to prepare my trip.
We are experience hikers looking to do the full Austurafréttur + Maelifell + Huldujökull loop (yellow + red +white trail).
Would you recommend going clockwise or counter-clockwise ? I know you did counter-clockwise. Wich one would offer the best views ?
Thanks
We prefer counter-clockwise, because this way you can enjoy the amazing views from Maelifell going down the red trail. However the direction you choose is not so important. The weather is! Pick a clear day, because in fog you won’t see a thing! 🙂
Hello
My name is Avishai and I will visit Iceland on Aug 2024 with my son for his 18 birthday.
First, let me say that the web site is GREAT!!!
1. Is all trails well marked?, I want to do the yellow and red Thakgil Yellow+Red trail (+Huldujokull glacier).
Best Regards
Avishai
Hi Avishai and thank you! Yes, the trails are well marked, except the Huldujokull white trail detour. Here we had a hard time finding the marks but the navigation isn’t that hard, you mostly hike along the edge of the canyon through rocks and you have to avoid moss because it’s delicate.
Hi
Thanks for your help
I want to do the yellow east as you recommended so this is great
Is there a map that we can buy or a gpx file of the yellow and red trails
It would be more safe to walk with them
Best Regards
Avishai
Hi Avishai, sure the .gpx file link is in our article above, I can link it here too. Here is our gpx file.
https://www.reddit.com/r/itookapicture/comments/q23ovp/itap_of_a_nice_waterfall_in_pakgil_iceland/
Igor,
I have seen photos of this waterfall, but there is no mention of where in þakgil it is. Did you see it on any of your hikes? My guess is the purple trail.
Haven’t seen it on red/yellow, so my guess is purple too 🙂
Hi Igor,
Thank you so much for all the time and effort you put in this website (and Reddit). It’s been extremely helpful.
Do you know how long are the yellow trail and the purple trail separately? I don’t think I have the stamina for the Red + Yellow loop. Maybe the eastern yellow + white, but I don’t know how long they are.
Thank you!
Hi Carolina and thank you! If you like what we do please leave us a testimonial / review on our Google profile and our Facebook Page, it would help us a lot!
The yellow+white trail is 5miles one way, see our hiking trail here. The purple trail is around 8 miles. So these two combined together are definitely longer than yellow+red loop.
I suggest you start with yellow from the east and you can always come back if you feel tired by the combined red/yellow trail, it’s the easiest one and quickest one.
Hi Igor, have you measured total distance and elevation gain of the loop described by you?
Sure, see our trail here: https://www.wikiloc.com/hiking-trails/thakgil-yellowred-trail-109393549 it’s mentioned/linked also in this article 🙂
Well, I learned on this red trail what exposed ridge means. I can confirm that it is much worse than in the photo. The fact that you also don’t have any mobile signal in that part will add some adrenalin when traveling alone. I also did it in the same direction, so on top of it all I was already exhausted. But I have survived. I wish the same luck to others. I would recommend going to the top of Mælifell or even Barð, but then return by a longer way via the yellow trail rather than descent and then go through fords which are everchanging. On the way to Barð I saw arctic foxes in both colors.
Hi Petr, thank you for sharing your valuable experience! Much appreciated!
This article was the main reason I made Þakgil a priority on my first trip last week – didn’t disappoint, new #1 hike ever with both the best scenery I’ve ever seen on a hike AND the most variety. Some tips from my experience — the purple bit labeled “shortcut” on your map should never be done downhill, it’s way too dangerous. We parked at the base of it and started our hike uphill that way, counterclockwise up to the insane overlook on Kotlujökull and then cutting across to the equally insane Huldujökull view (and all of its lakes! Didn’t expect those). We then went back via the Jeep road, which was delightful the whole time but had 3 or 4 particularly amazing views – the special green cliffs, the crazy stuff uphill from the cliffs, and the hidden waterfall & canyon about 50 meters off the trail at the V-shaped sharp bend near the north end of that part of the road. Don’t miss that! It’s not marked and I assume most people never know it’s there and walk right by it, but the waterfall is massive and the canyon it goes off into is beautiful.
Hi Kevin, thank you very much for sharing your experience! Hope you had an amazing time in Iceland!!
Hello Igor,
I wanted to plan at least 1 day out of the usual touristic list of things to do in Iceland for my first trip next July and found your article. I would like to park at the campsite take the shortcut to start the yellow trail, do the white trail to the glacier and come back to the car by the commun red/orange trail. How much time do you estimate this trail in total ? 6h? My husband and I usually hike during our holidays so I guess we are good conditions. Thank you in advance for your help !
Hi Laura, yes, 5 to 7 hours, based on your pace and the number of stops 🙂
Hi Igor,
We are living in Canada and plan to visit Iceland during this September (1-15th). One hike on our top list is this one. We definitely won’t be able to use the red line for descending, but really would like to see that huge green canyon as you posted. I am wondering how long will take for this detour. Thanks.
Hi Hao, the green cnayon is about halfway into the red trail: https://www.wikiloc.com/hiking-trails/thakgil-yellowred-trail-109393549
hello Igor!
thanks a lot for this precious article 🙂
just want to ask to understand better, are there any exposed sections on the yellow trail + the ascent to Huldujökull viewpoint? (so withot taking the red trail).. thank you!
Hi Luca and thank you! Not really exposed, just steep and might be slippery/muddy (e.g. steeper slope walking on the moss) when it rains. If you’re used to hiking, you’ll be good.
P.S. If you like what we do please write us a short review on Google: https://g.page/r/CaJt1bHCTbF1EBM/review it would help us a lot!
Igore!
thanks for the tip.
One of the top 5 hikes and roadtrips I have done in my life. Road to the trailhead absolutely amazing.
Yellow trail (starting at purple shortcut), to the glacier overlook and then continuing on old jeep track. Old jeep track is definitely worth hiking, it goes thru beautiful/scenic area. Don’t be fooled into thinking you can take your 4×4 and drive up on this old jeep trail, it is very technical (sort of Moab black trails in Utah). I know I will be back one day to hike the red trail.
Hi Radmila, we’re really glad you had an amazing trip! And thank you very much for coming back here and sharing your experience! That’s super valuable, not everyone does this!
Hi Igor and thanks for sharing your experience. I wonder if it makes sense to start at the red/yellow trail (jeep track) to reach the Huldujökull viewpoint via the white trail and return the same way (jeep track) to the camp. Would it be an easy hike and how long do you think this hike would take? Thank you very much, I will be there next week:-) Best regards from Austria!
Hi Thomas, yes this is the easiest way to reach Huldujokull 🙂 It’s not “super easy” but it’s OK.