Here are the best Icelandic waterfalls, with a focus on those that are easily accessible. According to our humble opinion B-). Based on the overall experience, i.e.:
- Uniqueness
- View
- Atmosphere
- Accessibility
- Crowds
Contents
9. GULLFOSS
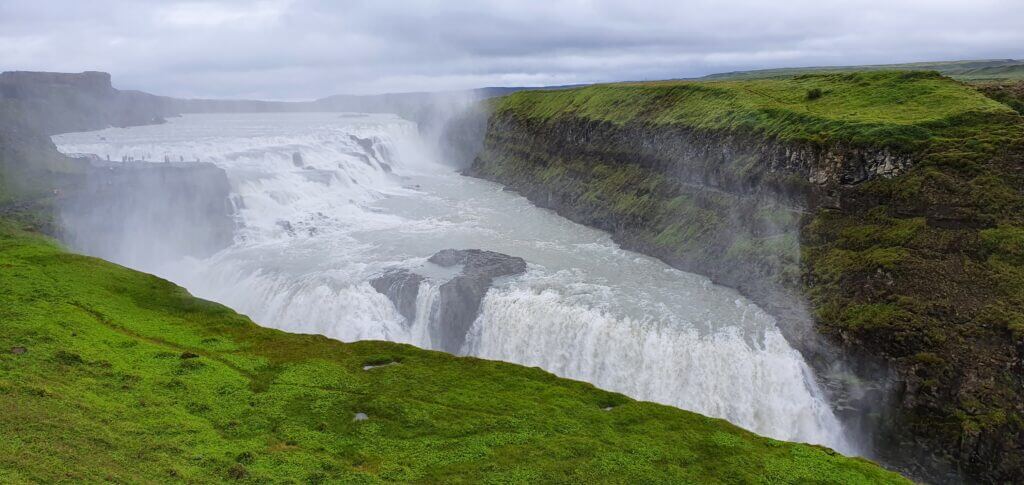
Gullfoss at the time of our visit, i.e. 7 pm
Summary
Distance from car park: 5 minutes
Time spent at: 10-20 minutes
Worth visiting even with bad weather: yes
Physical condition needed: little
Interesting index: 2 – great  (1-amazing, 2-great, 3-nice)
How to get to Gullfoss
In summer, Gullfoss is easily accessible by any 2wd car. Read about how we chose our car. Or just get free discounts for your Icelandic car rental.
Our experience with Gullfoss
The waterfall is very easily accessible, which probably explains why it’s usually so touristy. It’s also very picturesque. It wasn’t one of our favourites, though. We were already spoiled enough with all of the places we had seen already at that time. As someone on the Google maps had put it “3/5 Icelandic stars, that is 5/5 stars anywhere else”.

Tips about Gullfoss
Gullfoss is typically one of the most touristy places in Iceland. You’re going to notice it once you arrive at the gigantic car park next to the restaurant and a souvenir shop. However, we arrived in the evening during Covid-19 times. This meant an empty car park and a closed restaurant with a souvenir shop. And also – almost no tourists.
8. SELFOSS
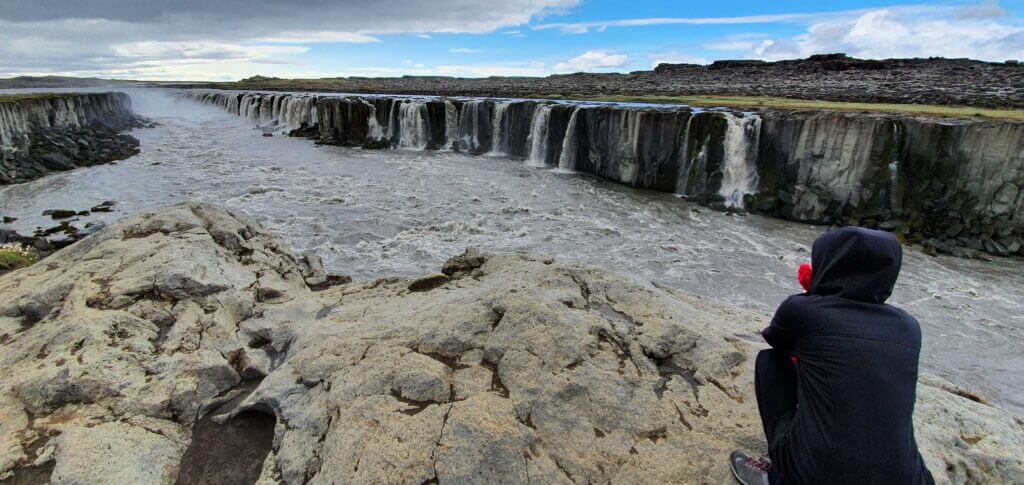
The east viewpoint of the Selfoss waterfall
Summary
Distance from car park: 20-30 minutes
Time spent at: 10-15 minutes
Worth visiting even with bad weather: yes
Physical condition needed: little / medium
Interesting index: 2 – great  (1-amazing, 2-great, 3-nice)
How to get to Selfoss
In summer, Selfoss is accessible by any 2wd car. I do recommend renting a cheap 4wd, though. Especially the eastern access is a rough gravel road. Read about how we chose our car. Or just get free discounts for your Icelandic car rental.
You may reach the waterfall from 2 different sides – the west and the east. Read below in our Tips section details about both of them.
Our experience with Selfoss
You have to reach Selfoss by walking, there’s no car park. Nevertheless, it’s a short walk of about 10-15 minutes from Dettifoss, again on either stony or normal path. After the waterfalls we’d already seen at that point, we were not that overwhelmed by Selfoss. It’s a nice series of many small waterfalls, so what’s interesting about it is its width. Needless to say, it’s still a very beautiful place to see.
Dettifoss with Selfoss were also the only places during the Covid-19 times where we met Asian tourists. I just wonder how many tourists are here usually, when there’s no Covid? Probably a lot of.

Tips about Selfoss
You have two choices about how to get to these well-known waterfalls. From the west or from the east. There are endless debates all over the internet about which side is the best. I will make it easier for you. Eastern side is the best. No discussion. Easy.
Ok, let’s be a bit more serious now. Yes, I think the eastern side is much better. Why?
- The road leading there is more adventurous
- View from the eastern side is much better
- Most likely you won’t get wet (much) on this side
- Car parks are smaller, but that should mean fewer tourists, right?
That’s why we went for the eastern side.
7. GODAFOSS
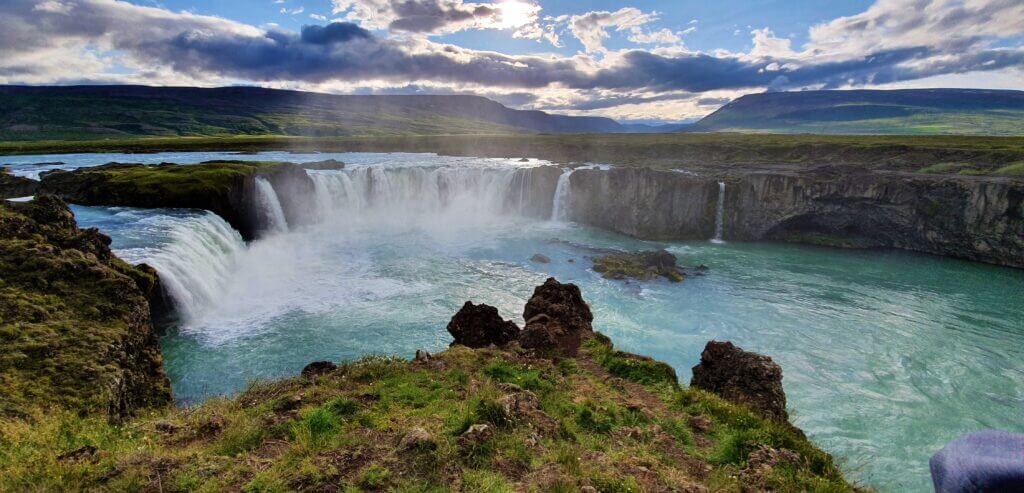
Godafoss before sunset
Summary
Distance from car park: 10 minutes
Time spent at: 10-20 minutes
Worth visiting even with bad weather: yes
Physical condition needed: little
Interesting index: 2 – great  (1-amazing, 2-great, 3-nice)
How to get to Goðafoss
In summer, Goðafoss is easily accessible by any 2wd car. Read about how we chose our car. Or just get free discounts for your Icelandic car rental.
Our experience with Goðafoss
Godafoss is a waterfall on a bucket list of everyone driving the entire ring road. You’ll most likely find it in every Icelandic guide. That means we’re talking about a touristy place again. Reaching Godafoss is easy. You may leave your car at the Fossholl parking lot. From there you take a 10 minutes’ walk either from the south or from the north of the waterfall. We took the southern route and I can recommend it, views from there were very nice.

Tips about Goðafoss
We were lucky again to have beautiful sunny weather and arrived at the waterfall around the sunset time. Path to the Godafoss is paved and literally, everyone can make this little walk. Goðafoss is very nice and definitely worth visiting, though not our favourite Icelandic waterfall.
6. HAIFOSS
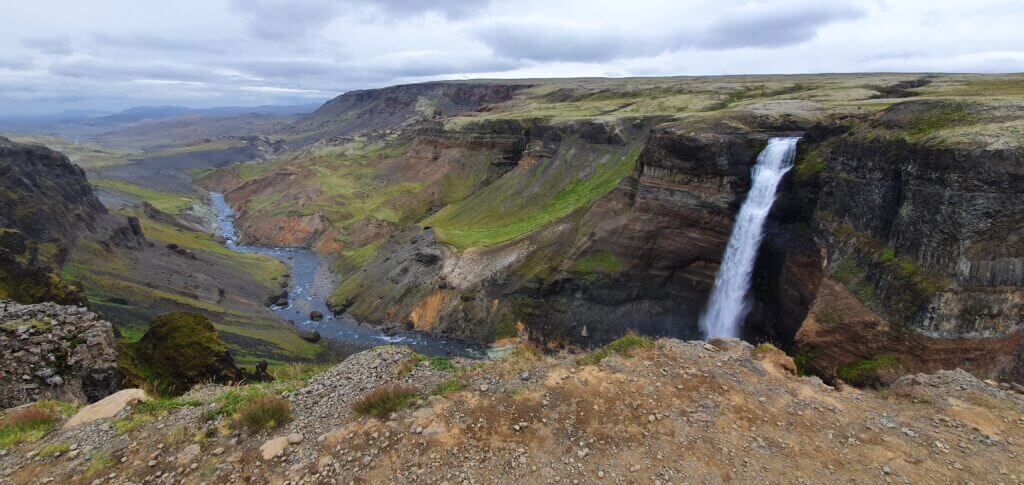
Just Haifoss
Summary
Distance from car park: 5 minutes
Time spent at: 15-30 minutes
Worth visiting even with bad weather: yes
Physical condition needed: little
Interesting index: 1 – amazing  (1-amazing, 2-great, 3-nice)
How to get to Haifoss
In summer, Haifoss is accessible by any 2wd car. I do recommend renting a cheap 4wd, though. The road 332 leading there is a rough gravel road, so you may save your car by using an SUV. Read about how we chose our car. Or just get free discounts for your Icelandic car rental.
Our experience with Haifoss
Once you reach the well-marked car park, Haifoss is just a few steps next to it, in a huge moss-covered green valley with many sheep around. Haifoss is supposed to be more touristy, due to its accessibility also by 2wd cars, and yes it was even during our visit. There were some 3-4 cars other than us parking at the car park, which seemed like a lot compared to our experience at that time.

There are several viewpoints of the waterfall, all next to each other so you will have enough space to admire the waterfall from and make some nice pictures. Despite the weather being cloudy already, we were able to make some nice pictures anyway.
Tips about Haifoss
The road leading to Haifoss (332) is the gravel road which you will be able to drive fast on with any 4wd car because it doesn’t have any potholes just a lot of gravel on it. That’s also why it’s not marked as an F-road. With a 2wd car, you would need to slow down, however.
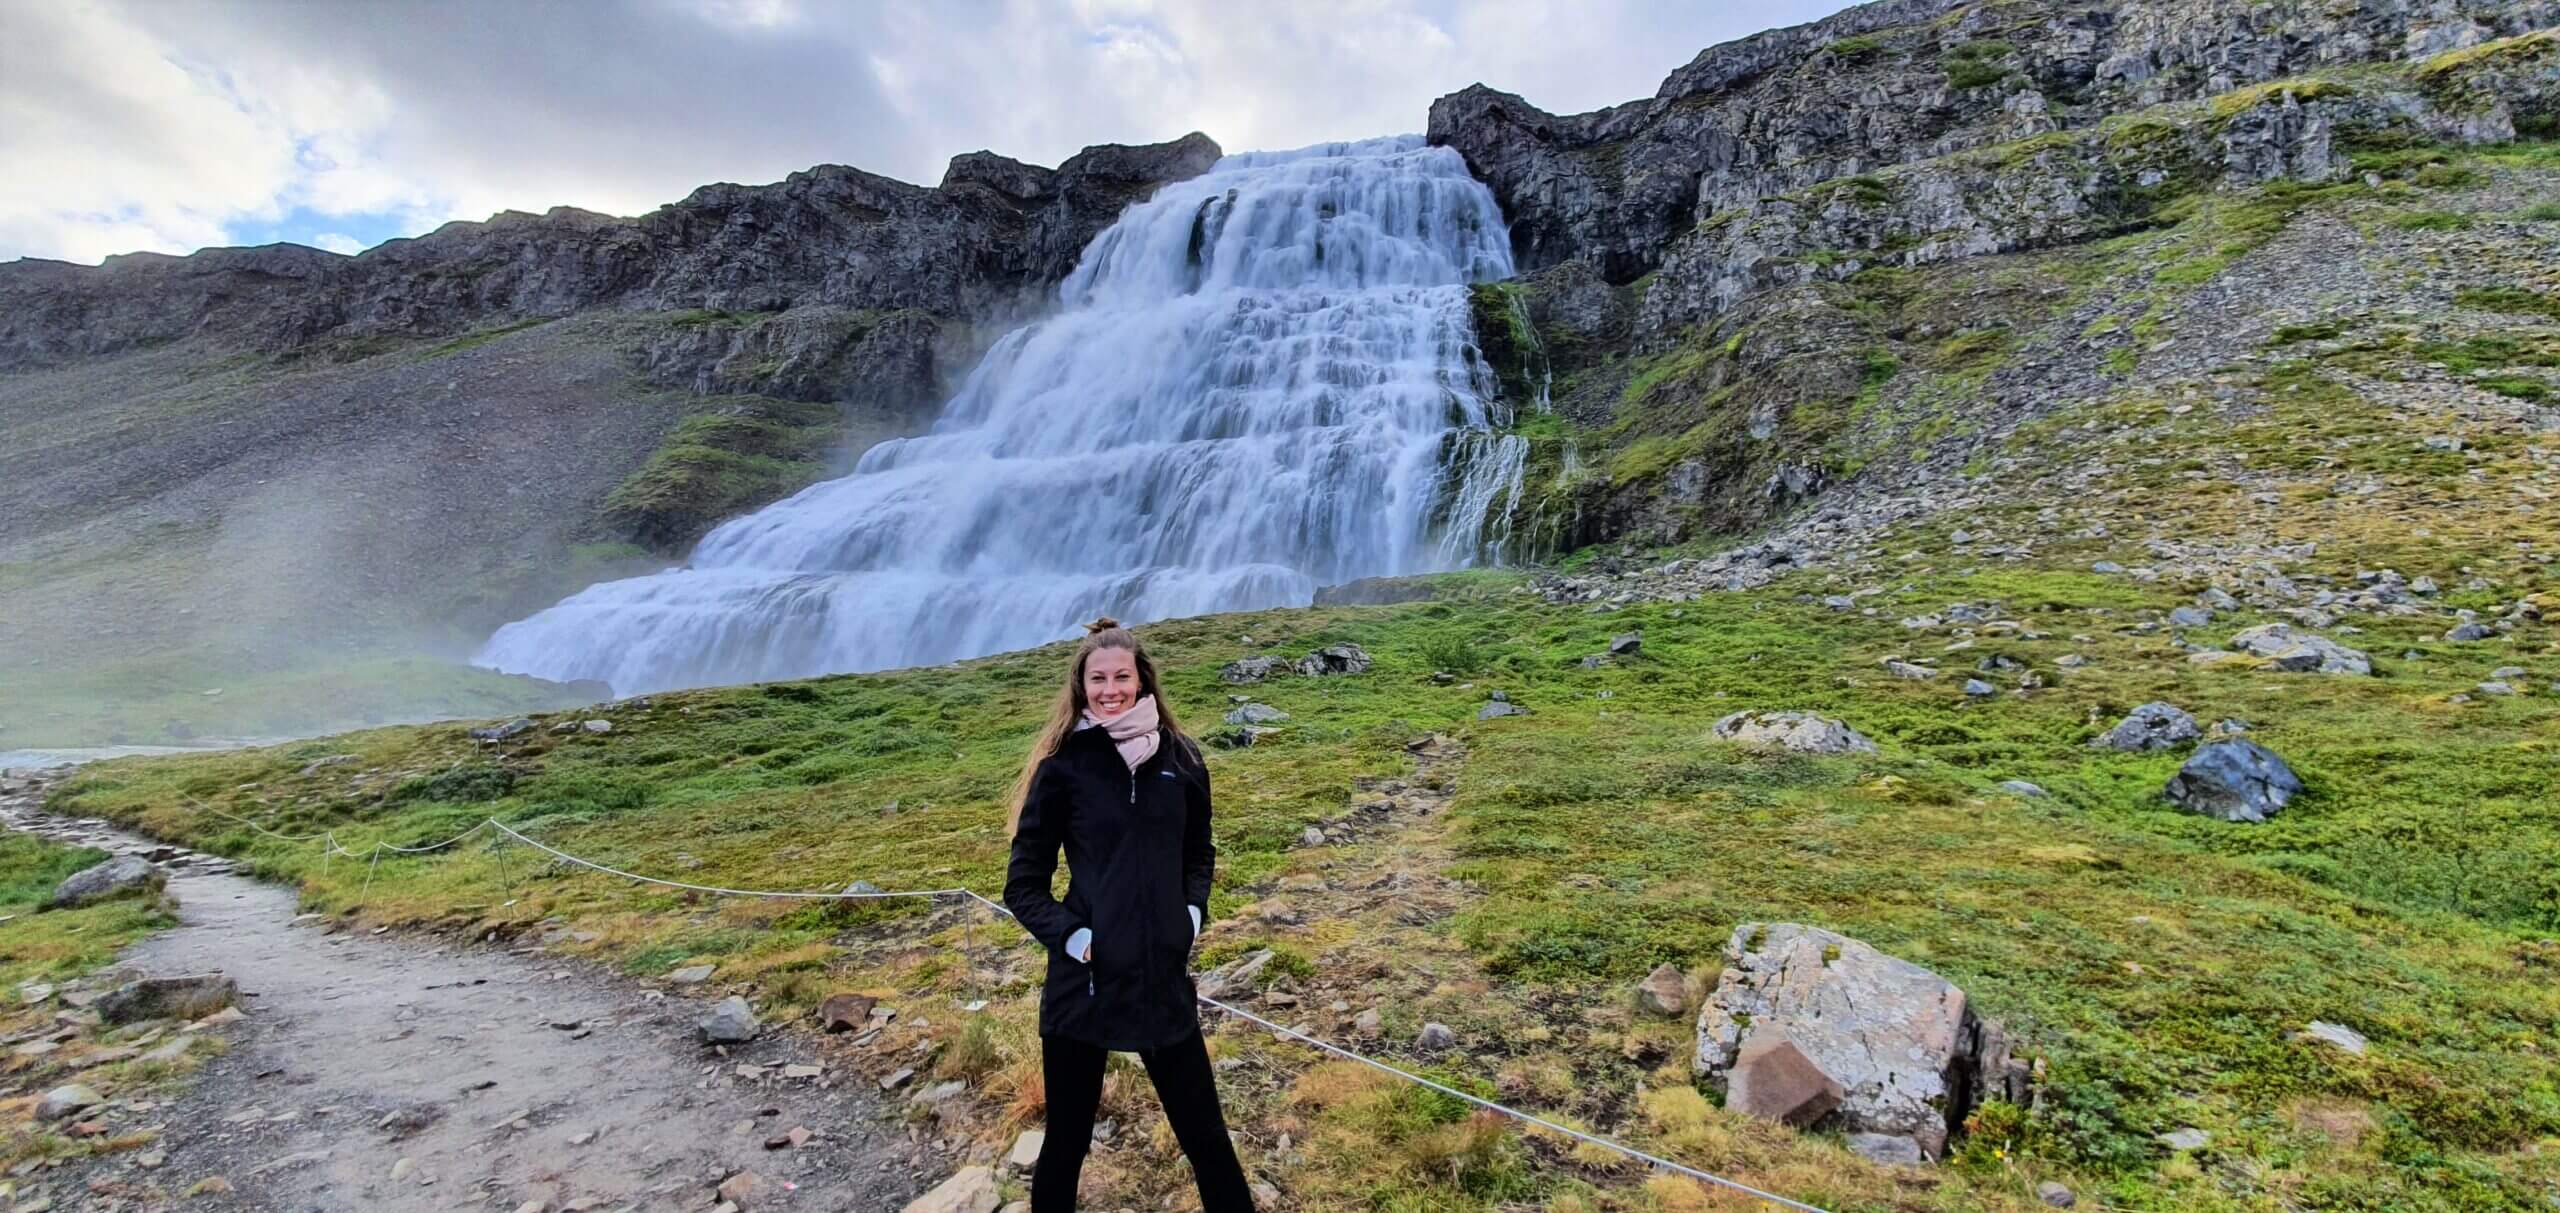
5. DYNJANDI

Dynjandi waterfall trail
Summary
Distance from car park: 10 minutes
Time spent at: 30-45 minutes
Worth visiting even with bad weather: yes
Physical condition needed: little to medium
Interesting index: 1 – amazing (1-amazing, 2-great, 3-nice)
How to get to Dynjandi
In summer, Dynjandi is accessible by any 2wd car. I do recommend renting a cheap 4wd, though. Westfjords’ roads near Dynjandi may get tough to drive in rough weather. Read about how we chose our car. Or just get free discounts for your Icelandic car rental.
Our experience with Dynjandi
Probably the most beautiful waterfall in Westfjords (and one of the best in Iceland as well) – that’s Dynjandi waterfall. The huge car park and the entire infrastructure around the waterfall suggest that Dynjandi waterfall is apparently a very touristy place during normal times. Not during Covid-19 times, though. When we reached the parking lot at 8 am, we were the only car parking there. Just us and the beautiful Dynjandi.

There are several smaller waterfalls below Dynjandi and you will meet them along your trail towards Dynjandi. The actual Dynjandi definitely belongs to the top Icelandic waterfalls we’ve seen. Its unique shape makes it more than just memorable.
Tips about Dynjandi
I had read before, that the hiking trail towards Dynjandi takes about 45 minutes to complete. That’s not true. It takes only some 10-15 minutes of light hiking to arrive at the base of the waterfall. Maybe there’s a trail continuing even further to the upper part of the waterfall (which takes 45 minutes to complete), I don’t remember any though.
4. SVARTIFOSS
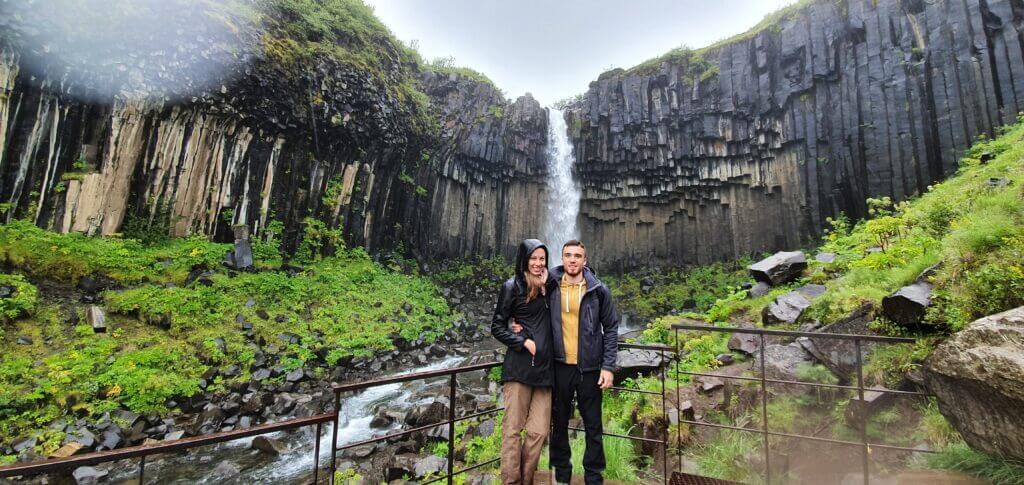
The closest viewpoint to Svartifoss after sky finally cleared a bit. Still, we are wet in the pic as you may see.
Summary
Distance from car park: 20-30 minutes one way
Time spent at: 15-30 minutes
Worth visiting even with bad weather: yes
Physical condition needed: little
Interesting index: 1 – amazing  (1-amazing, 2-great, 3-nice)
How to get to
In summer, Svartifoss is easily accessible by any 2wd car. Read about how we chose our car. Or just get free discounts for your Icelandic car rental.
Our experience with Svartifoss
This was a touristy day and we were aware of it, as we were visiting the most touristy part of an Iceland – the south. Svartifoss waterfall is famous mostly thanks to the Vikings series. Once we reached the car park of the Skaftafell national park, we realized what “touristy” actually means here. The car park and entire infrastructure around the entrance of the park were huge compared to all other sites we’d seen before. So we did park our car along 40 other cars and went for the Skaftafell trail towards Svartifoss.

The trail takes some 20-30 minutes to reach the Svartifoss waterfall and it’s a fairly easy one. Here is a map of the Skaftafell area. You’re going to probably meet a lot of fellow tourists, as we did, along the path. When we reached the Svartifoss, however, there were just 2-3 couples together with us and shortly thereafter we were there all by ourselves. The weather was so-so with cloudy sky and slight fog. Still, Svartifoss was really beautiful and worth seeing.
Tips about Svartifoss
There are many other hiking trails in the Skaftafell national park, so if you are into hiking you have several options to go for. Since Svartifoss is supposed to be the highlight of the entire area, we again didn’t go for any other trail and went just for Svartifoss. After seeing it and enjoying the views we turned back towards our car.
3. SKÓGAFOSS
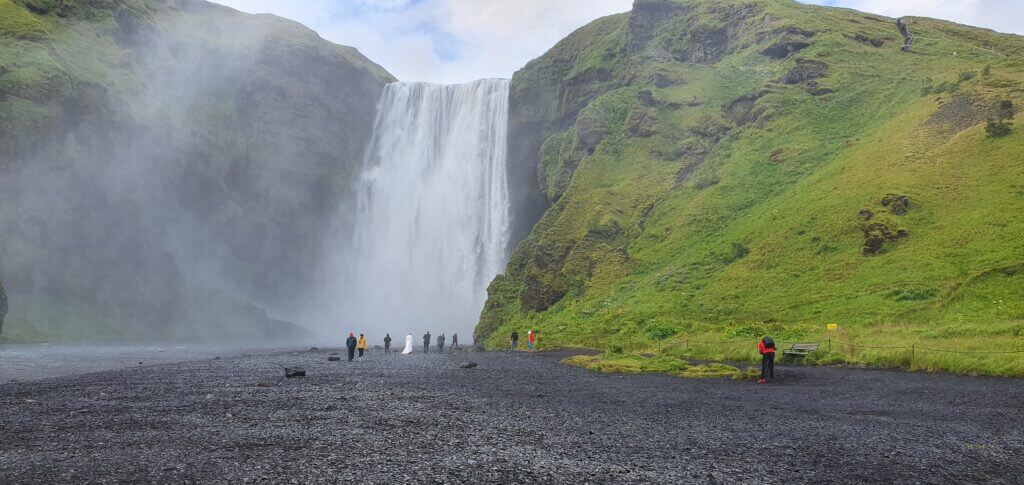
The bottom part of Skógafoss waterfall (and a wedding in the background ☺) at 8 pm
Summary
Distance from car park: 2 minutes (lower part), 7 minutes (upper part)
Time spent at: 30-60 minutes
Worth visiting even with bad weather: yes, probably
Physical condition needed: little
Interesting index: 1 – amazing  (1-amazing, 2-great, 3-nice)
How to get to Skógafoss
In summer, Skógafoss is easily accessible by any 2wd car. Read about how we chose our car. Or just get free discounts for your Icelandic car rental.
Our experience with Skógafoss
The entire area around Skógafoss is just incredibly pretty. There’s a campsite just next to the waterfall so if you have a chance to camp in here, definitely go for it! The next time we visit Iceland we would definitely camp in here. Waking up to the sound of bursting water and seeing the magnificent waterfall right after getting out of your tent must be an unforgettable experience.

With regards to the waterfall itself, you may walk literally into its bottom part. We were surprised that in most of the cases there were no barriers restraining you from going as close to the waterfall as you want. Which of course means, you have to take care of any danger for yourself.
Tips about Skógafoss
You may also climb a few stairs to get to the upper part of the waterfall, which we again definitely do recommend (especially in good weather) because you will be rewarded with a really nice view. Near the upper part, you will probably meet some sheep and you will see the path continuing more deeply into the national park. We didn’t go further as Skogafoss was supposed to be the highlight anyway.
2. DETTIFOSS
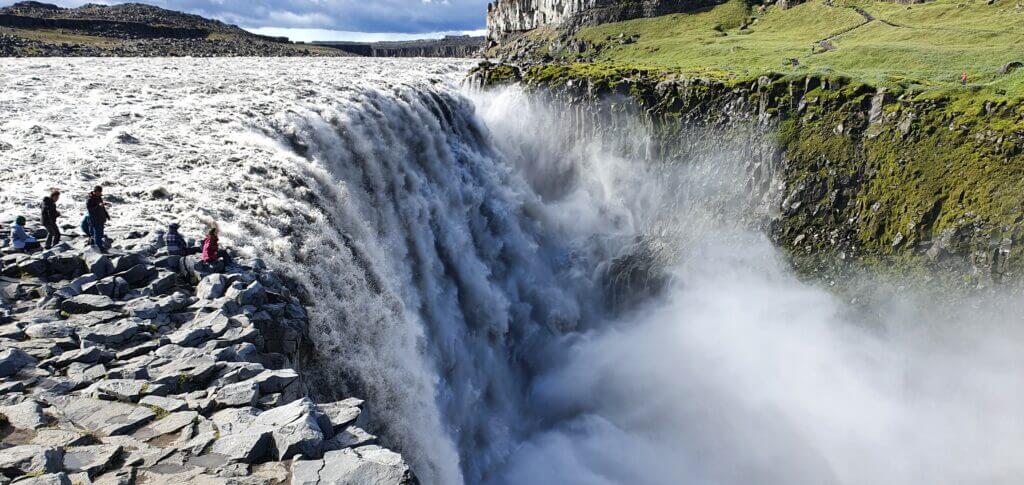
Observe tourists on our side (east) and the other side (west) of the Dettifoss
Summary
Distance from car park: 5-10 minutes
Time spent at: 10-15 minutes
Worth visiting even with bad weather: yes
Physical condition needed: little / medium
Interesting index: 1 – amazing  (1-amazing, 2-great, 3-nice)
How to get to Dettifoss
In summer, Dettifoss is accessible by any 2wd car. I do recommend renting a cheap 4wd, though. Especially the eastern access is a rough gravel road. Read about how we chose our car. Or just get free discounts for your Icelandic car rental.
You may reach the waterfall from 2 different sides – the west and the east. Read below in our Tips section details about both of them.
Our experience with Dettifoss
We visited Dettifoss on Day 7 of our packed 2-week trip. Dettifoss is close to many other beautiful sights in the Mývatn area, which we definitely recommend visiting too! We arrived at the eastern bank of the waterfall (see below, why the eastern one).
It will take you some 5-10 minutes to walk from the eastern car park on a stony but perfectly safe trail to reach the waterfall. Dettifoss is one of the most beautiful Icelandic waterfalls we’ve seen. Mostly, because its massive water volume is really impressive. It’s also said to be the most powerful Icelandic waterfall, and one of the most powerful ones in Europe as well. For those interested, there’s a nice website summarizing all waterfalls here. We were also lucky enough to catch Dettifoss with a rainbow over it.

Tips about Dettifoss – Which side to choose?
You have two choices about how to get to these well-known waterfalls. From the west or from the east. There are endless debates all over the internet about which side is the best. I will make it easier for you. The Eastern side is the best. No discussion. Easy.
Ok, let’s be a bit more serious now. Yes, I think the eastern side is much better. Why?
- The road leading there is more adventurous
- View from the eastern side is much better
- Most likely you won’t get wet (much) on this side
- Car parks are smaller, but that should mean fewer tourists, right?
That’s why we went for the eastern side.
1. SELJALANDSFOSS
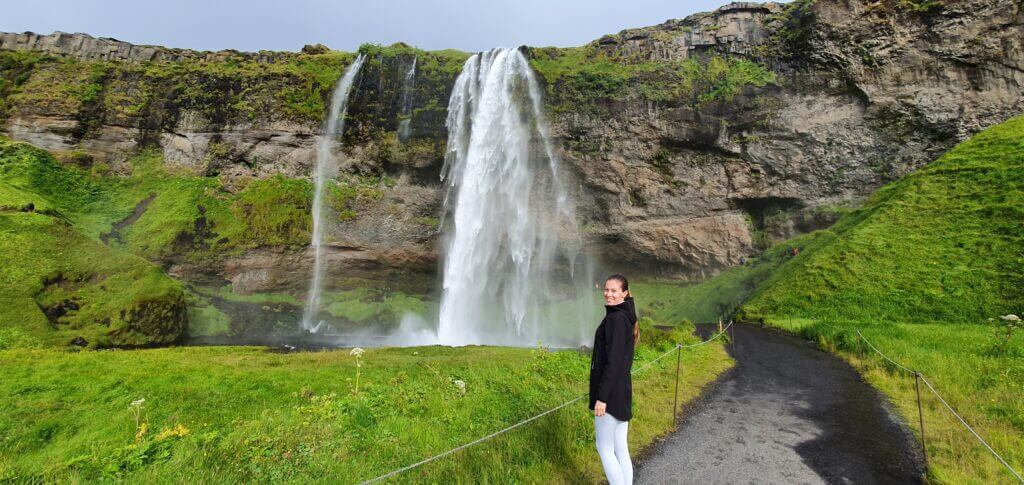
Seljalandsfoss at 7 pm
Summary
Distance from car park: 5 minutes
Time spent at: 20-60 minutes
Worth visiting even with bad weather: yes, probably
Physical condition needed: little
Interesting index: 1 – amazing  (1-amazing, 2-great, 3-nice)
How to get to Seljalandsfoss
In summer, Seljalandsfoss is easily accessible by any 2wd car. Read about how we chose our car. Or just get free discounts for your Icelandic car rental.
The car park in front of the waterfall is a paid one (7eur). Nobody had been checking the tickets at the time, however, we didn’t want to risk getting any infamously high Icelandic fines (e.g. 10 000 USD here) so we headed to the ticket machine. Over there my girlfriend realized that somebody had left their used parking ticket for someone else to use again, which seemed a really nice gesture, although I’m not sure whether this is, in reality, good or not (depends on, whether the area is being maintained using the fees collected from the parking or whether just someone is getting rich by renting a piece of ground for parking).

Our experience with Seljalandsfoss
Anyway, Seljalandsfoss was amazing. We were lucky enough that the sky cleared just before our arrival and we could experience the waterfall playing with the sun and an accompanying rainbow. And yes, Seljalandsfoss is the waterfall you can walk behind, and yes it’s a beautiful experience to do it. During Covid times, there were some 5-8 people around the waterfall area at the time of our visit, so we had the waterfall almost entirely to ourselves. We are not sure whether it’s because this was our first Icelandic waterfall or because of the really beautiful weather, but we feel like Seljalandsfoss was our favourite waterfall in entire Iceland.
Tips about Seljalandsfoss
Oh, and an important note – take a raincoat! It’s a waterfall so expect a water splashing everywhere, especially if you are planning to walk behind it (which you should!).
![]() ask questions or get inspired in our community
ask questions or get inspired in our community