Hikes

How to visit Eldgjá

How to visit Eldgjá

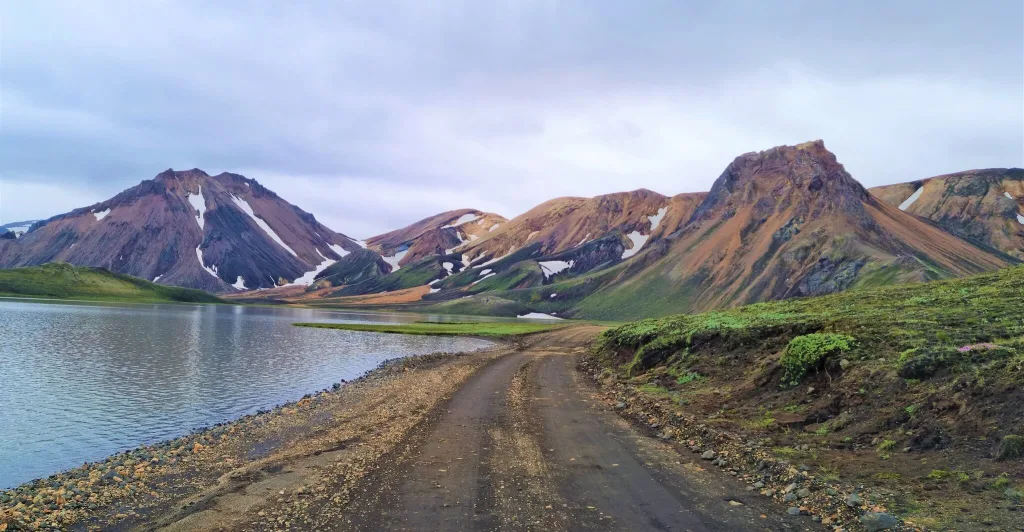
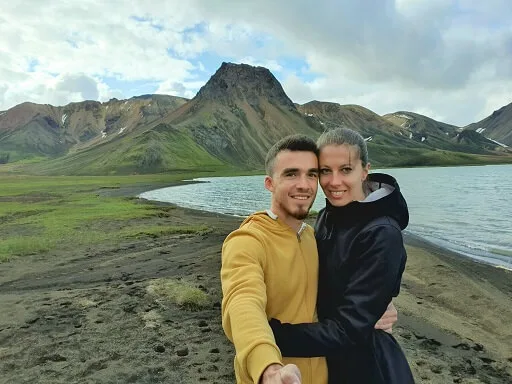
Eldgjá is a gigantic canyon created by the largest volcanic eruption on earth in the last millennium. From a historical point of view, Eldgjá is definitely a fascinating place to visit.

Except for the Eldgjá canyon, there’s also a very picturesque waterfall called Ófærufoss right in the heart of Eldgjá.

But does Eldgjá belong to one of the most beautiful places in the Icelandic Highlands, as many people describe it? Well, we are not so sure about that, and we will explain why below.

Map of Eldgjá

eldgja map iceland

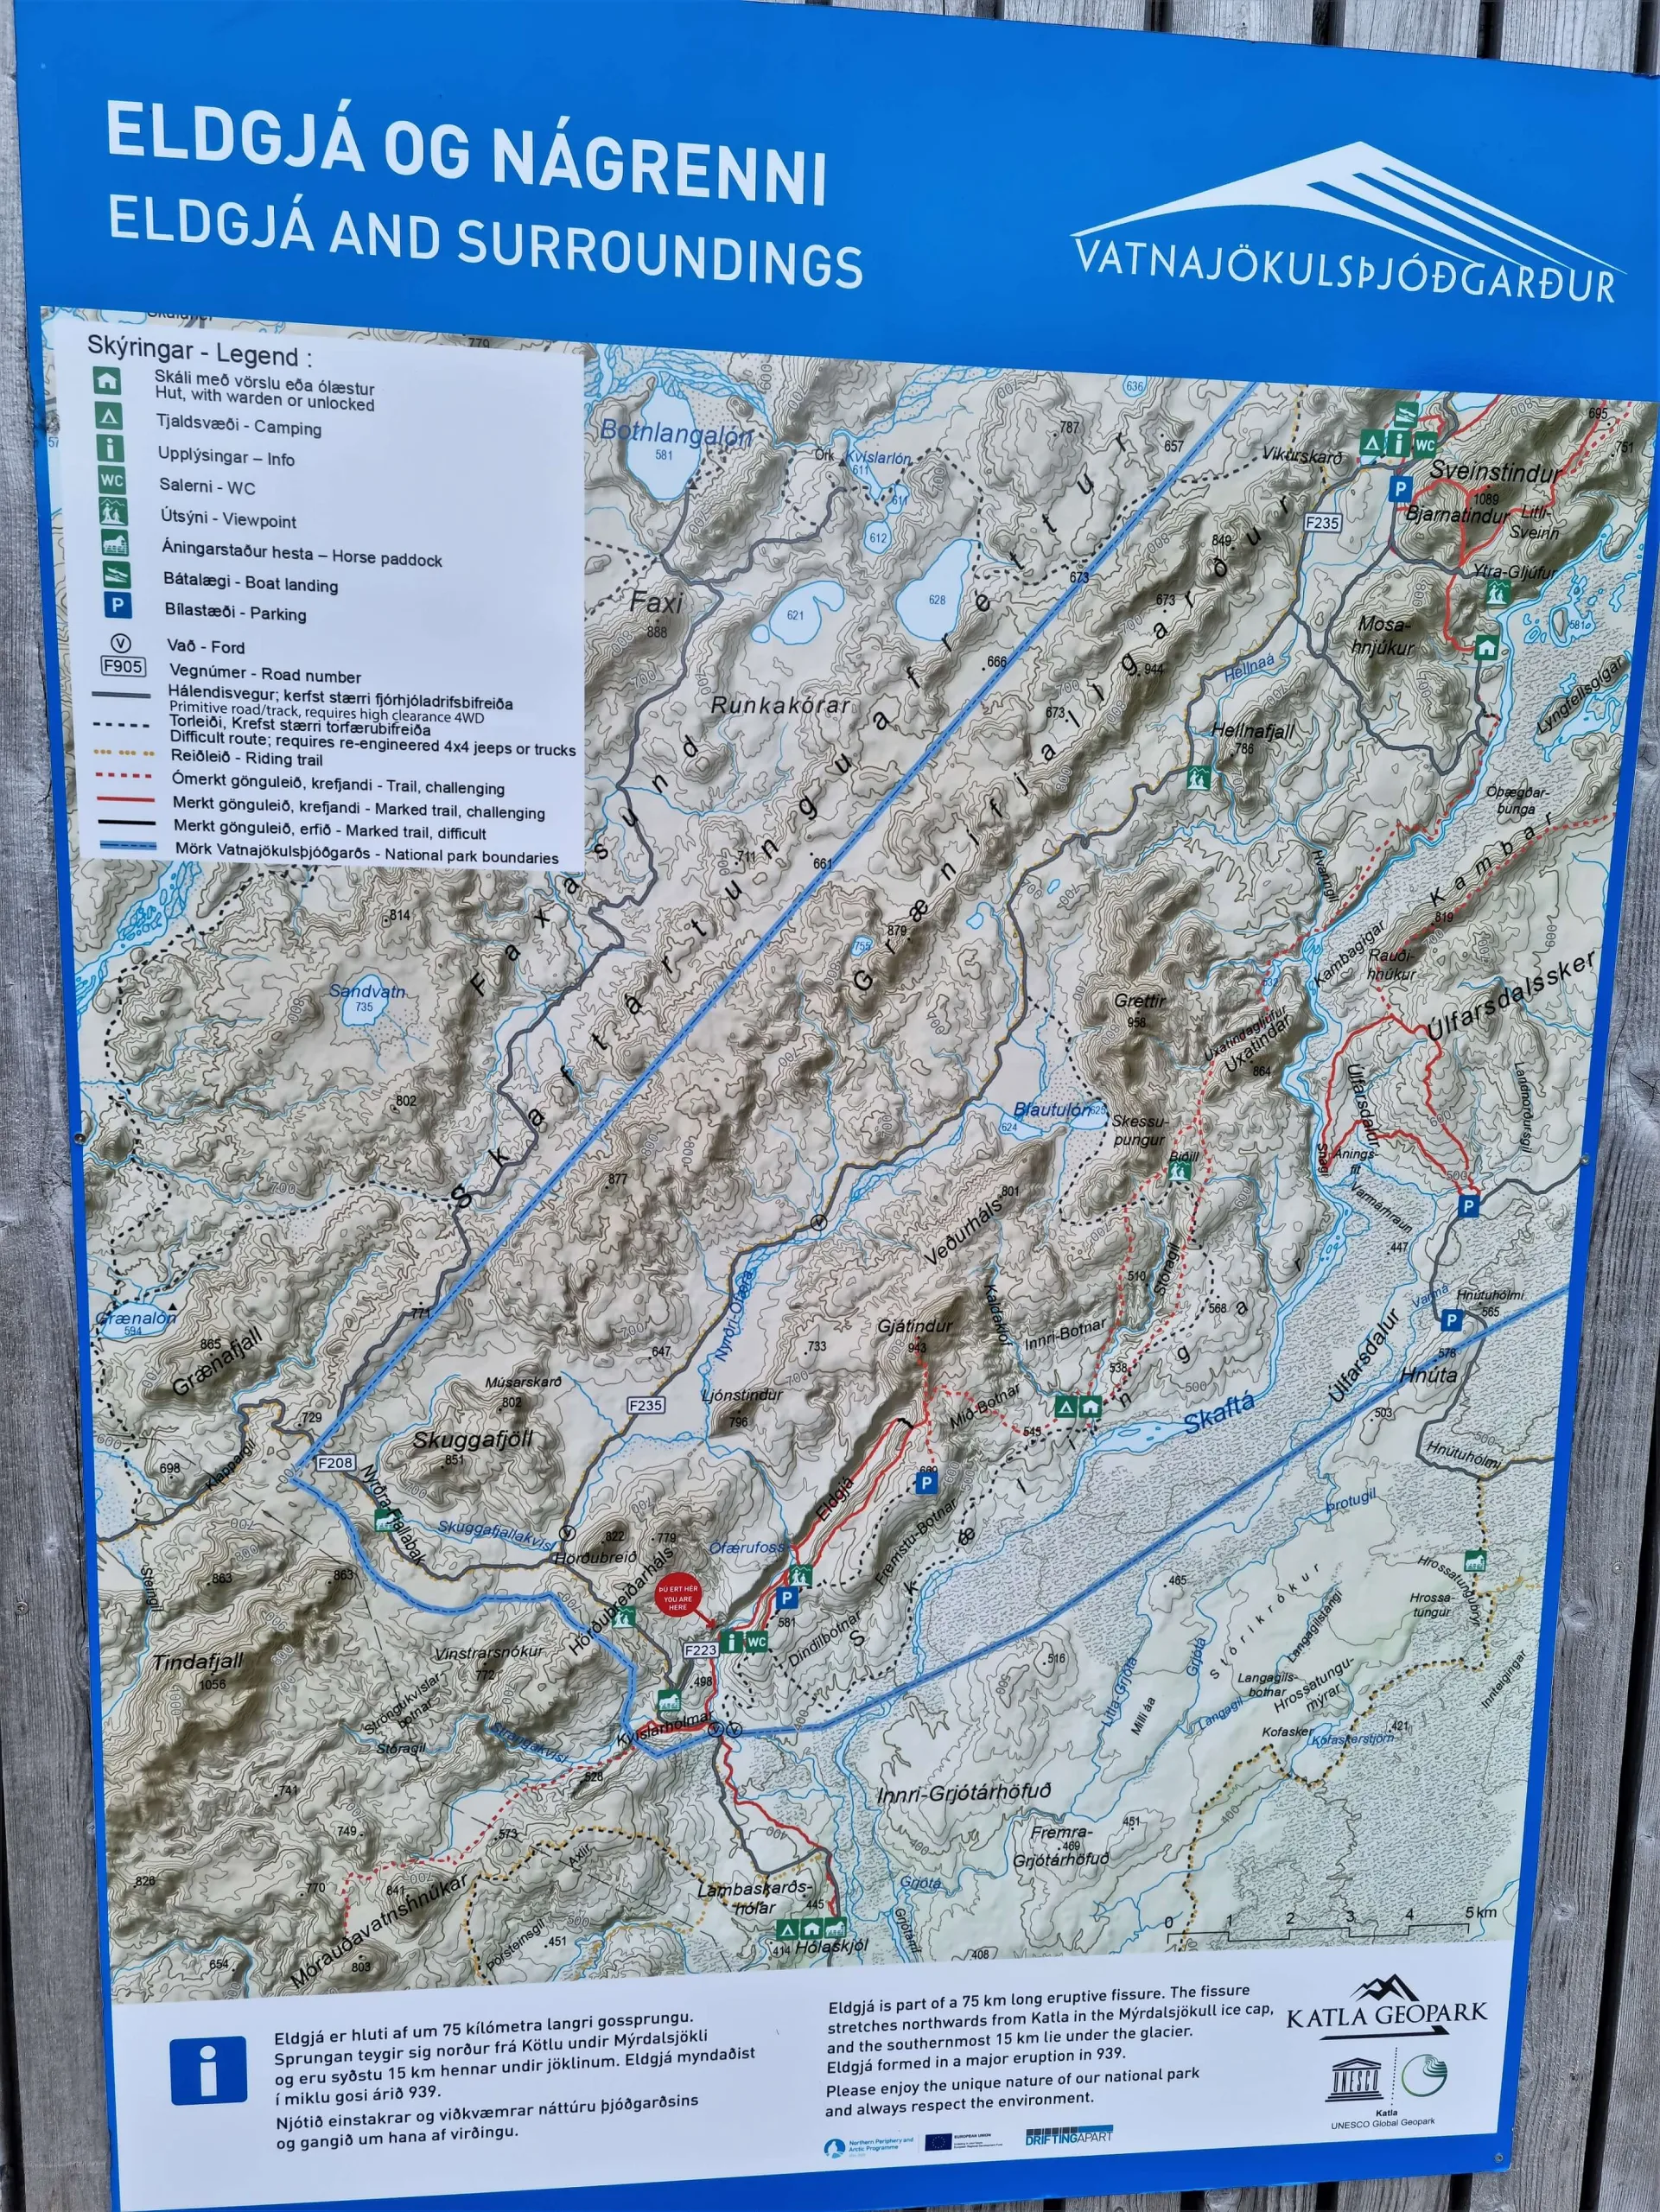
Map of the Eldgjá area (click to enlarge)

Eldgjá hiking trails

There are three main hiking trails in Eldgjá:

eldgja hiking trails iceland

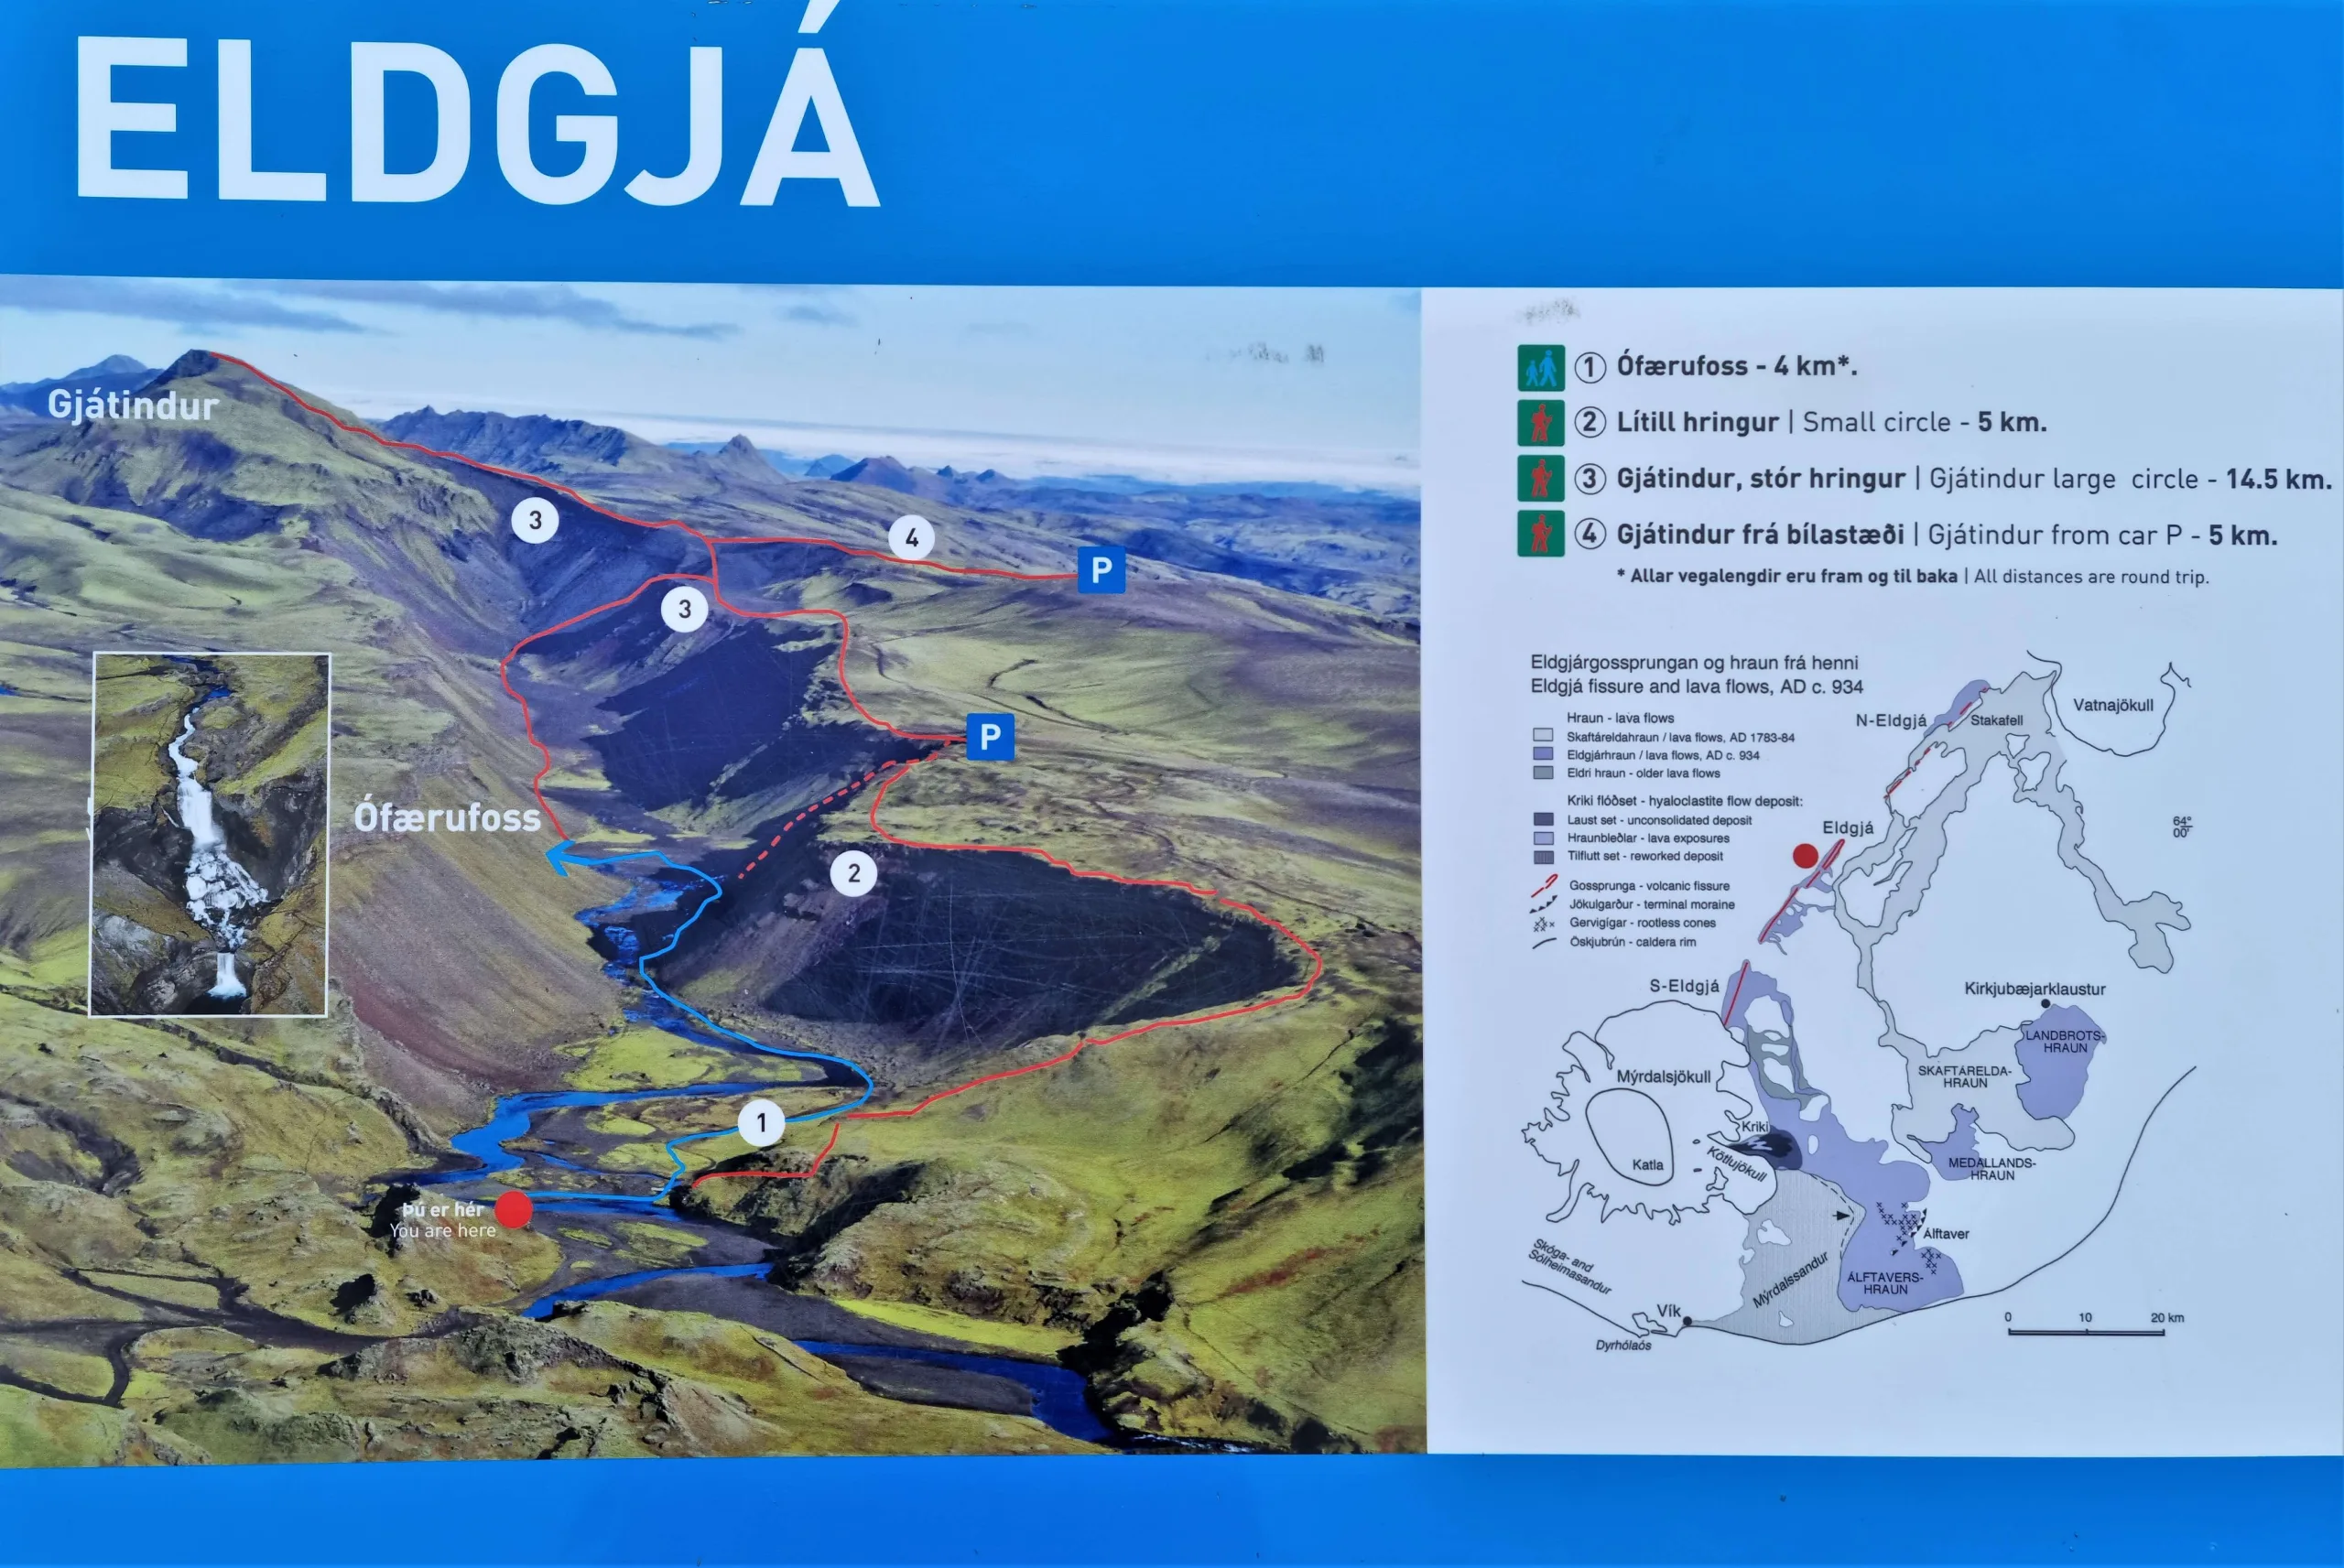
Hiking trails in Eldgjá

The two most popular hiking spots in Eldgjá are Ófærufoss waterfall and the peak of Gjátindur. The majority of visitors go only to the famous Ofaerufoss because it’s the most efficient option.

We wrote a list of 25 Off-The-Beaten Track Places in Iceland that nobody else writes about.

Besides the main trails, there are also several traverse routes leading to the Highlands.

Ófærufoss waterfall

ofaerufoss waterfall eldgja iceland

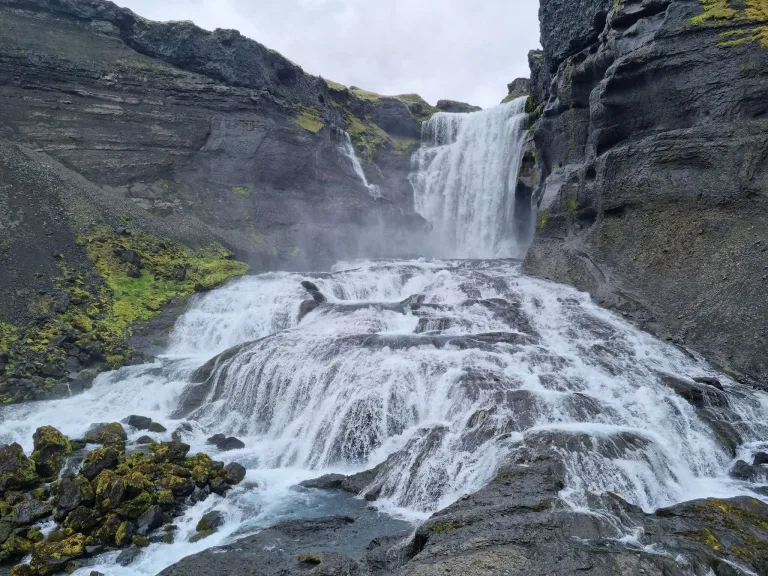
Beautiful Ófærufoss waterfall in Eldgjá

Hiking time: 1.5 hours round-trip
Difficulty: very easy
Trail Map: Ófærufoss hiking trail

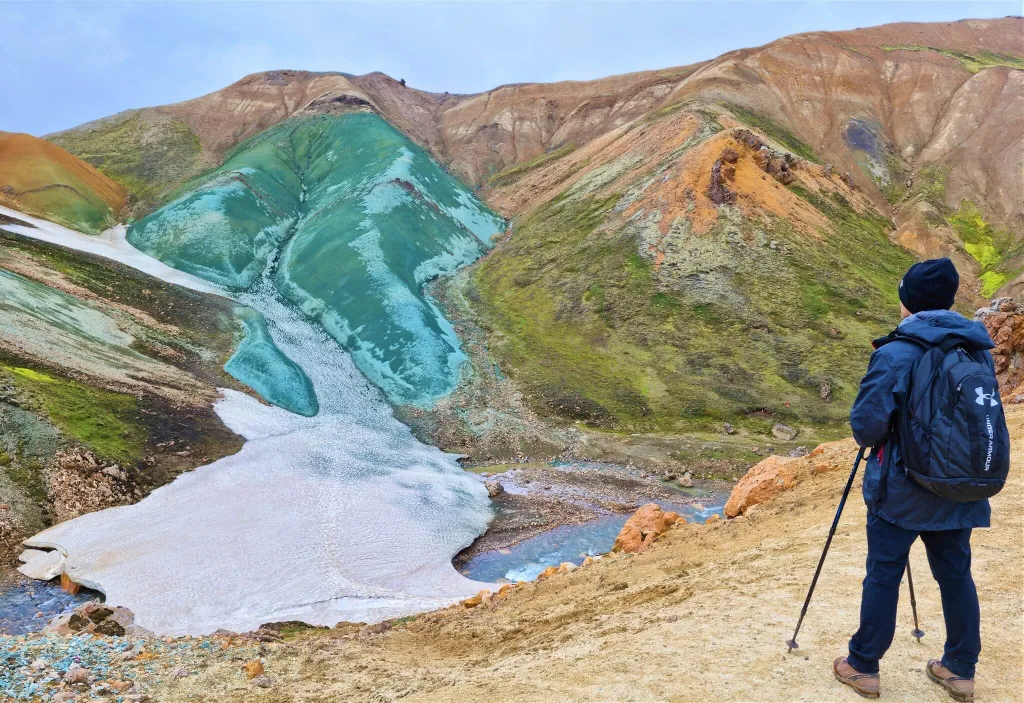
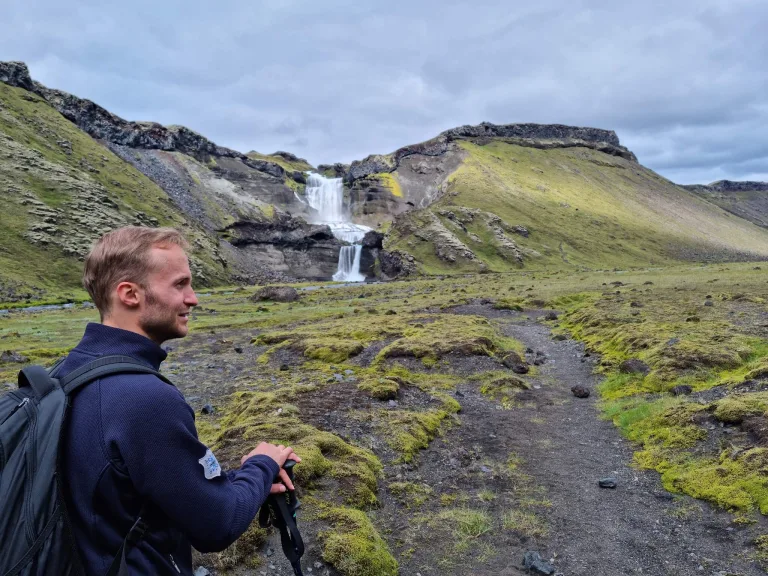
Ofaerufoss is the legendary picturesque waterfall and the main attraction of Eldgjá. The waterfall is a must-see spot in the area we highly recommend visiting. It’s spectacular in any weather.

It’s an easy, well-marked walk that anyone can do. It took us less than 30 minutes to reach the Ófærufoss waterfall from the Eldgjá car park.

The shortest trail to Ófærufoss leads along the right/eastern bottom of the canyon and turns left/west right before the waterfall.

Small circle

ofaerufoss waterfall eldgja

Ófærufoss viewpoint from the “Small Circle” hiking trail in Eldgjá

Hiking time: 2 hours round-trip
Difficulty: easy to moderate
Trail Map: Small Circle hiking trail

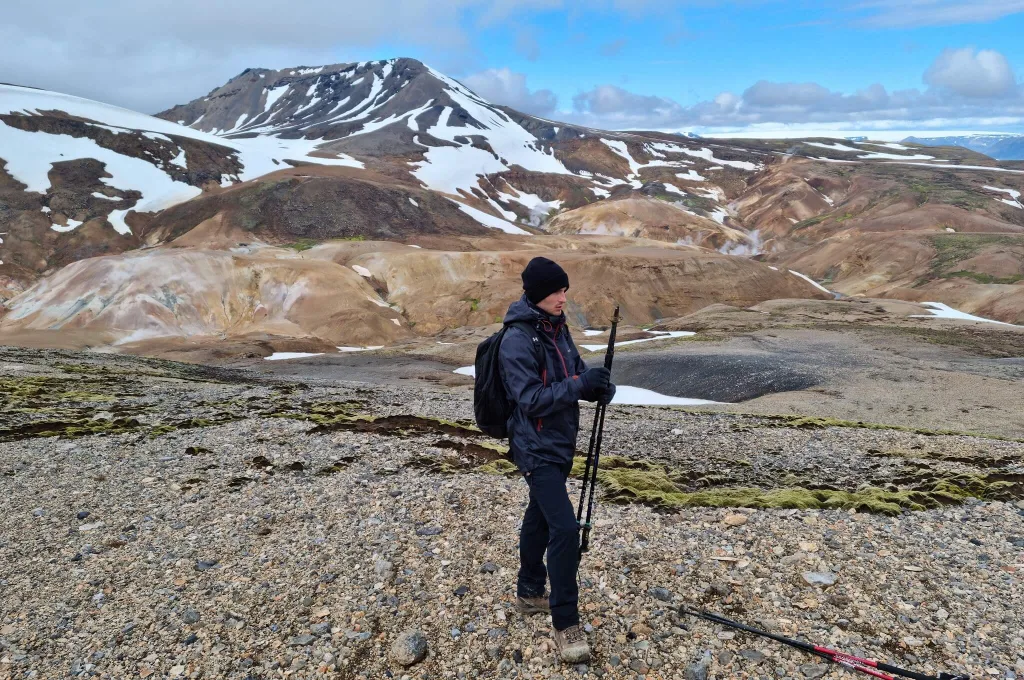
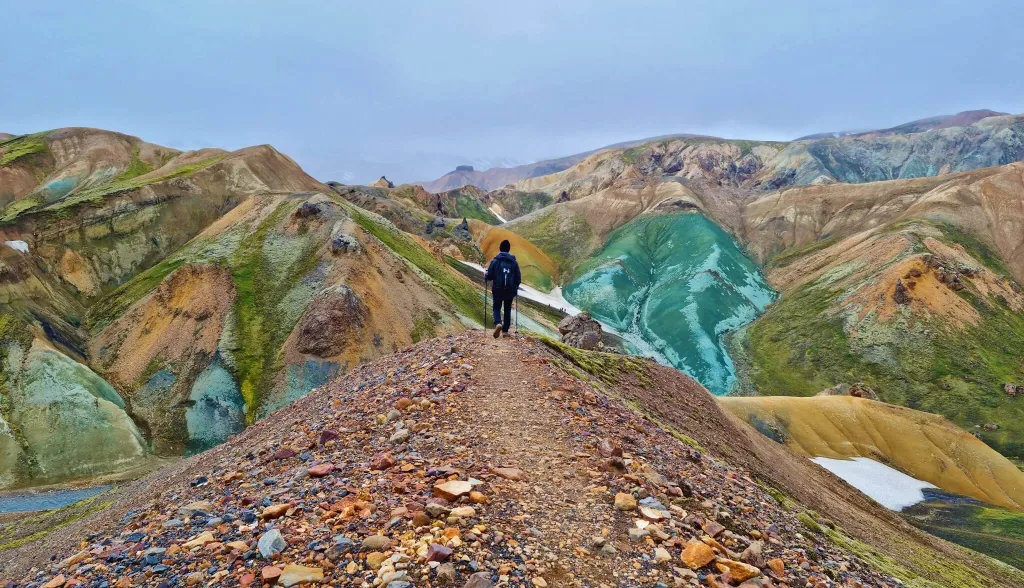
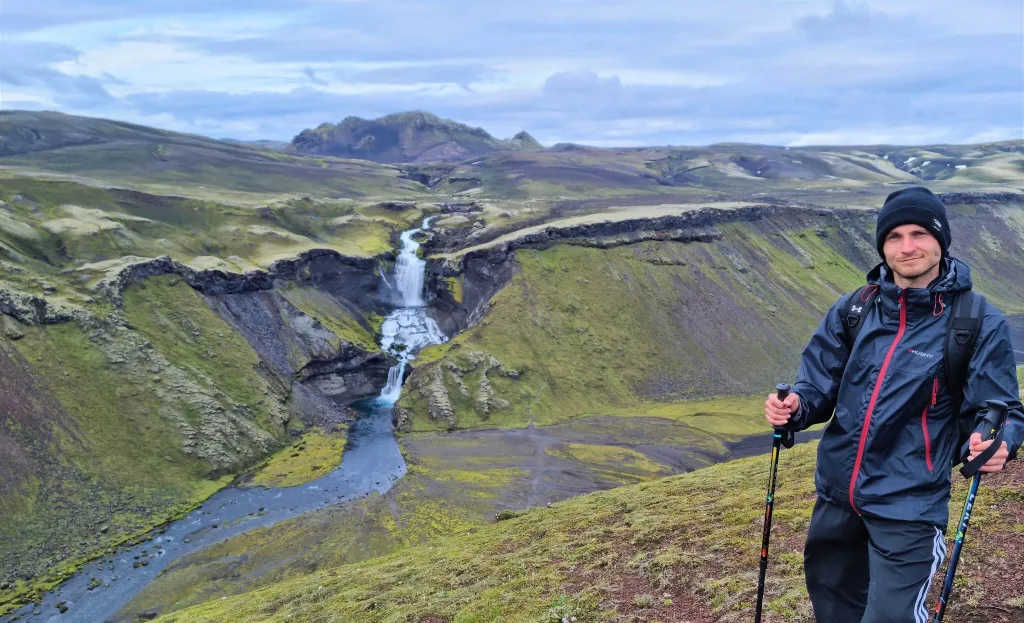
If you want to enjoy Ófærufoss from more angles and the bird’s eye perspective, you can take a longer Small Circle hike.

This trek is a loop path extension of the easy bottom-of-the-canyon walk. After passing Ófærufoss, you will need to climb shortly to the eastern edge of the canyon. From there, you turn back south.

Once you finish the climb, you will also get nice views over the Eldgjá Canyon. You can take this loop trail in any direction. It’s a nice compromise between a short Ófærufoss walk and a long Gjátindur trek.

Gjátindur circle

eldgja iceland

Bird’s eye view over the Eldgjá Canyon when hiking to Gjátindur

Hiking time: 5 to 6 hours round-trip
Difficulty: moderate with one steeper climb
Trail Map: Gjátindur hiking trail

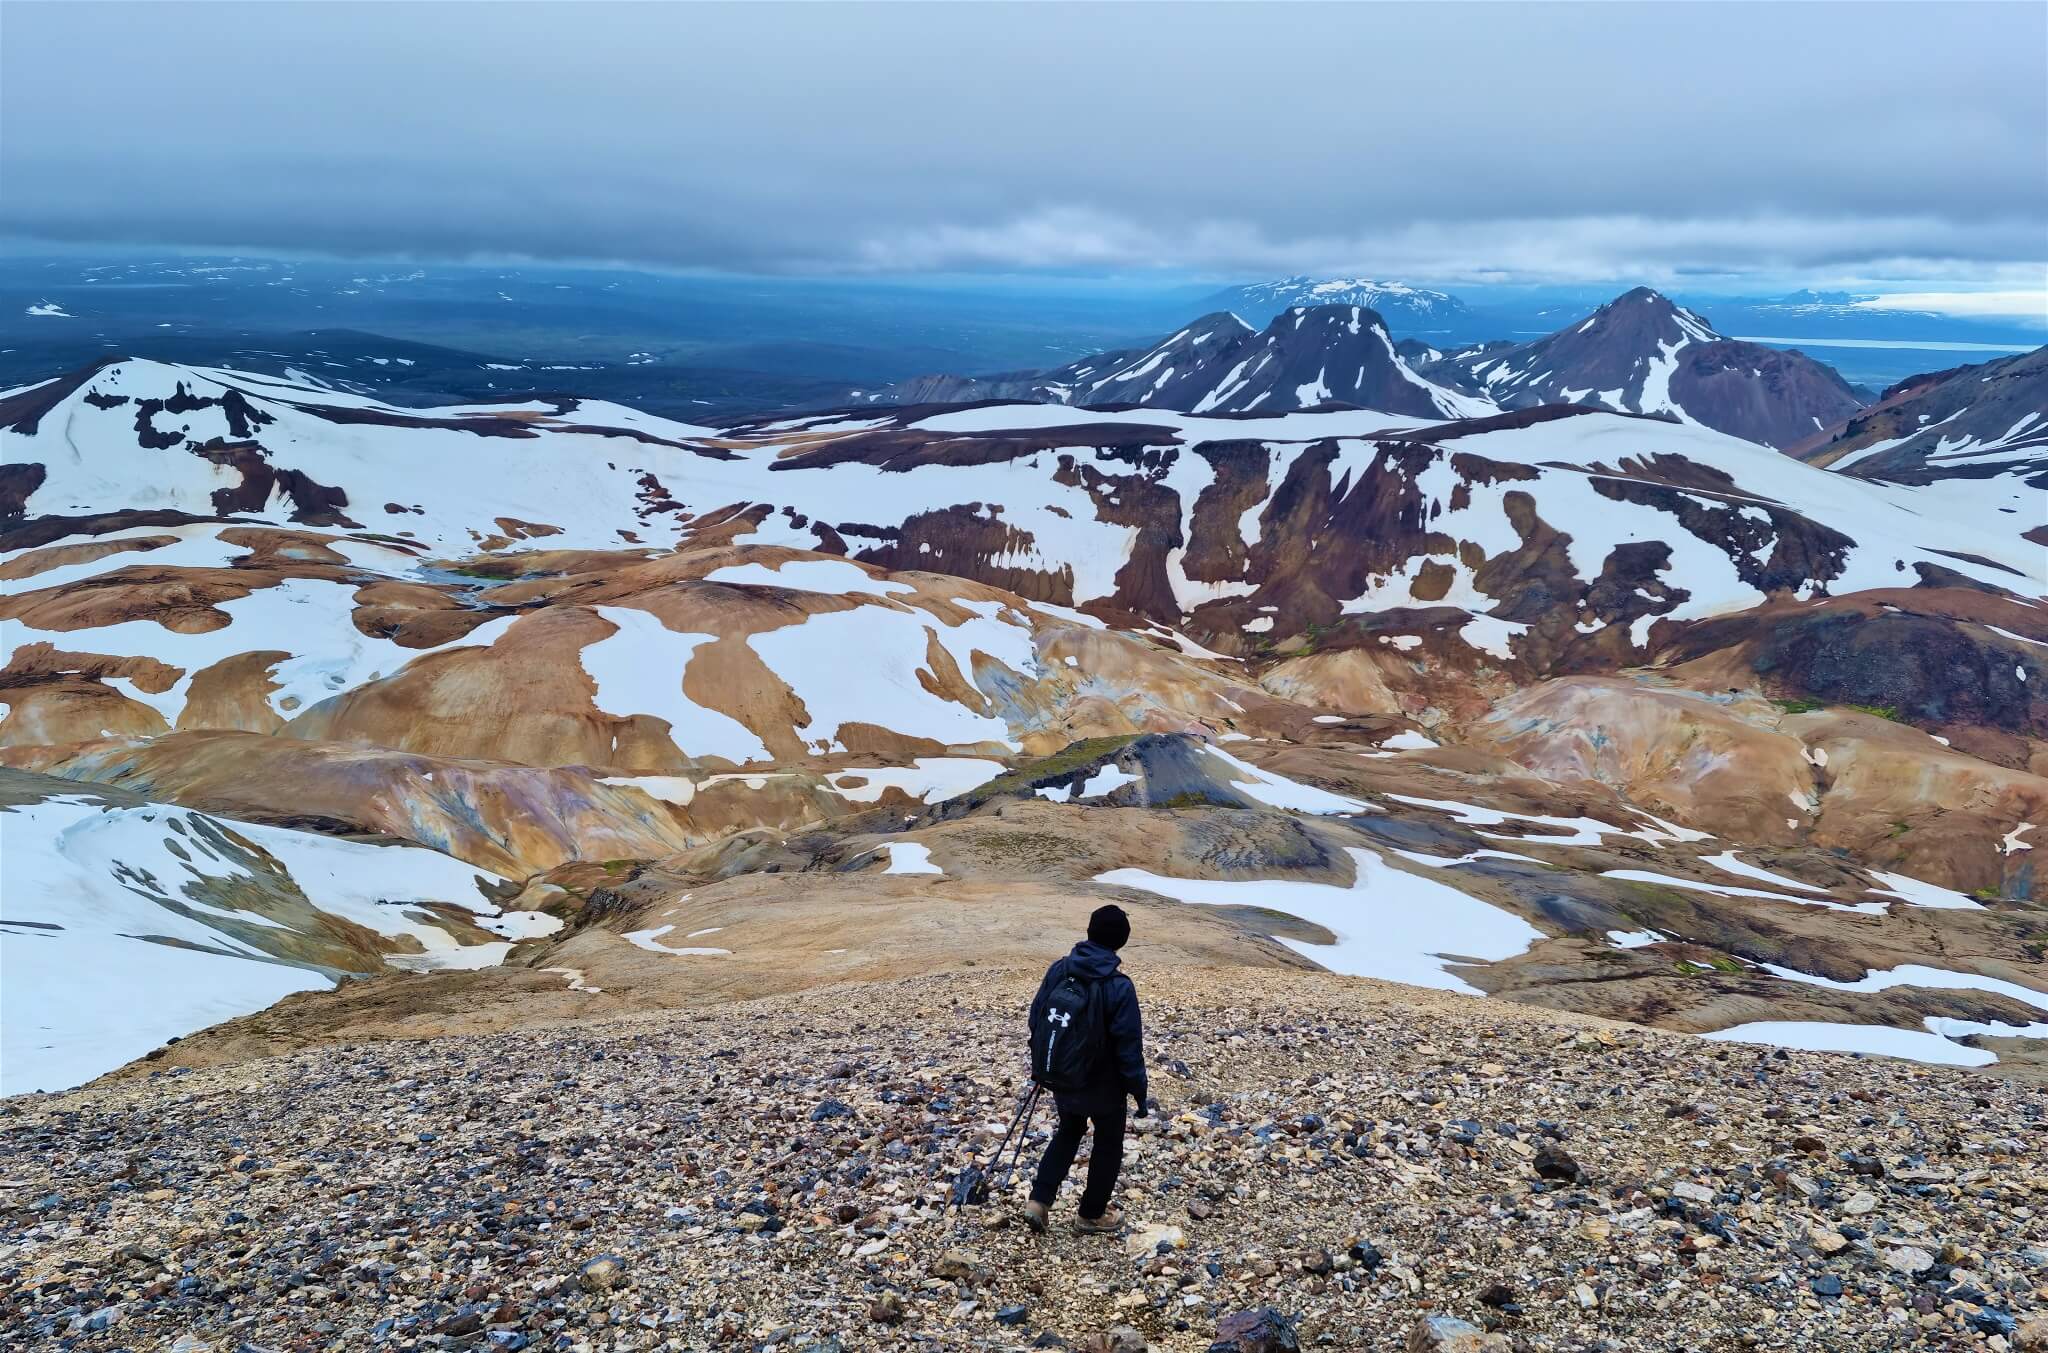
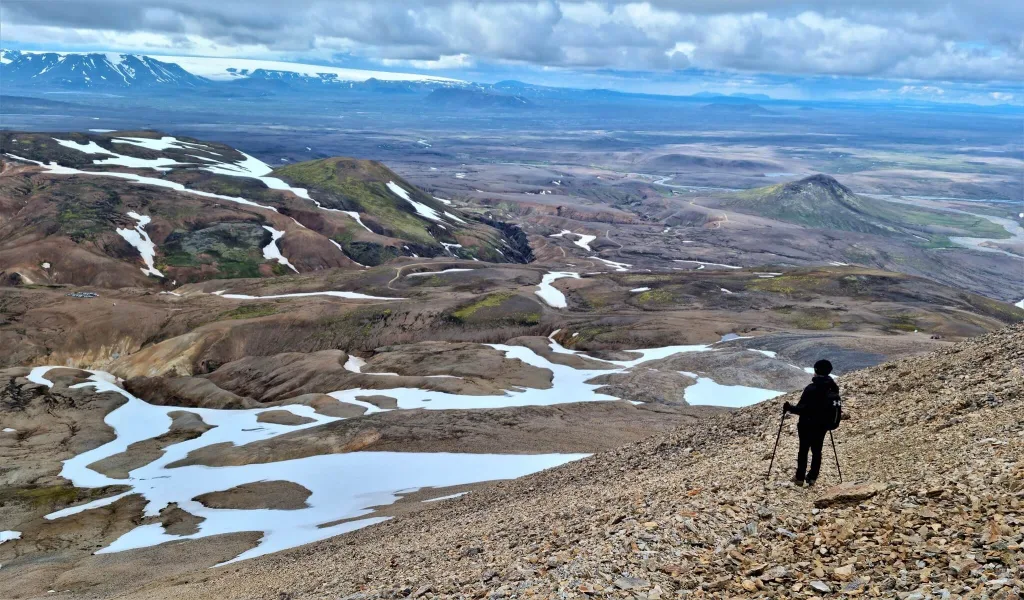
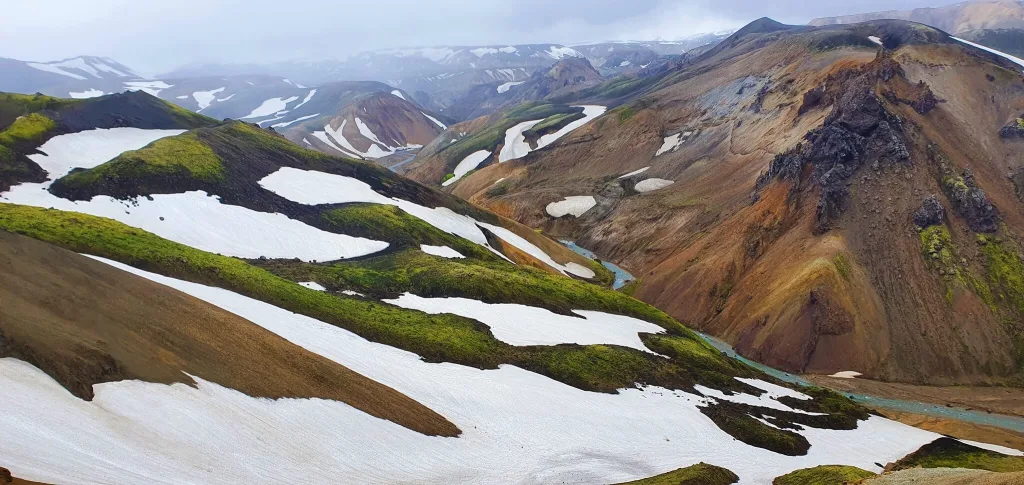
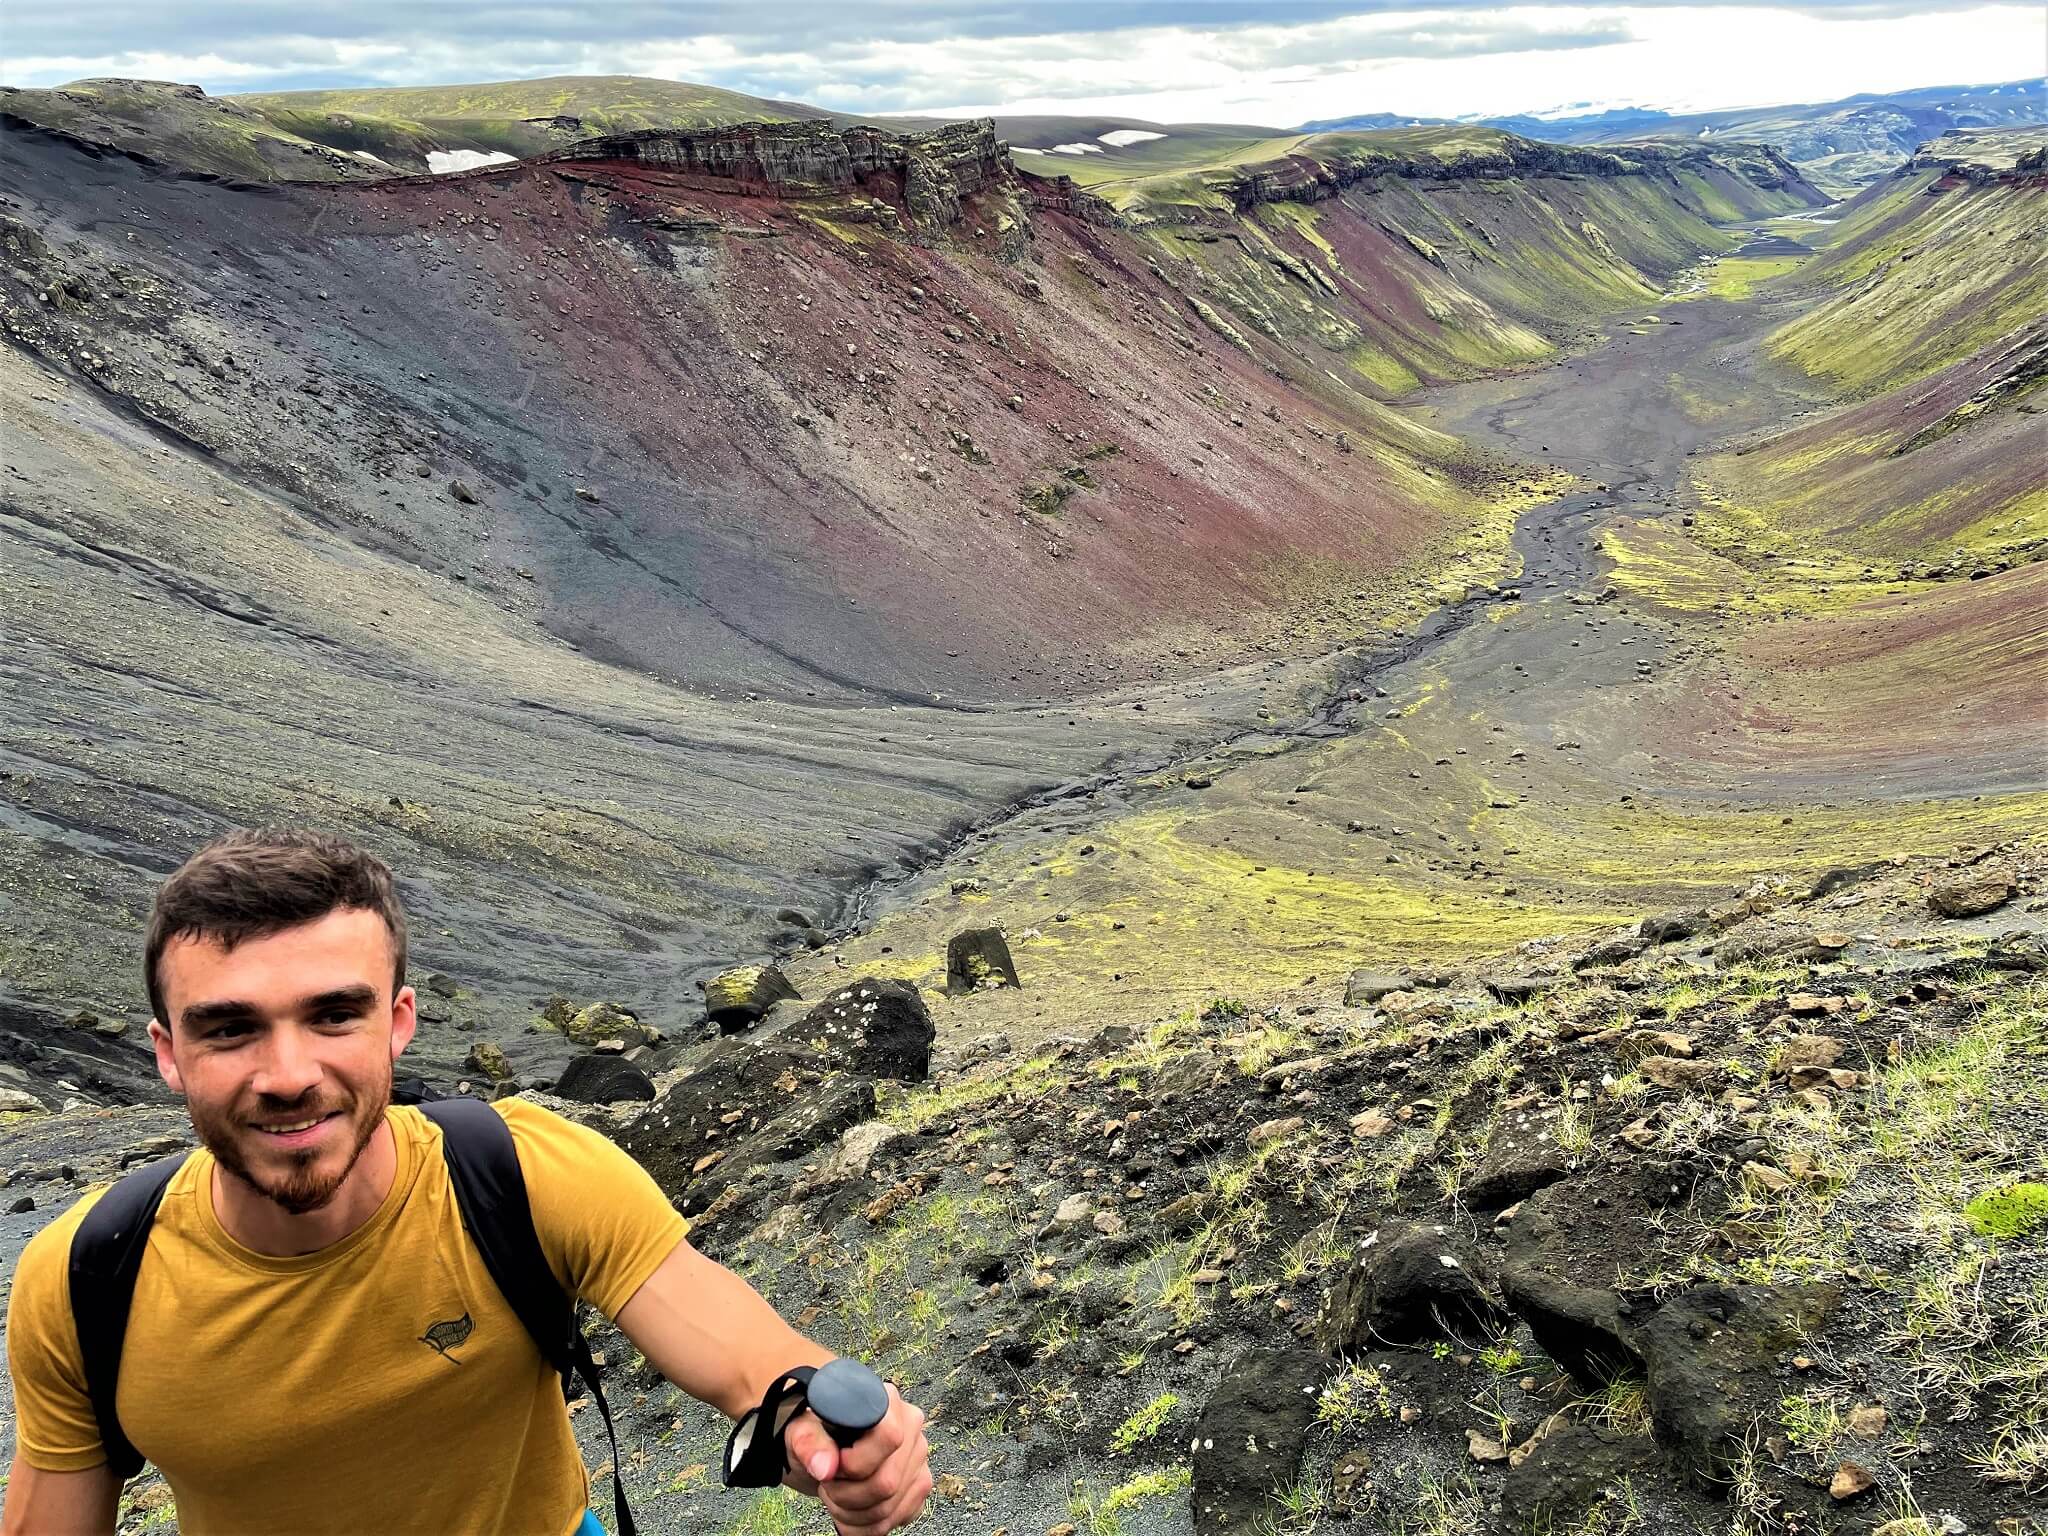
Gjátindur is the tallest peak in the Eldgjá area. By climbing Gjátindur on a nice day, you will be guaranteed to have the best views over the entire Eldgjá. But are these views worth the climb? Well…

It took us almost 6 hours to complete the loop trail to Gjátindur and back, including a stop at Ófærufoss and then a struggle to find the correct path. The hike to Gjátindur is moderately difficult, with one pretty steep ash climb. Otherwise, the trek isn’t anyhow dangerous. It’s just long (around 16 kilometers, or 10 miles).

Several different trails lead to Gjátindur. One of the trails leads inside the bottom of the canyon, while the other trail leads along the upper edge of the canyon, see the Eldgjá hiking map above.

Langisjór traverse trail

langisjór lake iceland

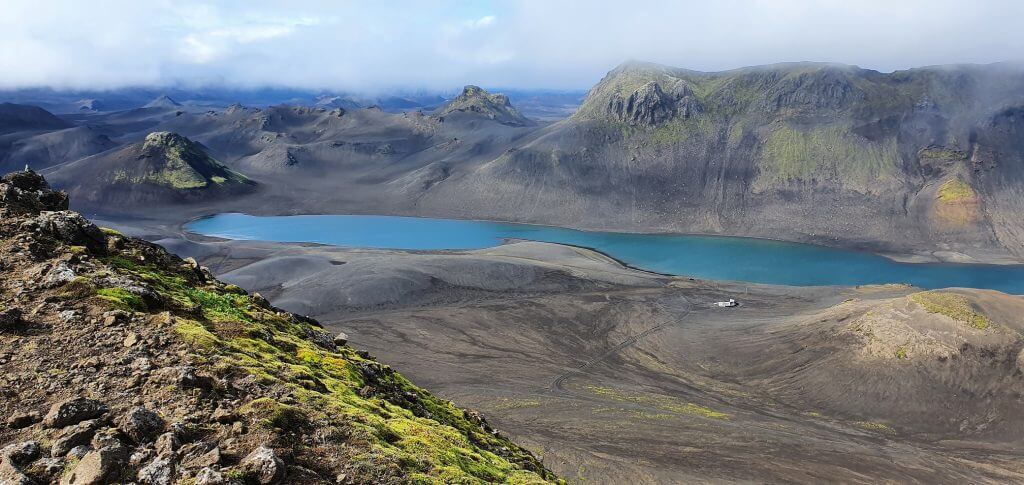
View over the Langisjór lake from Sveinstindur trail

Hiking time: 1 to 2 days
Difficulty: moderate to difficult
Trail Map: Eldgjá Skaelingar hiking trail

Eldgjá Canyon is actually a part of the vast hiking area that stretches all the way in between the road F208 (Fjallabaksleið Nyrðri) in the southwest and Lake Langisjór in the northeast.

Numerous marked and unmarked remote trails connect Eldgjá to Langisjór and Uxatindar mountains in between. See the huge Eldgjá map.

How to Visit the Icelandic Highlands and prepare for the Highlands road trip?

How to get to Eldgjá

To get to Eldgjá, you must take the F-roads F208 and F223, respectively. There are no buses or guided tours, so your only option is to drive or take a private tour.

Road F208

If you take the road F208 from the south, you have to cross one medium-sized river. You need to drive at least a medium-sized 4wd car to pass safely.

When you arrive by F208 from the north, you will encounter several small to medium-sized rivers to ford. This route is one of the most beautiful Icelandic highland roads.

We again recommend driving, at minimum, a medium-sized 4×4 car like Dacia Duster. That being said, if the conditions are ideal and the weather is dry enough, you may also pass with smaller 4wd cars like Toyota RAV4 or whatever is being called a 4×4 these days.

Road F223

F223 to Eldgjá is an easy F-road without any river crossings or other obstacles.

It’s a very short drive from the southern part of F208 (Fjallabaksleið Nyrðri). The only reason Eldgjárvegur is marked as an F-road is probably that it’s impossible to get there without using other F-roads.

Once you reach Eldgjá, there’s a huge car park with a ranger’s hut and modern toilets.

Is Eldgjá worth a visit?

Eldgjá is worth a visit if you have more time to explore the southern Icelandic Highlands. If you are short on time, we recommend other fantastic spots in the Highlands.

Interestingly enough, if you ask locals in Iceland to name a few most beautiful places in Iceland, many replies will include “Ásbyrgi” and/or “Eldgjá”. We have visited both, and both were actually slightly underwhelming in our opinion (and other foreign visitors’ opinions).

How to choose the Best Car for Iceland based on your trip plans?

Don’t get me wrong, both Eldgjá and Ásbyrgi are beautiful places to visit. But Iceland has so many unique gems to offer that Eldgjá or Ásbyrgi simply don’t measure up to many of them.

What is the Best Hike in Eldgjá?

gjatindur eldgja iceland

At the peak of Gjátindur in Eldgjá

If you have just a few hours dedicated to visiting Eldgjá, we suggest primarily seeing Ófærufoss. Ófærufoss waterfall was probably the highlight of our full-day visit to Eldgjá. Moreover, a hike to Ófærufoss is just an effortless walk, not even a hike.

If you have more time, you can do a longer hike to Gjátindur, the highest summit of Eldgjá. We suggest doing this hike only if you are really into hiking and have enough time. Once you climb the edge of the Eldgjá Canyon, there’s a nice viewpoint over the entire Eldgjá area from a bird’s eye viewpoint.

List of 130 most beautiful Icelandic Waterfalls with detailed info.

However, to reach Gjátindur, you need to continue even further, and the view from the peak isn’t that special in our opinion. Definitely not if you compare it, for example, to nearby Sveinstindur, Bláhnúkur, or Thakgil.

Once again, don’t get me wrong, the Gjátindur hike is pretty. If you have time and energy, then go for it. It’s just not among our favorite ones in Iceland, not even close to it.

Our Eldgjá Experience

We visited Eldgjá at the end of July and did all the main treks. We hiked to Ófærufoss and then to Gjátindur for the best views over Eldgjá.

Ófærufoss hike

As expected, we met many fellow tourists along the way to Ófærufoss. Apart from tourists, we also met many infamous Icelandic midges 🙂 Eldgjá is actually the only place where we’ve ever used head-nets in Iceland.

Ófærufoss hiking trail eldgjá iceland

Easy hiking trail to Ófærufoss

Midges don’t bite, and they are not dangerous. They are just very pesky and persistent about getting into your nose and eyes, being attracted to wet spots. So either you will be waving your hand in front of you, or you’re gonna use head-nets.

Ófærufoss is totally worth a short walk. If I were to come here next time, Ófærufoss would be the only place I would visit again in Eldgjá. The waterfall is magnificent, and it will definitely make it to our list of favorite Icelandic waterfalls.

There’s even a huge viewpoint platform with seating. Rangers built ropes around the waterfall to protect the moss and tourists from falling into the waterfall. Despite the ropes, several arrogant visitors didn’t respect them and stepped on the moss to take better pictures anyway. This is how NOT to be a responsible tourist.

crowds at ofaerufoss iceland

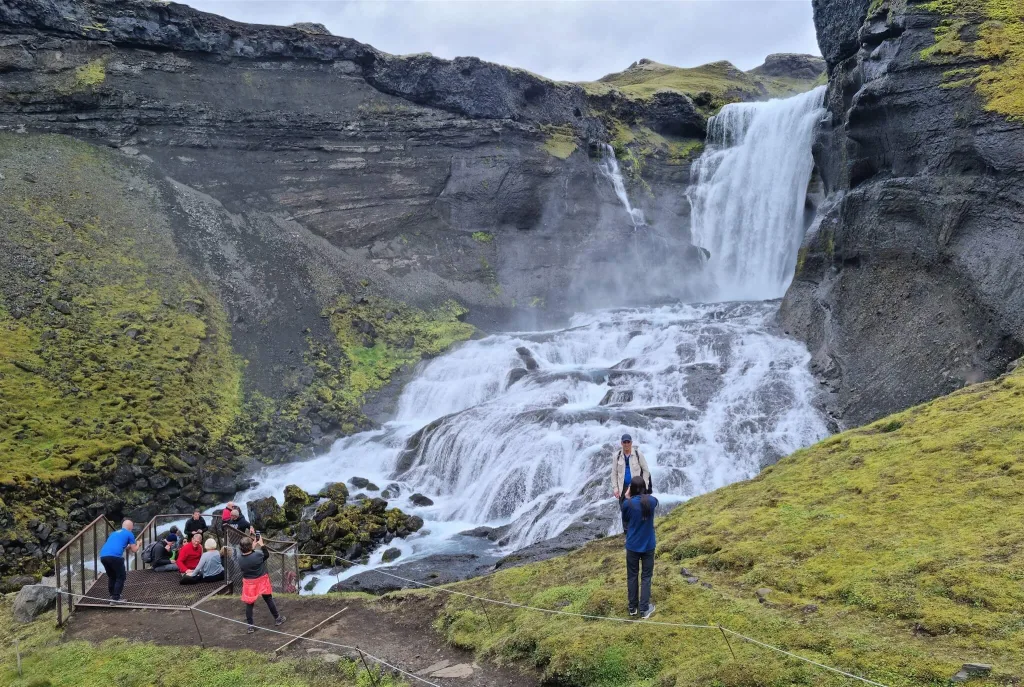
Crowds at Ófærufoss and tourists breaking the rules by standing behind the rope.

Gjátindur hike

After seeing Ófærufoss, we still had enough time and energy to hike more, and the weather was ugly everywhere else anyway. Thus, climbing Gjátindur made great sense.

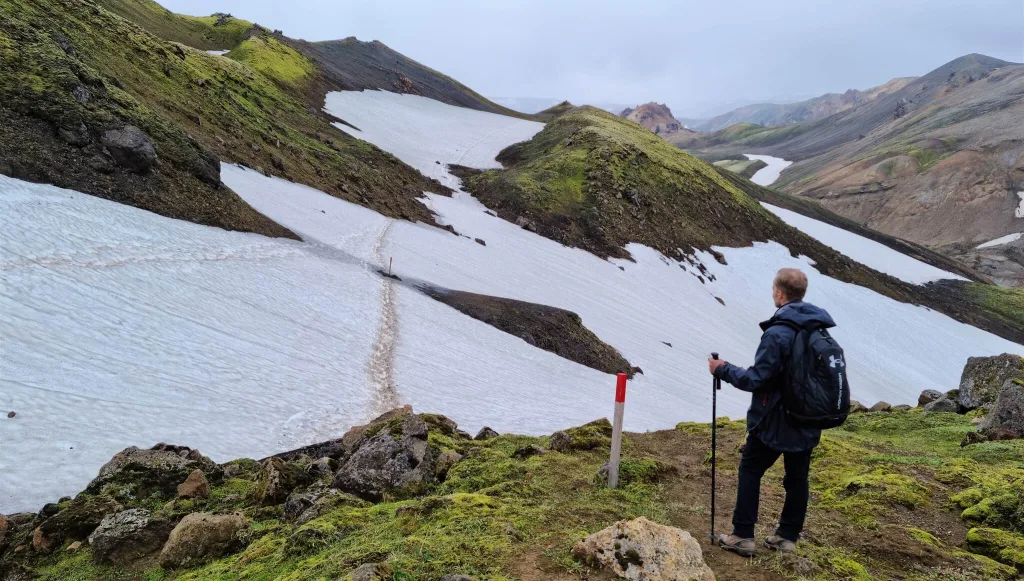
We were equipped with hiking poles, head nets, and an old map, which showed we were supposed to be able to reach Gjátindur from the western trail. The map was terribly wrong. The only real trail leading to Gjátindur is the eastern trail, but more on that below.

Be sure to always check the safety warnings, road conditions, and weather forecast before embarking on any hike in Iceland!

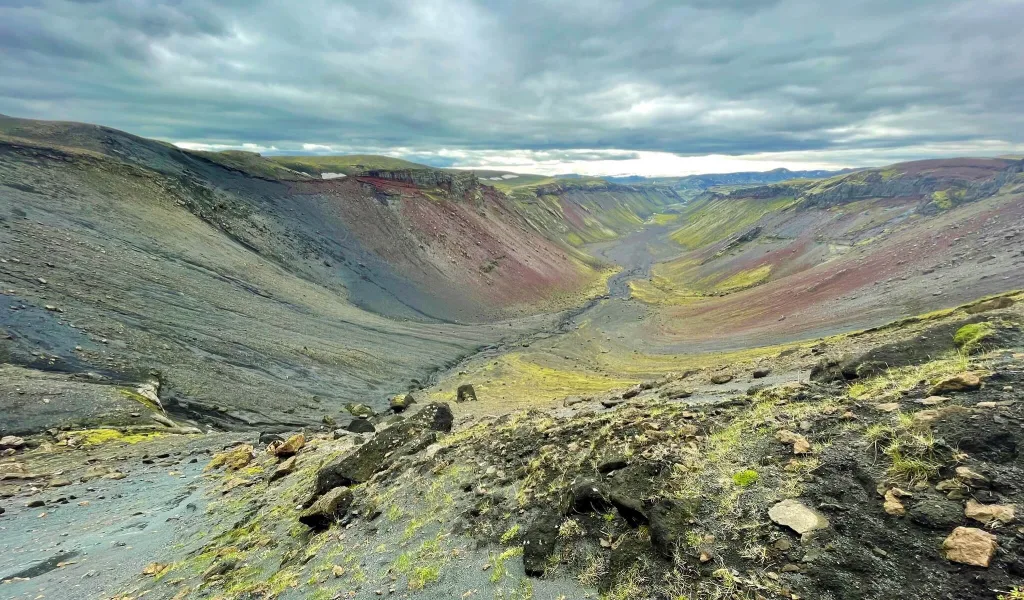
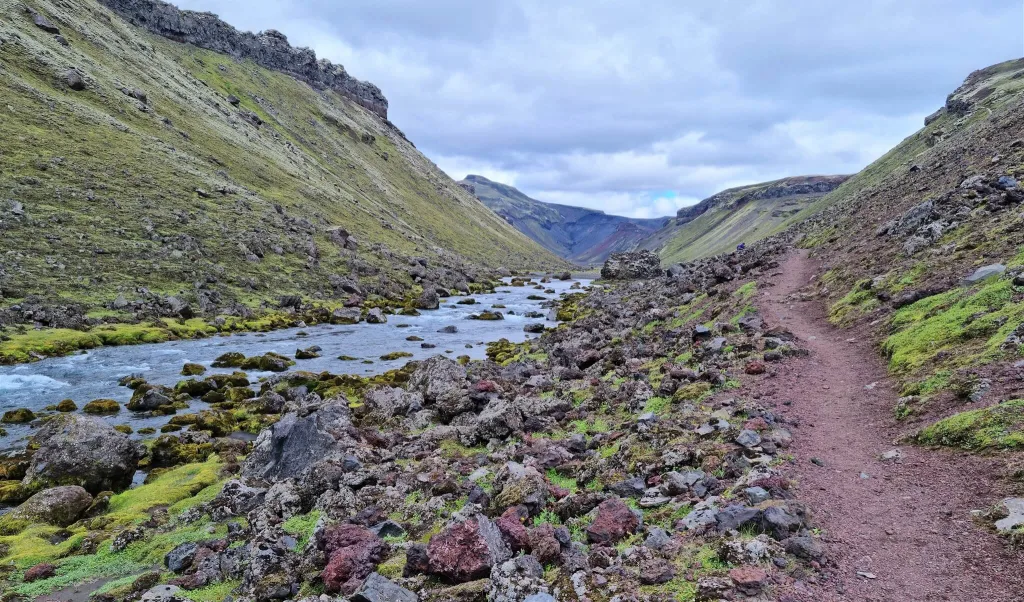
The Bottom of the Canyon

Our hike to Gjátindur started by walking to Ófærufoss from the eastern bottom of the canyon which, right before the waterfall, turned to the west to reach the waterfall itself. After stopping at the waterfall, we continued further along the western bottom of the canyon in the north direction towards Gjátindur.

eldgja canyon hiking

Hiking the bottom of the Eldgjá Canyon

This part of the hike is a fairly easy walk on flat ground. I remember very sparse red marks, but we mostly just followed the well-trodden steps along the bottom of the canyon.

Ascent to the Edge of the Canyon

According to our map, we were supposed to turn left a few hundred meters before the canyon ended and begin ascending steeply. There were no marks, only steps of someone else walking before us.

List of All Hot Springs in Iceland with detailed info.

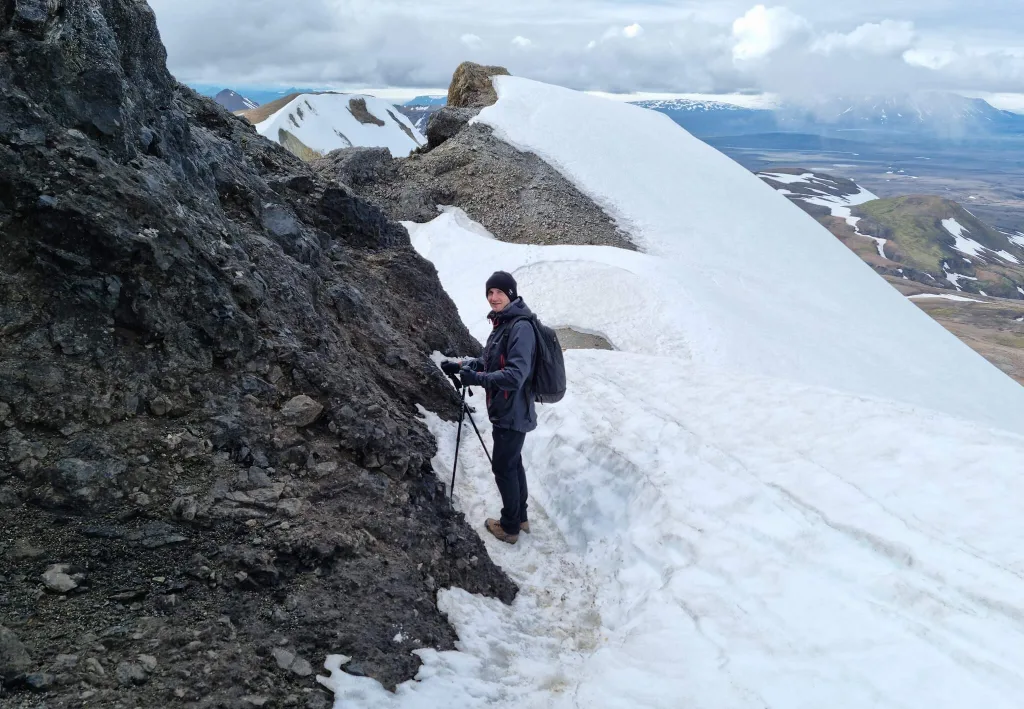
Thus, we followed the steps, which soon turned into a very slippery and steep ascent via the ash slope. Steps soon disappeared, and we reached the point where it was impossible to continue safely. We tried to find the correct western trail but without success.

After climbing down the ash slope, we instead turned right to the marked trail (yellow sticks if I remember correctly). This eastern trail to Gjátindur led via a pretty steep slope entirely consisting of ash. Thus, with every step we slipped back a bit, because ash rolled back together with us. This was the spot where hiking poles came in extremely handy.

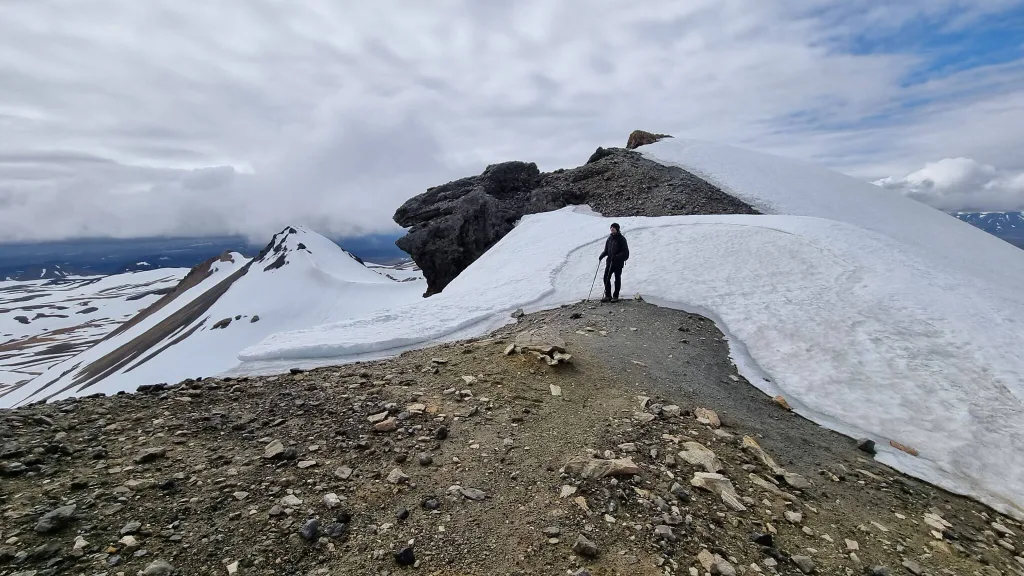
Crossroads and the Ridge

eldgja canyon iceland

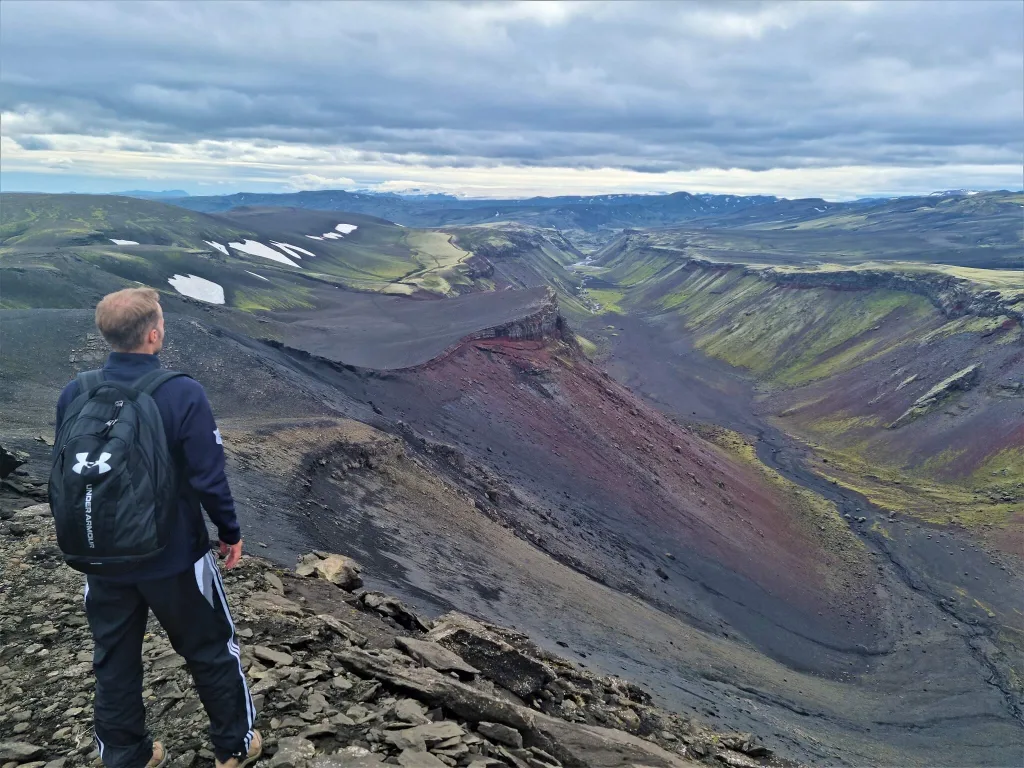
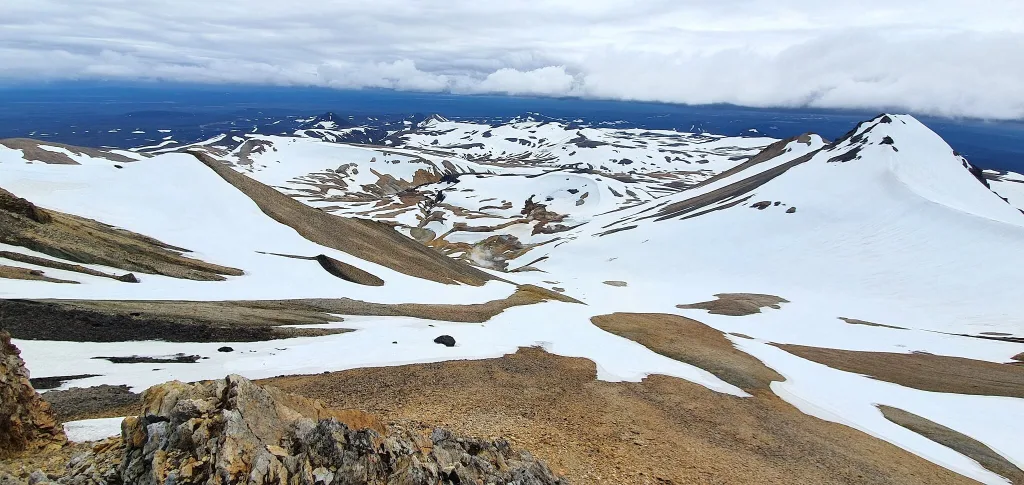
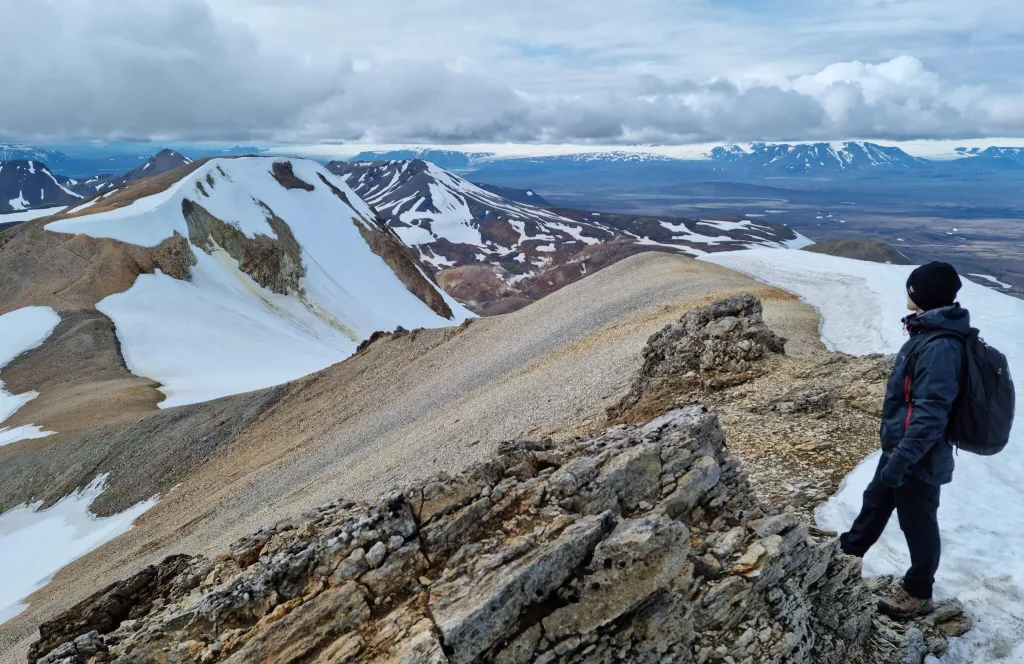
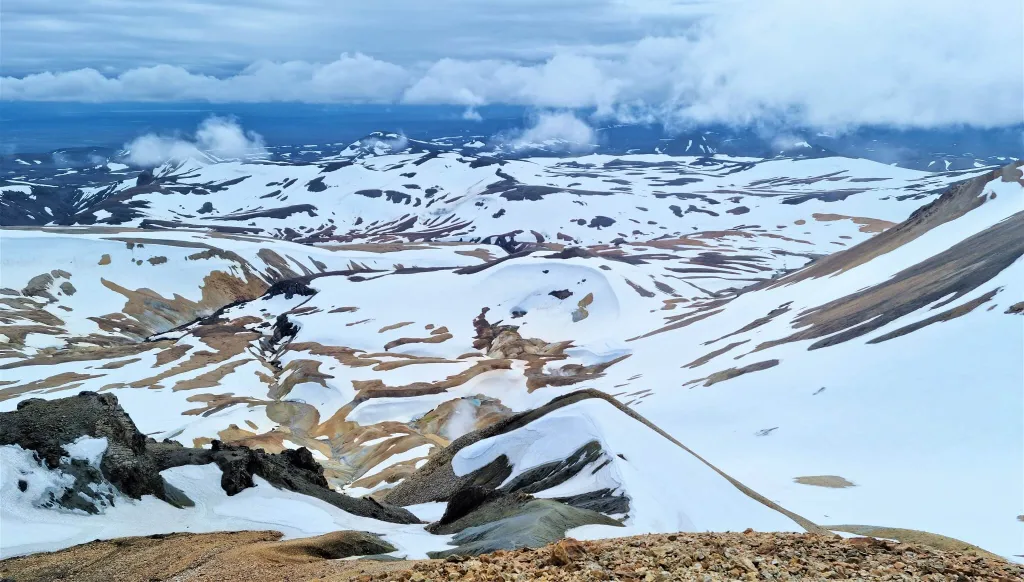
Great view over Eldgjá on a halfway towards Gjátindur

After finishing the climb to the eastern ridge of the Eldgjá canyon, we soon reached the crossroad of several different trails. Some lead further toward the Langisjór area, while one leads to Gjátindur (yellow sticks). Another trail leads back to Eldgjá car park, but not via the bottom of the canyon, but rather via the upper eastern edge of it.

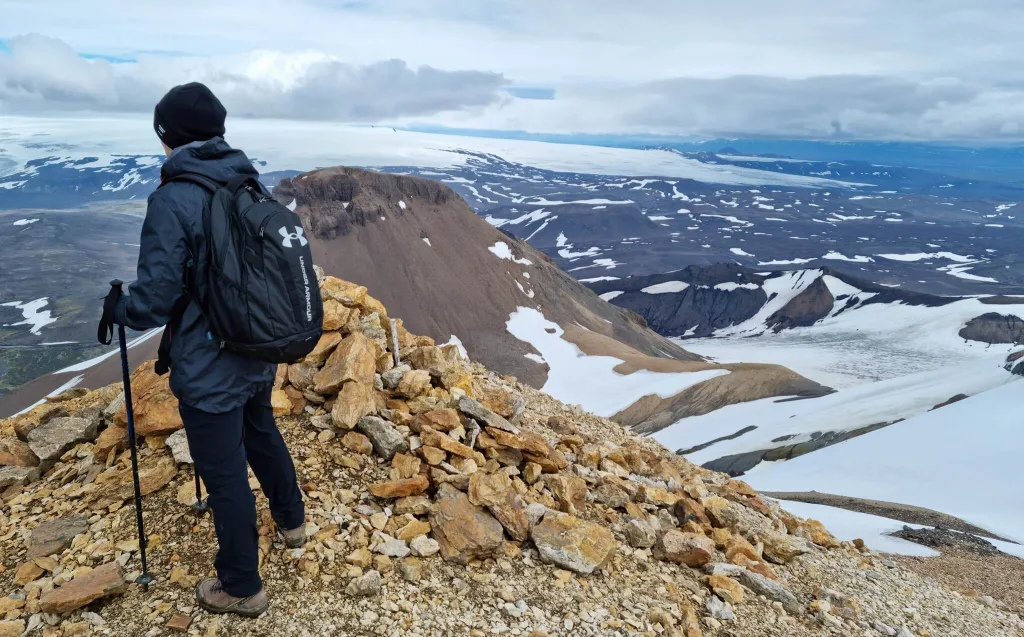
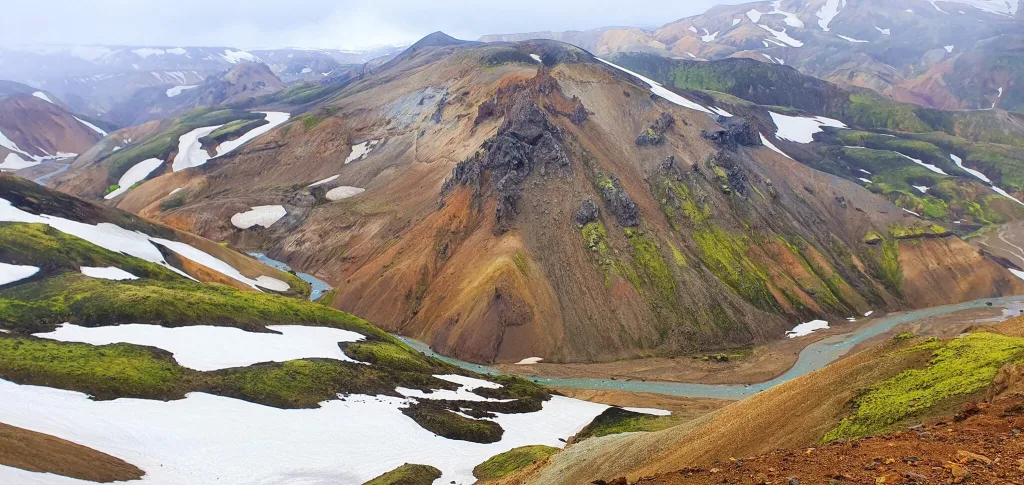
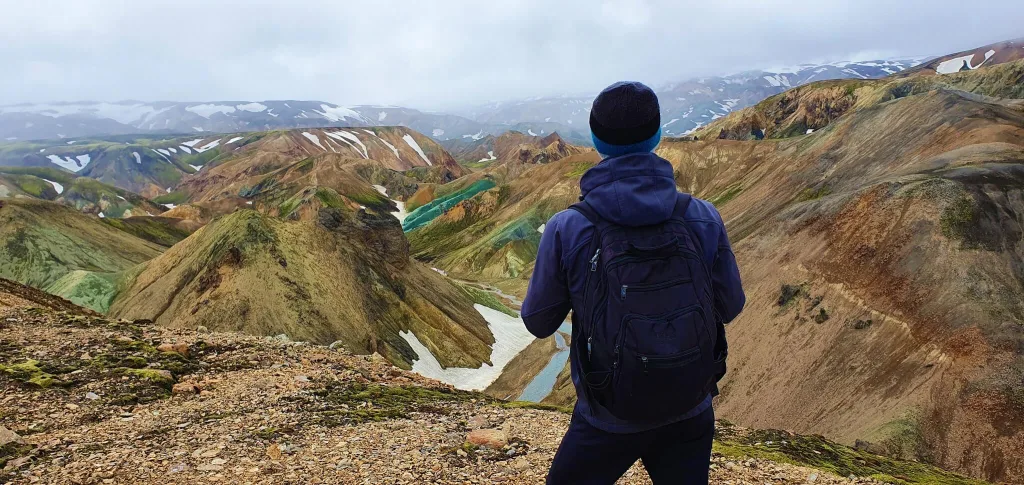
Once you finish this climb and get to the edge of the canyon in the Gjátindur direction, this is where the most beautiful views over Eldgjá will pop up in front of you. You can see the entire Eldgjá Canyon from the bird’s eye viewpoint and this sight is really magnificent.

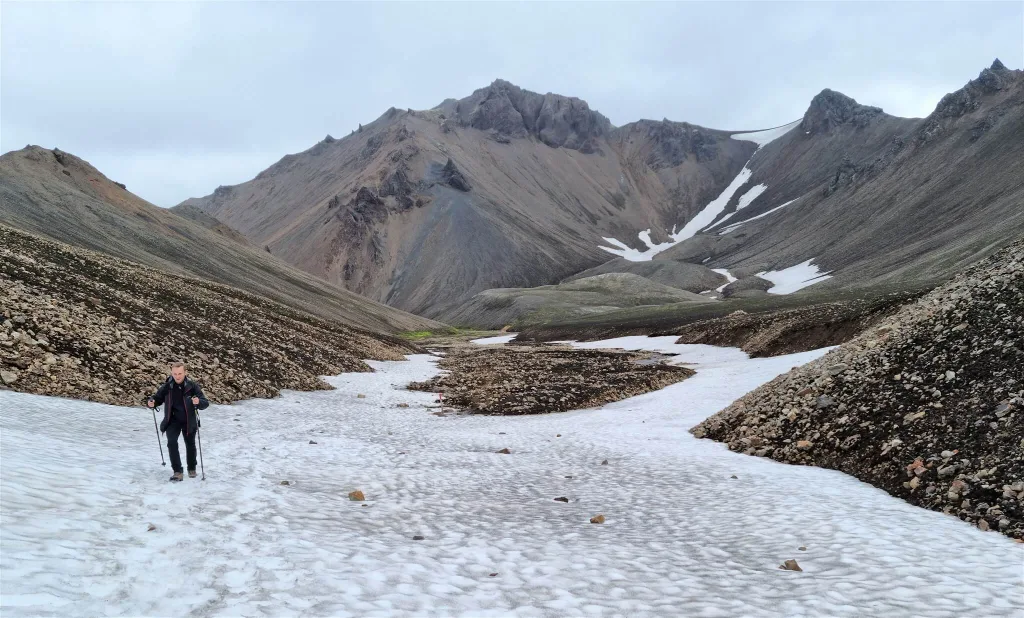
We then continued towards the peak of Gjátindur via a marked trail, which was basically a pretty dull and rocky ascent. It took us roughly an hour to reach Gjátindur from the above-mentioned crossroad of routes.

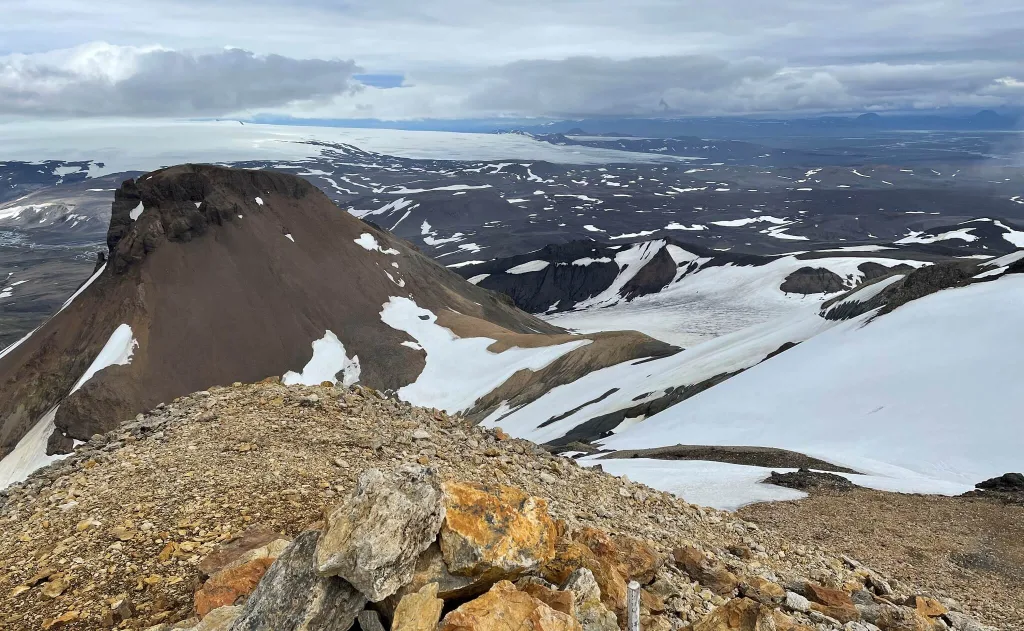
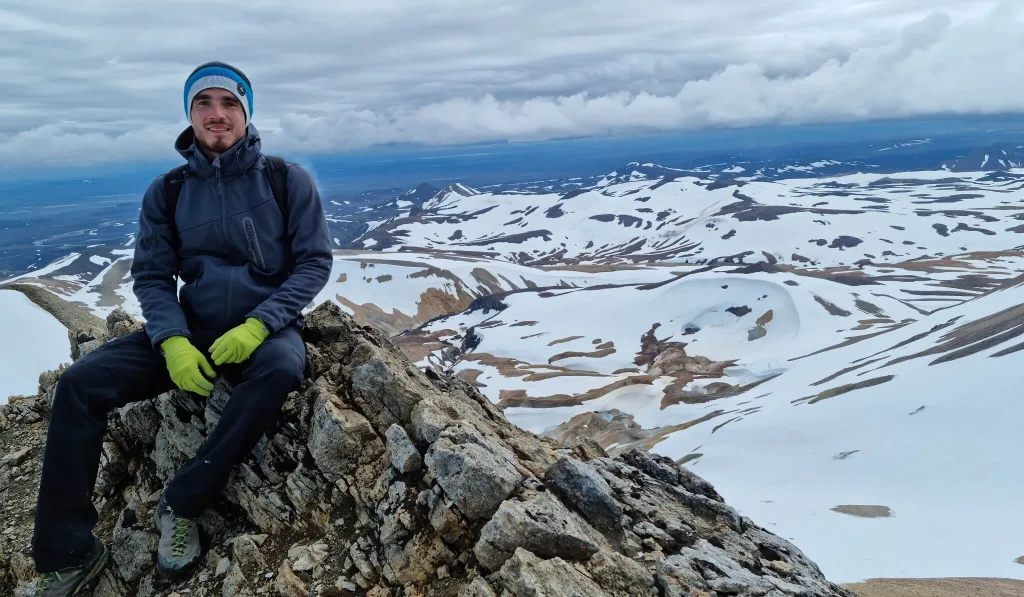
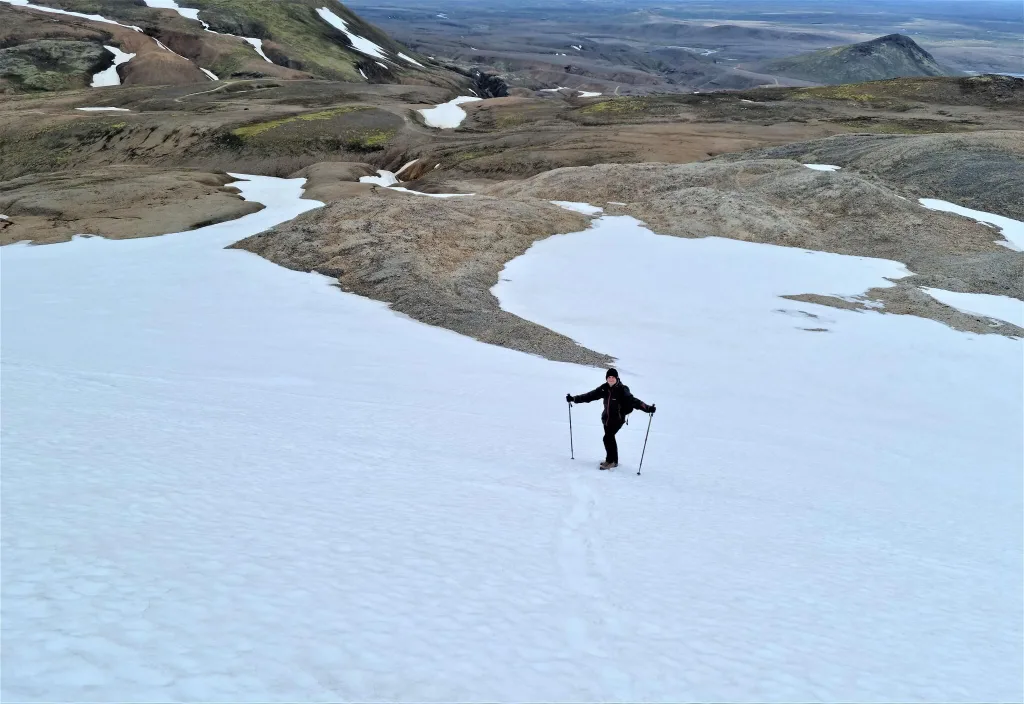
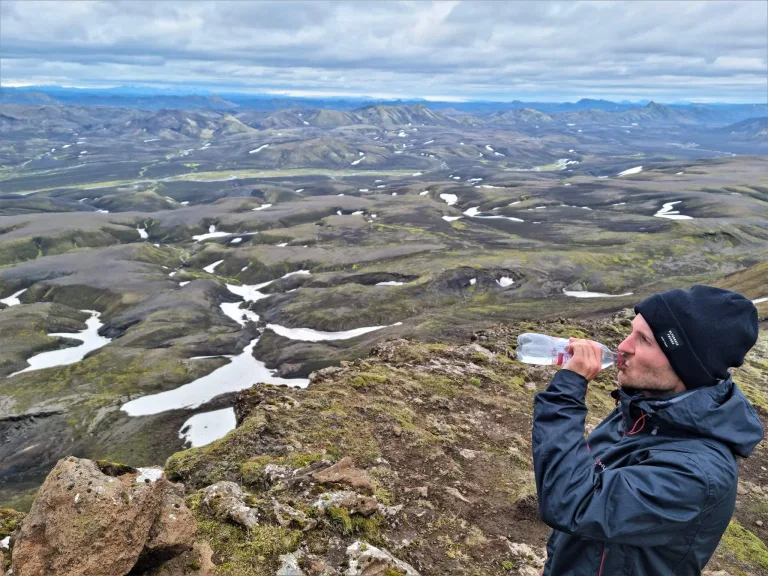
The summit of Gjátindur

gjatindur iceland eldgja

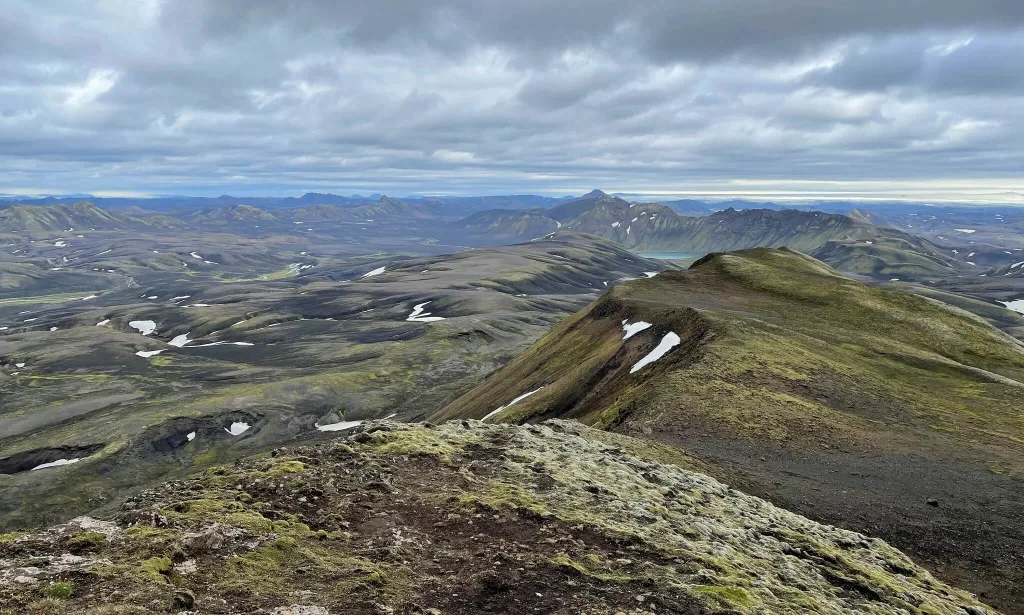
Views from the summit of Gjátindur

Gjátindur is the tallest possible viewpoint over the entire Eldgjá, so yes, you will be guaranteed 360° views if you hike on a day with good visibility. Despite the moody weather, we were lucky to have this good visibility.

Nevertheless, we were not overwhelmed by the views from Gjátindur. They were a bit monotonous and not that spectacular compared to many other amazing views we’d seen already at that time. Nice hike, nice views, but nothing out-of-this-world.

The weather felt a bit cold at the time of our visit, with some 5°C and light winds. Not ideal picnic weather, though. We started to feel cold even in all our layers after standing on Gjátindur for 5 minutes. Thus, we made a short protein bar break and started our descent back.

The Way Back

gjatindur hiking trail eldgja

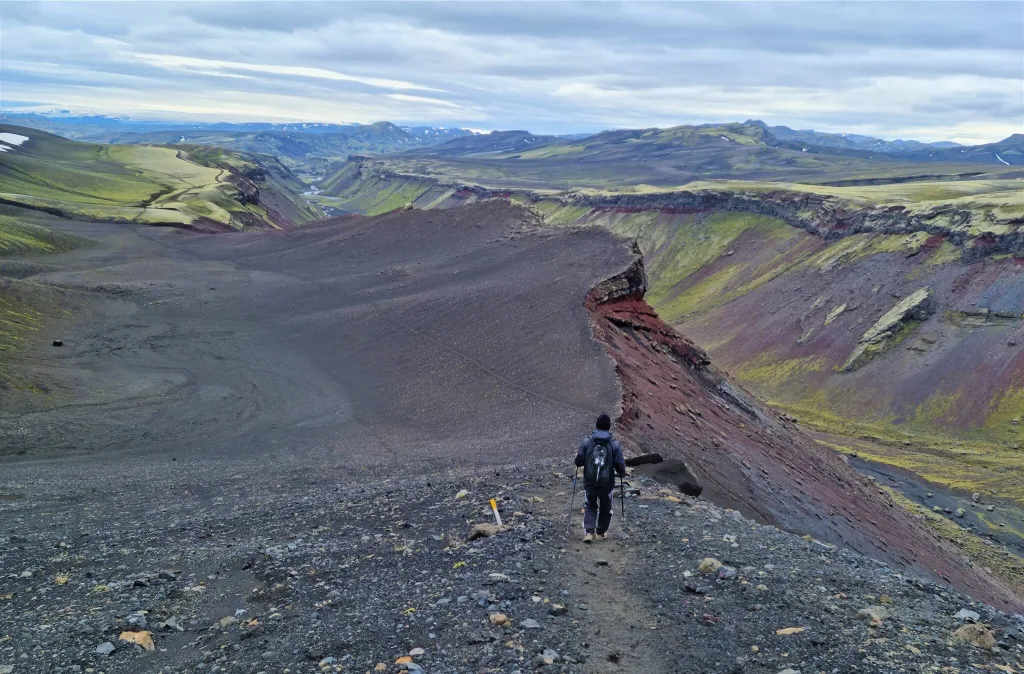
Hiking trail to and from Gjátindur

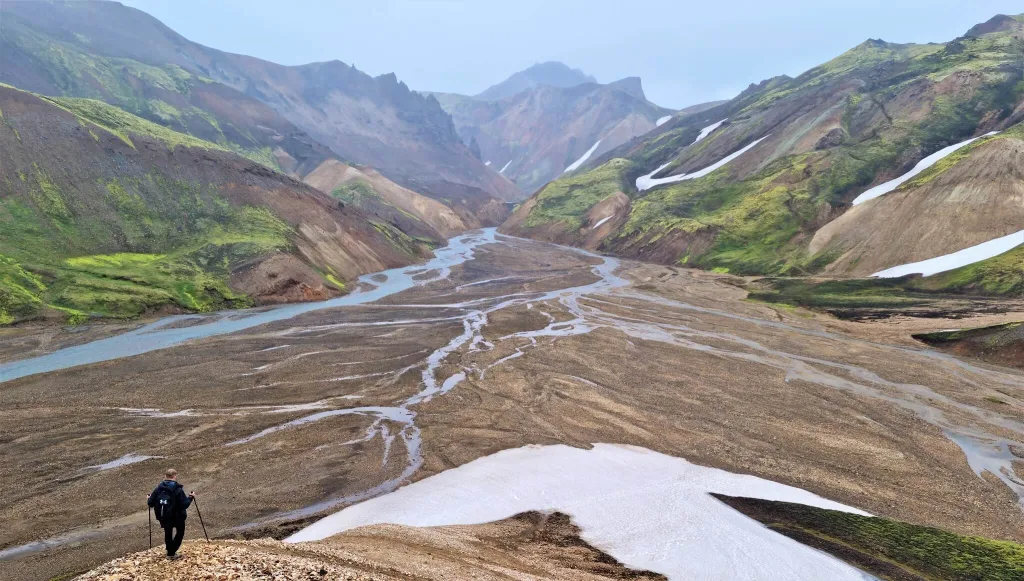
We decided to take a loop trail because we didn’t want to hike the same route twice. It was a good decision. Not only we avoided the unpleasant and steep ash slope descent, but we also saw Ófærufoss from a beautiful eastern ridge viewpoint.

The loop trail back from Gjátindur is a marked trail that leads along the upper edge of the eastern part of the Eldgjá Canyon. After more than halfway through the trail, you will reach an Ófærufoss viewpoint from the bird’s eye perspective, which is undoubtedly worth seeing. This is already a part of the “Small Circle” hike in Eldgjá. The trail then continues and descends back towards the car park.

YOU MAY ALSO LIKE:

epic iceland facebook group ask questions or get inspired in our community

Posted by Igor in Highlands, Hikes, 0 comments
Snækollur – Hiking the highest peak of Kerlingarfjöll

Snækollur – Hiking the highest peak of Kerlingarfjöll

Snækollur is the highest peak of an amazingly beautiful Kerlingarfjöll. And guess what happens if you hike to the tallest point of the heavenly place? You will be getting once-in-a-lifetime views!

And that’s exactly what you will get once you climb to Snækollur on a nice day. Views above Kerlingarfjöll you will never forget.

Most Kerlingarfjöll visitors go just for the Hveradalir hot spring area and/or just visit the Kerlingarfjöll campsite area. Both of these are quite easy to hike, and this way, typically, everybody ends up visiting the same spots. Instead, we wanted to do something different this time. A hike to the highest peak of Kerlingarfjöll, Snækollur, seemed an ideal candidate.

Hike in a Nutshell

Hiking time: 4 to 7 hours round-trip (depends on the trail and conditions)
Length: 9.3km / 5.8mi
Difficulty: moderate to difficult
Season: July to September
Obstacles: slippery terrain, snowfields, sometimes bad visibility and sparse marking
Trail map: Snaekollur main hiking trail

Snækollur main hiking trail via Fannborg. Powered by Wikiloc

Kerlingarfjöll Hiking Map

Snækollur hiking trail map

The main hiking trail to Snækollur along other Kerlingarfjöll hiking trails

How to get to the Snækollur trailhead

It’s easy to reach Kerlingarfjöll by car via Kjölur (road 35, or former F35) and F347. You need a proper 4×4 car, though. We’ve already explained how to get to Kerlingarfjöll in our Guide to Kerlingarfjöll.

Heading to Highlands? Read how to prepare for Highlands in Iceland.

Snækollur trailhead is just a few hundred meters from the main Hveradalir geothermal area. You can easily park there, similar to parking in Hveradalir.

When to hike Snækollur

We highly recommend hiking only from mid-July until mid-September, when the trails are clear of snow. Sometimes, when spring is hot enough, it may also be possible to do the hike a few weeks earlier. And vice versa, when summer is longer than usual, also a few weeks later.

These are the Top 25 Places in Icelandic Highlands.

Regarding weather, we again highly recommend visiting only on days without rain or strong winds. Ideally, you aim for a day with good visibility. Otherwise, it doesn’t make sense to hike to Snækollur and see nothing from above.

How to hike Snækollur

Hike to Snækollur is challenging. It’s no easy walk. You need to be in good physical shape to climb all the way up. On the other hand, the Snækollur hike is not especially dangerous or exposed if you come at the right time, in the right shape, and follow the right trails.

Now what about equipment? I highly recommend you bring hiking poles and a satellite location device, for example, PLB, if any emergency occurs. Otherwise, just autumn hiking clothes are needed.

snækollur hike kerlingarfjöll views

Views from the peak of Snækollur

Expect very chilly weather. The temperature reached around 5°C (41°F) at noon in July, when we reached the peak of Snækollur. Kerlingarfjöll is one of the coldest areas in Iceland due to its proximity to two glaciers and a pretty high altitude.

Oh, and one last thing – if you want to do the hike as a loop, starting at an unmarked trail in Hveradalir (as we did), you will need to cross a river. In that case, bring some water shoes and a little towel.

Hiking trails to Snækollur

There is one main hiking trail to Snækollur. It begins next to the Hveradalir geothermal area car park and leads first to the peak of Fannborg and then to Snækollur. It can only be done as an out-and-back trail. The main route is the easiest one for orientation.

snaekollur hike map kerlingarfjoll

Various hiking trails to Snaekollur, most of them unmarked

Then there are also several unmarked hiking trails leading to and from Snækollur. It was almost impossible to get any info about ANY of these trails, even the marked one, before our trip. This was also one of the main reasons why I decided to write this article.

All the alternative routes to make a “loop trail” are unmarked or barely marked. We’ve chosen one of these loop trails. And it was pretty hard to follow. I recommend instead taking the marked trail to Snaekollur and back the same way.

Before every trip check weather forecast, road conditions, and safety warnings.

Fannborg car park to Snaekollur – the main trail

When you drive to Hveradalir, coming from the Kerlingarfjöll campsite direction, there’s an often-overlooked detour left, a few hundred meters before reaching Hveradalir. This detour will take you to the Fannborg car park.

This is the beginning spot for the only marked trail to Snaekollur. We took this route on our way down, returning from the peak. This is the recommended trail. We describe it in detail in the section about the descent.

The barely marked loop trail we took (not recommended – take the main trail instead). Powered by Wikiloc

Hveradalir car park to Snaekollur – mostly unmarked

This is the trail we took on our way up. It starts at a Hveradalir hot springs area (marked) and follows as an unmarked detour towards the river crossing. You then steeply and steadily climb upwards to Fannborg, where you will join the marked main Fannborg trail. For more details, see our Snækollur experience below.

Other trails – mostly unmarked

There are multiple other, mostly unmarked trails leading to and around Snaekollur – see our Snækollur trails map. Most of them were covered by deep snow at the time of our visit in July. I strongly advise against taking these trails without a local guide. There’s a risk of an avalanche and dangerous falls.

Our Snækollur hiking experience

snaekollur hike kerlingarfjoll

Views from the Snækollur hike in Kerlingarfjöll

Since our first visit to Kerlingarfjöll, I wanted to see Kerlingarfjöll also in nice weather, which seemed almost impossible. I’ve been watching the forecast for quite some time, and Kerlingarfjöll had the worst weather possible for most of the time. The same happened last July when I was planning our 2nd visit.

Trail and Conditions

We began our hike to Snaekollur at 11:00 after a long morning drive from Selfoss to Kerlingarfjöll in the middle of July. The weather was very nice when it came to Kerlingarfjöll – cloudy, no rain, little wind, and occasional sun fighting through the clouds.

It was not ideal, though. From time to time, some huge fog clouds appeared, especially the higher we were on the trail. Nevertheless, this was definitely very good weather for the hike.

Snækollur hike views

Snækollur hike views

We chose a loop trail that starts in Hveradalir hot spring area, follows a marked path in Hveradalir towards Hverabotn, and then it turns into an unmarked trail as a direct ascent to Fannborg. Once reaching Fannborg, it then continues via a classical partially marked trail to Snækollur.

We finished at Snækollur, turned back, took the main marked trail down via snowfields to reach the north-eastern Fannborg car park, and then walked back to Hveradalir. This was our Snækollur hiking trail in a nutshell. Now how did it look in detail?

Ascent from Hveradalir

We left the car in a classical Hveradalir car park, where visitors of all the Hveradalir hot spring area park. Firstly, we descended to the famous hot spring area. Several short hiking trails lead all around Hveradalir, so we struggled a bit to connect to the correct path toward Snaekollur.

Following the Wikiloc trail on our cell phones definitely helped a lot. In Hveradalir, we turned left, climbed stairs onto a nearby hill, and continued hiking the otherworldly landscapes of Kerlingarfjöll for a few hundred meters.

hveradalir ascent to snaekollur

Beginning of the unmarked trail from Hveradalir to Snækollur

The marked trail then starts turning right. However, this is the direction toward another hot spring area called Hverabotn, not the right direction for our hike. Firstly, we got confused and hiked a little bit in this direction, but then we realized we had to take a different – unmarked – trail, so we did.

We followed some barely visible footsteps, which anyway disappeared for most of the time, and mostly used Wikiloc GPS trail for orientation.

Please never ever step on moss or fragile orange soil. It may never recover. If unsure, you better take a marked trail.

River crossing

We reached the point where there was no other way than to cross the nearby river. We searched for a suitable spot for a while and had to descend down to the river via slippery hills, following the almost invisible footsteps and our GPS.

At times even GPS didn’t help because its precision is relatively poor without a satellite connection. Nonetheless, we were surrounded by the fantastic beauty of Kerlingarfjöll and full of energy and motivation to reach Snaekollur.

We finally found an (at least for us) suitable crossing point. We removed our shoes, put on our wading shoes, and quickly crossed the ice-cold river stream.

Soon after the river crossing, another obstacle appeared right in front of us. A large, melting snowpack was blocking the (at least what we thought to be) trail, so we had to find a safe and careful way around it.

A word of caution – never step on any moss in Iceland, and don’t step on the ground in a way that the soil below your feet falls down. This can cause erosion to the fragile soil. If this is the case, find a different path or turn back.

The Worst Part

After about 20 minutes of searching for the best spot to climb the nearby hill, we finally found our way. We finished the very steep and slippery ascent with the substantial help of our hiking poles. This was one of the worst spots of the entire hike – hard orientation and risk of falling down. That’s why we instead recommend taking the main marked trail.

Snækollur hiking trail ascent

Snækollur hiking trail ascent

The footsteps completely disappeared at this point, and we only had to use our GPS trail. GPS was inaccurate and often led directly via deeper snowfields, which didn’t feel safe to cross through.

During this part, we basically had to traverse a lot between snowfields and take special care to step only on stones and gravel and head towards Fannborg. This is precisely the point where you need good visibility. I cannot imagine heading towards Fannborg if we didn’t see it before us.

Fannborg ascent

What followed was the steep and steady ascent towards Fannborg, with the ground covered by trillions of pieces of broken stones. With each step, we were getting more and more rewarded with better and better views of the entire Kerlingarfjöll area. You will not get these views anywhere else, only from this hike.

snaekollur trek kerlingarfjoll

Between Fannborg and Snækollur

After about less than an hour, we successfully connected to the (supposedly) yellow-marked hiking trail leading from the left (from the Fannborg car park) and continuing up to Fannborg and Snaekollur. The only thing was – the marks were not there 🙂 However, the footsteps on the ground were more evident, so we could follow them more easily. Finally, some guidance.

We reached the peak of Fannborg after 2.5 hours of hiking from Hveradalir. On a nice day with good visibility, views from Fannborg are already more than impressive.

If, for whatever reason, you are unable or just don’t want to continue all the way to Snaekollur, you don’t need to regret it too hard because you will already see close to the best available views from Fannborg.

fannborg kerlingarfjoll views

Views from Fannborg, the peak right before Snaekollur

Nevertheless, we initially thought we’d already reached Snækollur when we got to Fannborg. Only after checking the GPS, I wondered why it still shows less than one more kilometer to go.

Unfortunately, after we climbed to Fannborg, the fog settled down more intensely, interrupting our breathtaking views. At that moment, we contemplated ending the hike at Fannborg and turning back because continuing with almost zero visibility didn’t make sense. Moreover, Snækollur seemed still quite far away and not that easy to reach with a lot of snow on the trail.

Snækollur ridge

My cousin co-hiker, however, persuaded me to finish our hiking plan, no matter the weather. And luckily, I agreed. In the same way, the fog had started to settle down, it slowly faded away in a few minutes, and our spectacular views got even better.

snaekollur ridge snow

Snaekollur hike – ridge with snow

360° views into Kerlingarfjöll, Hveradalir, and around all nearby hills and hot springs partially covered with snow and partially with out-of-this-world orange and blue colors were simply overwhelming.

That being said, we still had to hike for quite some time through the ridge leading from Fannborg to Snaekollur. There was still a lot of snow on this part of the trail, so we had to be careful, and hiking poles came really handy here. We also had crampons in our backpacks but didn’t need them because the snow was soft, and the problem wasn’t the grip on the snow but the fear of falling deep into the snow. And, obviously, you don’t know what’s below the snow.

Firstly, we had to descend a bit from Fannborg, only to ascend again a few hundred meters later. The trail was not evident from a distance and sometimes not even clear a few meters ahead.

We reached the point where we had no other option than just to go through the snowfield and slightly climb over the big rock. During this part, we passed some pretty exposed spots of the trail, with steep falls on both sides. Luckily, the snow was firm enough to hold us, which we’d tried to test before stepping on it.

snaekollur peak kerlingarfjoll

At the peak of Snækollur

Finally, the last and the steepest climb took us to our final destination – the peak of Snækollur. It was hard but totally worth it! We felt like having climbed the Icelandic version of Mt. Everest.

Snækollur, the highest peak of the entire Kerlingarfjöll, obviously offers the best views out there over the Kerlingarfjöll area. We were lucky with good visibility and pleasant weather. Although cloudy, the clouds were high enough not to block our views and small enough not to produce rain. On a nice day, views from Snækollur could easily qualify as a natural wonder.

Descent – partially marked trail

If it wasn’t so cold out there, we would have stayed and admired the views for at least an hour. However, the reality was a bit harsher, with around 5°C (41°F) and occasional wind, up at Snaekollur. This meant that, by just sitting or standing, we started to feel pretty cold, and thus, we were pretty motivated to move again.

descent from fannborg

Descent from Fannborg

We had to return via the same steep and exposed parts, partially covered with snow, to reach Fannborg again (see section Snækollur ridge). Then we continued further down, now via the yellow-marked trail leading to the north-east. We got back to the little crossroads of our unmarked trail, which we used for the climb up and of a (supposedly) marked path with footsteps leading eastwards (to the right).

The trail led diagonally downwards on the slope of Fannborg, with billions of broken stones forming the ground. Still no marks, just footsteps. Eventually, we reached the point where there were only snowfields to continue through. One gigantic, which didn’t look very safe, and one smaller, with what looked like some old footsteps. We opted for the smaller snowfield with (hopefully) footsteps.

My cousin checked the snowfield, and it seemed to be pretty firm. Hence, we began our snowfield descent. Luckily, everything went alright. After crossing the biggest snowfield of our trip, we finally saw a stick in the ground. Is this supposed to be the mark or just the random stick? Yes, it turned out to be a mark, because it was followed by another yellow bar soon.

snaekollur trail snowfields

Snækollur hiking trail snowfields

Finally – a first real trail mark after 4 hours of hiking. This made the descent much more straightforward, and no other obstacles were on the trail. Soon we arrived at the Fannborg car park and headed back to the Hveradalir car park, which is about 10 minutes of walking on F347 away.

To sum up, the north-eastern (supposedly) marked trail to Fannborg is definitely easier in many aspects:

  1. The bottom part of this trail is marked, making orientation easier.
  2. Even after marks end, there should be trodden footsteps to follow in summer.
  3. This trail is much shorter. The unmarked trail via Hveradalir was more adventurous, but I instead recommend you take the partially marked trail from the separate Fannborg car park.
kerlingarfjoll highest peak view

Bird’s eye views of still snowy Kerlingarfjöll even in July, after the hard winter

YOU MAY ALSO LIKE:

epic iceland facebook group ask questions or get inspired in our community

Posted by Igor in Highlands, Hikes, 0 comments
Grænihryggur hike: Guide to the hidden Green Ridge

Grænihryggur hike: Guide to the hidden Green Ridge

Graenihryggur hike is one of the most beautiful hikes in Landmannalaugar with stunning views full of spectacular colors. Grænihryggur is also one of Iceland’s best-kept secrets with almost no visitors even during the peak season! It’s a longer and more difficult hike but well worth the effort, making it a once-in-a-lifetime hiking experience.

So what is Graenihryggur? The literal translation would be a „green ridge“. And this is precisely what makes Grænihryggur special. Out-of-this-world blue-greenish color. It’s a ridge well hidden deep in the Landmannalaugar mountains. It can’t be seen from typical touristy hikes in Landmannalaugar, like Bláhnúkur or Brennisteinsalda.

Icelandic locals know well about Grænihryggur and they are usually the only visitors you will meet on a trail. Besides locals, guided tours also head to Graenihryggur, because this is one of those places in Iceland that can still be considered a true „hidden gem“.

Hike in a nutshell

Graenihryggur hike is an 8km long out-and-back hike that takes about 8 hours to complete. It is moderately difficult with some steeper and slippery parts and is accessible only in summer. It is one of the most beautiful hikes in Iceland, still not known to many visitors.

Location: 7km south of Landmannalaugar campsite detour
Length: 8km (5mi) one way, 4 hours one way
Difficulty: moderate to difficult
Season: typically from July to September
Gear: hiking shoes, hiking poles, rain-proof, and wind-proof clothes
Hiking trail: coordinates of the hiking trail

How to get to the Graenihryggur hike

Graenihryggur is located in Landmannalaugar, close to the campsite. There are several different ways to reach Graenihryggur hiking trails and none of them is trivial. Firstly, you need to reach the famous Landmannalaugar area. For that, you have the 3 options below.

f208 landmannalaugar iceland

Amazingly beautiful roads around Landmannalaugar

Getting to Landmannalaugar

You can get to Landmannalaugar via three different roads:

We explained in detail the differences between these three roads in our Guide to Landmannalaugar. You need to have a 4wd car when heading to Icelandic Highlands and Landmannalaugar. A medium-sized 4×4 car is the best for this type of trip.

Getting to Grænihryggur trailhead

There are two main trailheads leading to Graenihryggur from Landmannalaugar. The first, shortest, and most popular trailhead is located right next to road F208, close to Landmannalaugar campsite, 8 kilometers (5 miles) south of road F224. It is depicted on the map above and also zoomed in the picture below.

Grænihryggur trailhead map

Grænihryggur trailhead map. Source: Wikiloc

The second trailhead is located at the Landmannalaugar campsite itself, where all famous Landmannalaugar hikes start. For our hike, we chose the first option – the so-called Halldórsgil trail. Halldórsgil is the most popular and also the shortest and safest trail leading to Grænihryggur. It leads via Halldórsgil canyon. The other trails are difficult, dangerous, and barely marked, see below.

Grænihryggur hiking trails

Graenihryggur is located in the heart of Landmannalaugar, between Brennisteinsalda campsite and Hrafntinnusker hut. This means you can get to Graenihryggur by many different trails, none of them being short, nor easy, though. Several of these trails are not even marked, that’s why many choose a guided tour instead of a self-hike.

Map of the Grænihryggur hiking trails:

graenihryggur hiking trails map

Map of the Grænihryggur hiking trails

There are three known hiking trails to Grænihryggur:

  1. The main Halldórsgil trail. It starts as a hike through the canyon of Halldórsgil. Halldórsgil trail is a well-marked trail (red sticks). This is the shortest, easiest, and also most popular trail. The only disadvantage of the Halldórsgil trail is that it’s an out-and-back trail. Landscapes around the trail are more than just amazing. We took this trail and describe it in detail below. It took us roughly 6 hours to complete a round-trip.
  2. The Landmannalaugar trail. The second, significantly longer, more difficult, and unmarked trail is a loop trail from Halldórsgil, via Grænihryggur to Landmannalaugar campsite and back (or the other way around). After reaching Graenihryggur you have to climb up and down several steep and unmarked ridges and also ford the fast-flowing and wide Jökulgilskvísl river. We highly recommend doing this hike only as a guided tour, or only if you are a very experienced hiker and you are in luck with a great weather forecast (no fog, rain, or strong winds). The Graenihryggur Landmannalaugar loop takes about 10-12 hours to complete.
  3. The Hrafntinnusker trail. Apart from the two main Grænihryggur trails mentioned above, you may also hike to Graenihryggur by several different combinations of various trails in the area. Most of them are longer and more difficult than those we mentioned above. Hikers usually hike them as a part of multi-day Landmannalaugar hikes. In addition, the majority of them are unmarked.

Map of the Graenihryggur hike

Below is the detailed map of the main Grænihryggur hike, the Halldórsgil hike. There are the exact coordinates of the hike as we’ve done it in late July. All necessary info such as altitude, hiking times, and the trail we took are included in the interactive map below:

Powered by Wikiloc

Hiking difficulty

  • The hike is considered to be a moderately difficult hike.
  • The main danger of the hike lies in unpredictable weather, a very remote area with no network coverage and slippery trails
  • It is a full-day hike, it takes 7 to 9 hours to complete it as a round trip.
  • There are no chains, nor very exposed parts, yet some of them are steep
  • Many steeper parts are made of small gravel or dirt and the grip is not the best, especially if it rains
  • There is one river crossing, a wide Jökulgilskvísl river, not very deep; it is possible to cross it on dry feet in dry weather, however, you may need to wade it when there’s more water in the river;
  • It’s a great hike for anyone with hiking experience, even for families experienced in hiking;
  • It’s NOT a hike for the elderly or small children, or anyone used to just hiking for 1 hour and no more
  • Take special care early in the season (June/July), there may be snow bridges with dangerous rivers under them!

landmannalaugar Grænihryggur hike iceland

Unbelievable Grænihryggur hike views

When to hike Graenihryggur

Typically, you can go for the hike any time between the beginning of July and mid-September. Similarly to when F-roads are open, the hike is accessible when there’s no considerable snow on the trails. This usually starts in July, once most of the winter snow has melted, and ends at the end of September when the new snow arrives.

Of course, there are exceptions to the general rules mentioned above. After mild winters, you may be able to hike Graenihryggur even in June and maybe even until October. On the other hand, after very tough winters, you may encounter huge amounts of snow on trails even in July or August. This is exactly what happened to us in late July. The amount of snow was bearable, though, so we could just hike over it and not get stuck in it.

If you are unsure about the current conditions of the trails, it’s always best to contact SafeTravel.is by email, or to ask a local. One last important thing – even in summer, always check the weather forecast before the hike. Don’t hike during strong rain or strong wind, it can be very dangerous. Skies don’t have to be clear, but at least aim for no heavy rain or wind. We also wrote a handy guide on How to find nice weather in Iceland.

Grænihryggur hiking trail iceland

Grænihryggur hiking trail

How to prepare for the hike

  • Wear proper hiking shoes, wind-proof, and water-proof clothes (not just repellent!)
  • Have a winter hat and gloves ready if it’s too chilly
  • Hiking poles are a big plus, although it’s possible to hike also without them (not recommended)
  • Check the local weather forecast, and read tricks on how to manage weather; Go only if it doesn’t rain or blow too much; Ideally no rain at all
  • Check road conditions; you are looking for the green color
  • Better rent a satellite location device if you are not in a big group or not with a local
  • Bring wading shoes and a little towel for river crossing
  • Crampons are not necessary during the main season (July to September) and they won’t help either outside of the season (just don’t go)

graenihryggur hike view

One of the countless picturesque spots during the hike

The main hike – our experience

We drove by the Graenihryggur Halldórsgil trailhead on a cloudy, rainy, and foggy day. Definitely not an ideal day for a hike. We were indecisive about whether to go for the hike or not until the very last minute. Finally, my cousin co-hiker persuaded me to give it a try. And I’m now glad he did because the weather actually improved and the hike was amazing even without sun and clear skies!

We reached the starting point of the trail by our modified Land Cruiser around lunchtime, so pretty late. That was also the reason why we didn’t speculate with longer, unmarked trails, and rather stuck to the classic marked Grænihryggur trail from Halldórsgil canyon. The Halldórsgil trailhead is located just a few minutes of a drive south from the crossroads of F224 and F208.

There’s no car park, but we recognized the trailhead thanks to around 6 local Icelandic cars being parked at the edge of the road. These were apparently no tourists, but locals. We parked our car as the last one in the row, packed our backpacks, and headed out into moody weather.

graenihryggur trailhead

Graenihryggur hike trailhead -the beginning of the hike via Halldórsgil

Halldórsgil canyon trail

The first part of the trail to Graenihryggur is the easiest and also the most boring part of the hike. It leads via Halldórsgil canyon, which is one of the less magnificent Icelandic canyons, yet definitely a peaceful one. You won’t meet many fellow tourists here, as I already mentioned.

We hiked to Grænihryggur in July, in a year of a very strong Icelandic winter. This means we encountered a lot of snow on the trail, even in the second half of July. Soon into the hike, we reached smaller snowfields that got bigger and bigger the further we proceeded with the hike. Some of these snowfields were a bit scary. At one moment we could see a flowing river right under the melting snowfield and we had to walk through this snowfield, hoping not to fall down through it.

Halldórsgil canyon trail Grænihryggur

Snowfields in July on the Halldórsgil canyon trail to Grænihryggur

The ascent was gradual and there were no technical parts in this section of the hike. There was just a lot of walking in the snow, which is naturally more tiring compared to firm terrain. After about an hour of hiking, we stumbled upon the first of many amazing viewpoints. We finally got high enough to be able to observe the monumental Halldórsgil valley from the bird’s eye viewpoint. This is the typical Grænihryggur hike moment – Landmannnalaugar, but different, more remote, and even more magical, everywhere around you.

Crossing Jökulgilskvísl river

After reaching the highest point of the trail, what follows is at times steep and slippery descent all the way down to Jökulgilskvísl river. And yes, you have to cross the Jökulgilskvísl river. Luckily, at the time of our visit in July, it was possible to cross the river with dry feet. The reason is, this is not the main riverbed, it’s just an arm of Jökulgilskvísl. Or better said, many small arms.

graenihryggur river crossing

Graenihryggur river crossing of the river Jökulgilskvísl on our way back

We were able to either hop over some of the river arms or we found some shallower spots where our shoes didn’t get wet, or we managed to find some stones suitable for hopping through. This fun can actually take some time. At least we were able to cross it with dry feet, unlike the river in Vonarskarð.

Now maybe you can guess what follows after this descent? Yes, you’re right, another ascent! And once again slippery and at times steep. This is one of the reasons we don’t recommend hiking Grænihryggur during/after a strong rain. Trails can get wet and even more slippery, and trust me, you don’t want to hike steep trails with mud all over the trails.

Rainbow hills

rainbow hills graenihryggur hike

Rainbow hills on a Grænihryggur hike are some of the most beautiful ones in Landmannalaugar

Despite being a bit more difficult, the hike to Grænihryggur is strikingly beautiful! Most of the time you’re gonna be surrounded by various types and tones of rainbow mountains, feeling totally like in a fairy tale. The weather was far from clear skies during our hike, we nevertheless felt like on another planet anyway.

Shortly before the final ascent of the hike we met the local Icelandic hiking group, which seemed to be just a huge group of friends. At that moment we saw who came with all these local cars 🙂 The group was apparently enjoying their summer hike and making a little picnic with some amazing views over nearby rainbow hills.

graenihryggur green ridge hike iceland

The first glimpse of the green ridge in the distance

Nevertheless, we continued with our hike and eventually reached the plateau, where we could finally see the famous Grænihryggur in the distance! Visibility wasn’t ideal, and Grænihryggur definitely looked much better in reality compared to the pale colors in the pictures. But that’s Iceland! We were happy we caught only a slight drizzle and weak fog and conditions were otherwise nice.

From this point we could already see Graenihryggur in the distance, so we could have easily ended at this spot and turned back, but we wanted to arrive right next to this famous green ridge. That being said we continued further along the trail.

green ridge hike iceland

The final descent towards the green ridge of Grænihryggur

Grænihryggur

The plateau leads to a ridge that can get you all the way right next to Graenihryggur. At this part of the trail, we were able to observe Graenihryggur getting nearer and nearer in front of us with every additional step.

From this ridge, we had to again descend down into the valley and finally reached Graenihryggur with its out-of-this-world colors itself. It’s forbidden to walk over the green ridge, because of the very fragile soil that can be damaged easily. Nevertheless, you can stand by Graenihryggur for as long as you wish and for example take a little picnic, as we did.

This is where the easiest and the most popular “Halldórsgil to Grænihryggur” hiking trail ends. You can then either turn back and follow the same trail back, as we did. Or you can continue with unmarked trails to follow different ways back and/or get to Jökulgil canyon or Landmannalaugar campsite. These trails are more difficult though, and we do not recommend hiking them without extensive hiking skills and/or a local knowledge of the area.

Grænihryggur green ridge

Admiring the famous Grænihryggur green ridge!

Quick hiking Tips

  • Choose a nice day. I know it’s easier to be said than done, we’ve been there. But try to choose a nice day. This at least means no stronger rain and no strong fog. We had a light fog and light rain and the hike was nice anyway. Of course, ideally, you aim for clear skies and no fog, but that may be hard to achieve.
  • Come with a proper 4×4 car. You’re gonna need it to reach the trail.
  • Study beforehand where the trailhead, i.e. the beginning of the trail is located. It may be harder to find, there’s no big sign, nor a car park.
  • Bring hiking poles and good physical health. This hike is not for small children, nor for the elderly.
  • Some climbs are pretty steep but if you are in a good shape they are definitely doable, no chains, no sharp ridges, just typical slippery Icelandic hiking 🙂
  • Enjoy the hike, views, and surroundings are very versatile, Graenihryggur is one of the most beautiful hikes in an entire Iceland in my honest opinion.

epic iceland facebook group ask questions or get inspired in our community

Posted by Igor in Guide, Hikes, 6 comments